 While many articles offer suggestions for projects for small amounts of leftover yarn, the focus of this post is to work on larger projects that combine individual whole skeins with collections of smaller skeins to create attractive shawls, blankets and lapgahns. My closet bins were stuffed to overflowing, and there were several shopping bags filled with skeins that no longer fit into the closet. I was determined not to buy any additional yarn and to make a significant dent into my stash. How did I accumulate so much yarn that had not been designated for a specific project?
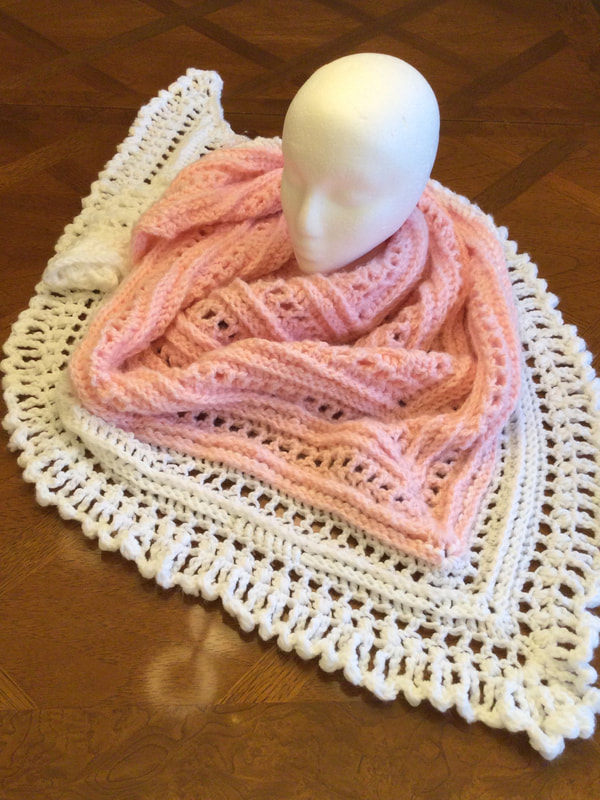
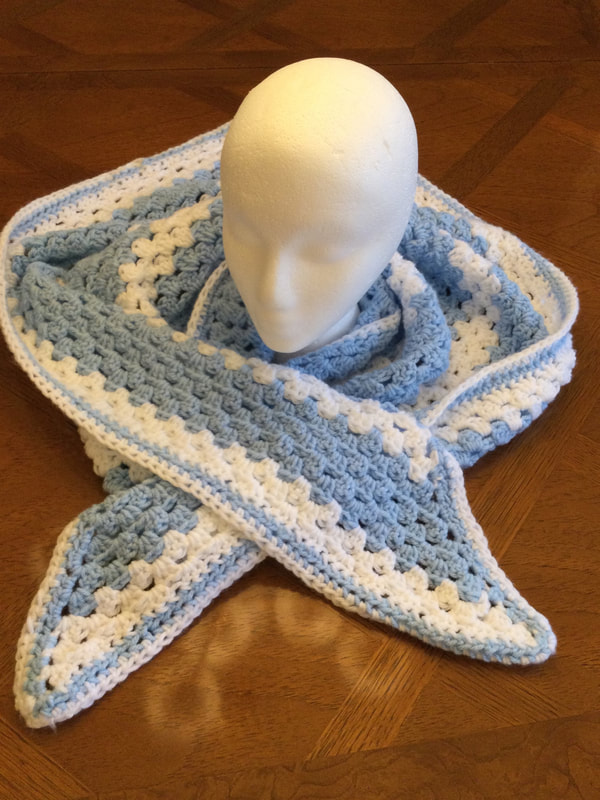
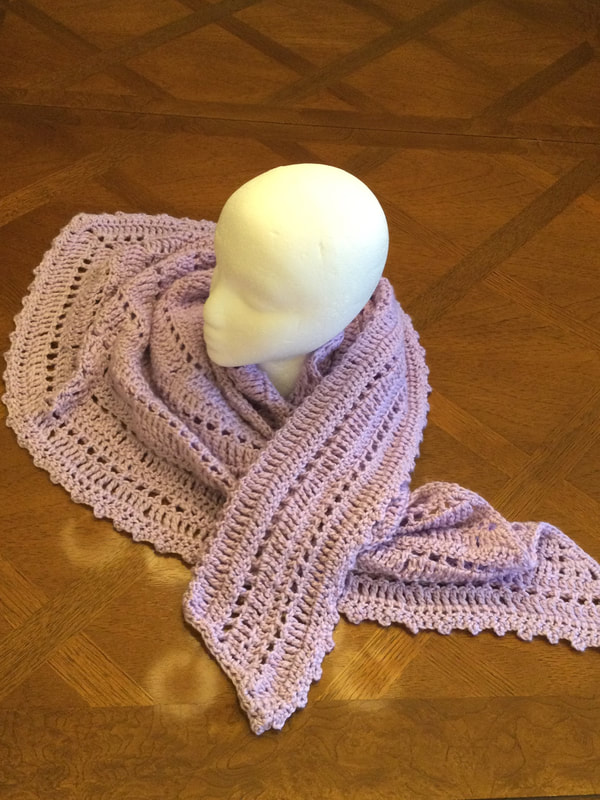
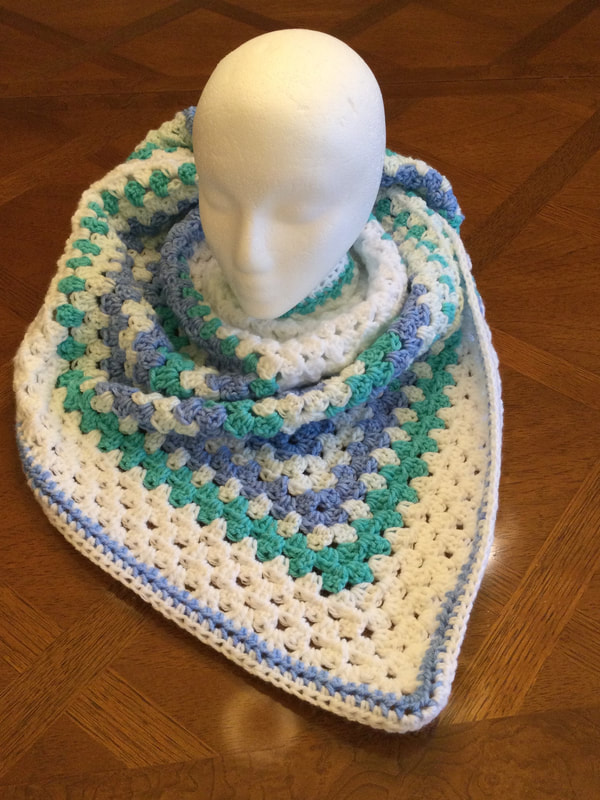
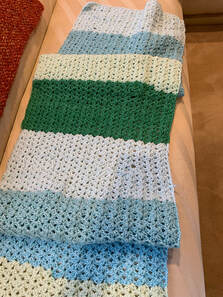
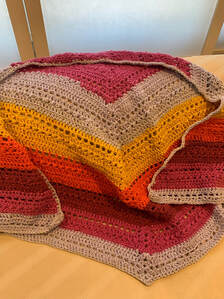
What is important to note is that there was usually not enough yarn in any skein or collection to make a complete project. A key element of the plan was to use what I had on hand without buying any more yarn. While I worked with basic shawl patterns, I had to adapt and improvise as I was not sure how the yardages would play out. I am still contributing to Threads of Love to help our chapter reach our 1000 piece goal. Therefore, creating shawls was a good place to start. The second part of my mission would be to crochet blankets or lapgans. However, as I started writing this post, I realized that series of projects would have to wait for my next article.  Project 1: This shawl was based on a basic triangular scarf pattern that incorporated 5 skeins of light blue worsted weight Premier Just Yarn that I purchased from my local Dollar Store. This yarn had a lovely hand feel, but with a total yardage of about 600 yarns there was not enough yardage to complete crocheted triangle shawl that required 900 to 1000 yards. Luckily, I had a several orphan partial white worsted skeins that were compatible with the blue yarn. I combined the two fibers by starting with a large white triangle. Then I proceeded to alternate several white and blue rounds of granny cluster stitches. I ended the body of the shawl with several rows of white. Although I was about to run out of blue yarn, I had enough to edge the shawl with one row of HDC in blue and a second row of HDC of white. The finished blocked measurement was 62 inches wide by 30 inches deep. 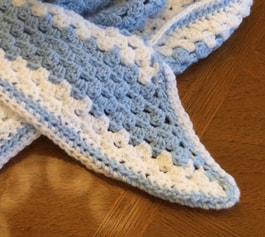 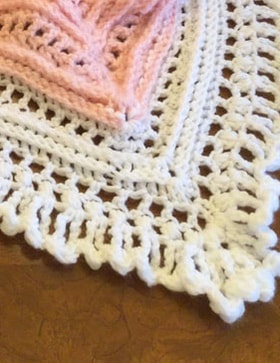 Project 2: This pink shawl with lacy white edging was based on 5 skeins of Red Heart Jiffy Yarn that yielded 650 yards of fiber. I started with the Secret Paths Pattern by Mijocrochet . Since this was a #5 yarn, I used a K hook. I really liked the ridged effect that was achieved with FPDC, but I could not incorporate the rows of bobble stitch as the yarn was just too thick. I just skipped that part of the sequence. When I ran out of pink yarn, I transitioned to orphan white worsted that I had in my stash. There was no label, but the yarn worked with the pink Jiiffy yarn. Since this yarn was a worsted. I was able to work in a single row of puff stitch before I switched over to the lacy edging with a J hook. This was my first experience with a lacy edging, and I was happy with the feminine touch it gave to the shawl. The finished piece measured 62 inches wide by 31 inches deep.  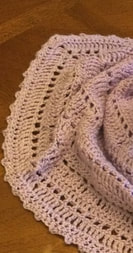 Project 3 made use of 2 complete and 2 partial skeins of Caron Simply Soft in lavender. This yarn was donated, but I did not think that I would use it for personal projects. I wanted to crochet a soft draping shawl, and designed a stitch sequence to achieve this goal. The pattern was based on the typical triangle shawl crocheted from the top down. After an initial starting set up triangle, increases were made in the corners and in the chain 2 space in he middle. Row 1: Double crochet Row 2: Triple crochet Row 3: Triple Crochet mesh stitch. I finished the body with a DC row. A round of HDC provided the base for a final round of picot stitching  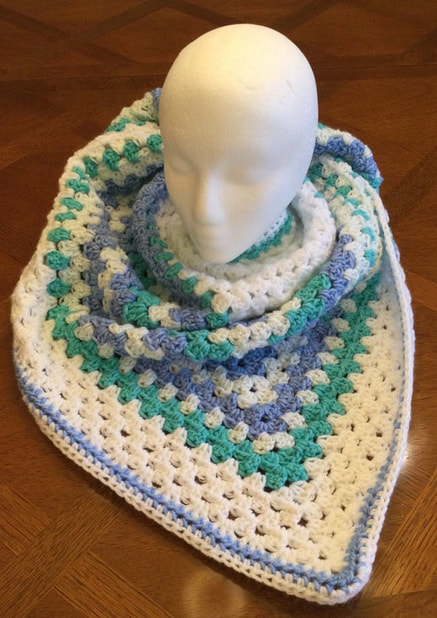 Project 4: Somehow I had 2 rolls of Sweet Roll Self-striping yarn languishing in the bottom of one of my bins. I had bought the yarn to use with my fingerless gloves, but had decided to work with more neutral hues. The turquoise, iris blue, and white stretches of yarn would make adelightful shawl. With 285 yards per skein, I had 570 yards to work with. I had bought a lot of white yarn at one time because I could easily add it to other skeins when trying out different combinations. I stayed with my tried and true triangle pattern and started with a white triangle. ThenI transitioned to the Sweet Heart Rolls that made their own self striping display of colors. Since I wanted to finish with a row of HDC in colored yarn, I had to cut off enough yardage to anticipate this round. I crocheted several rows of white Granny clusters before working the single row to top off the piece. The final measurements for the shawl were 60 inches wide by 30 inches deep. Our group was quite happy to receive these attractive shawls in spring colors. We bagged them and included the Threads of Love card of wishing and caring. The decorated bags would be delivered to Yale New Haven Hospital and to the St. Rapahel Campus in the following week. Did I succeed in denting my stash? I used 15 smaller colored skeins and 2 larger white skeins of white yarn in this part of my mission. I folded up 2 extra shopping bags that had contributed to the clutter in my craft room. Now I am moving onto the blanket phase of my enterprise. I look forward to showing you the results in my next post. Thank you for your feedback and reflections. I welcome you to join me on my stitching journey.
1 Comment
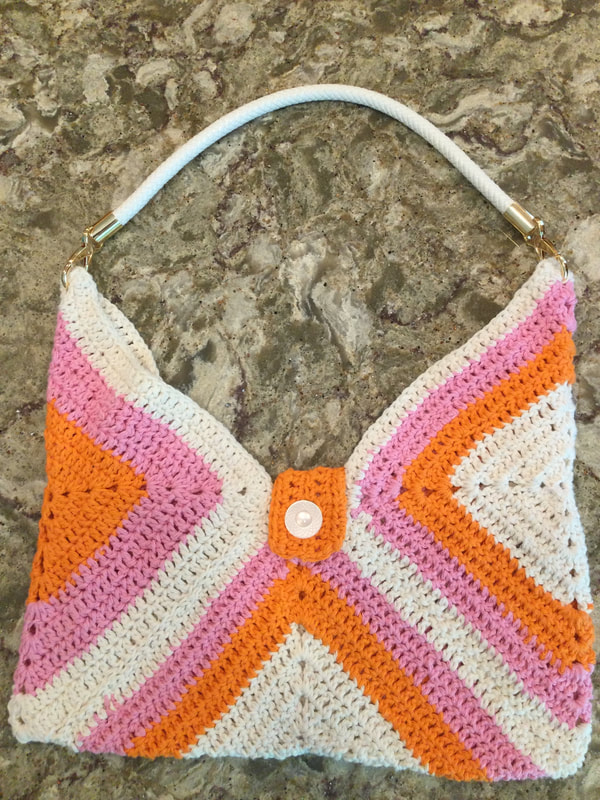
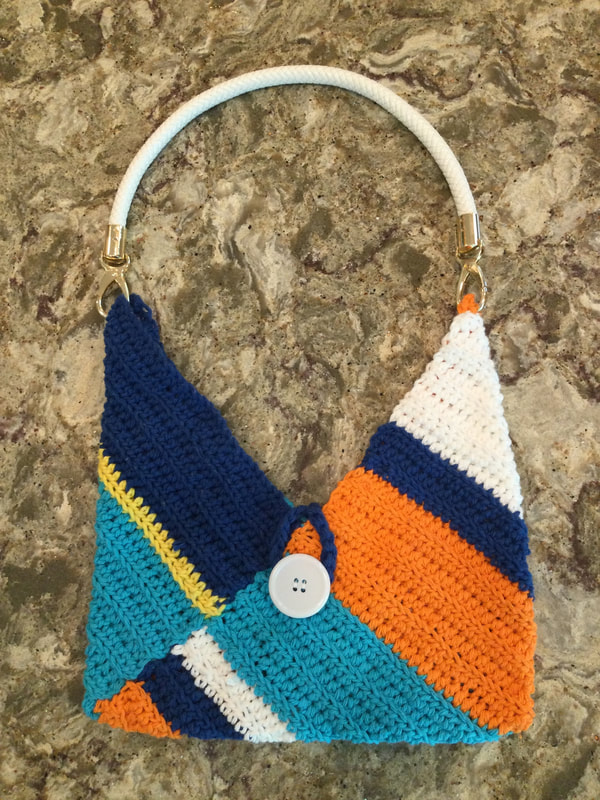
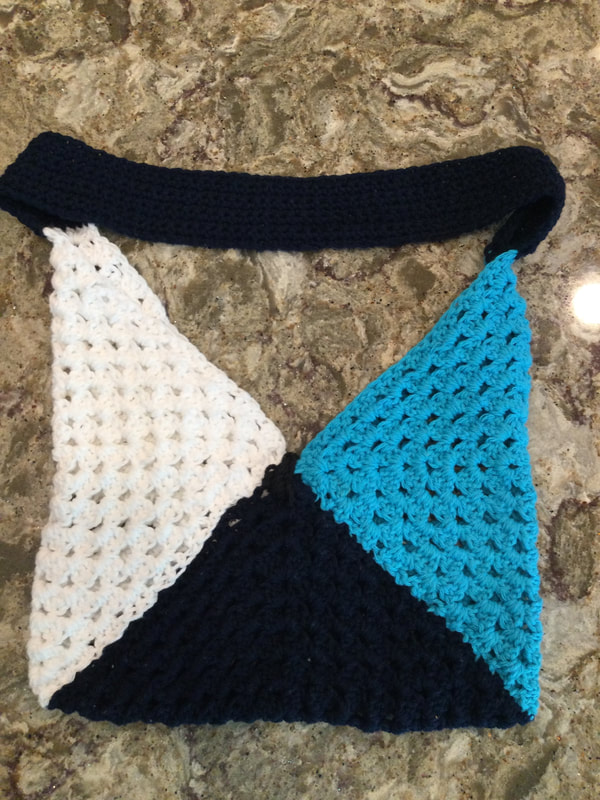
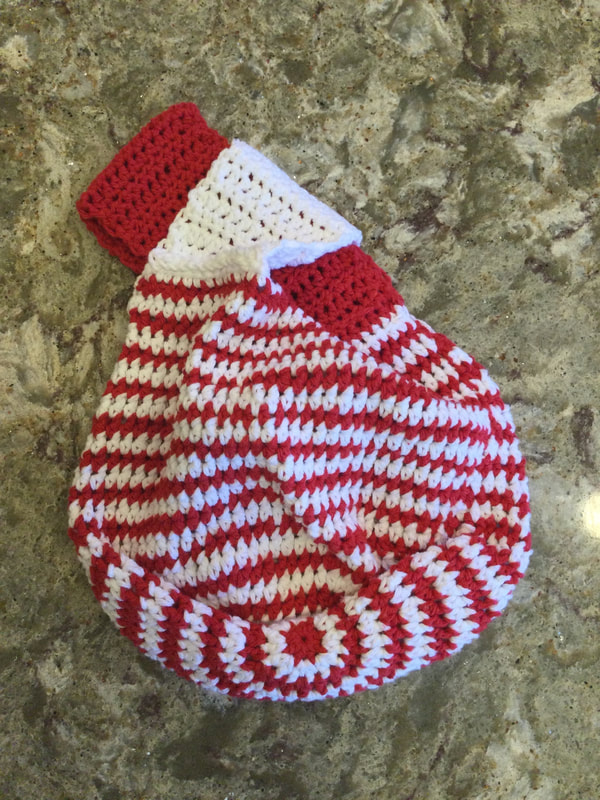
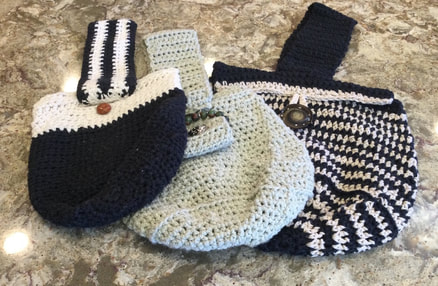 With Mothers' Day and warm weather approaching it is time to refresh your wardrobe or develop a gift for someone dear to you. I wrote about the Japanese Knotted Purse and the Bento Purse last year, but I wanted to showcase the designs with some new colors and new creations.
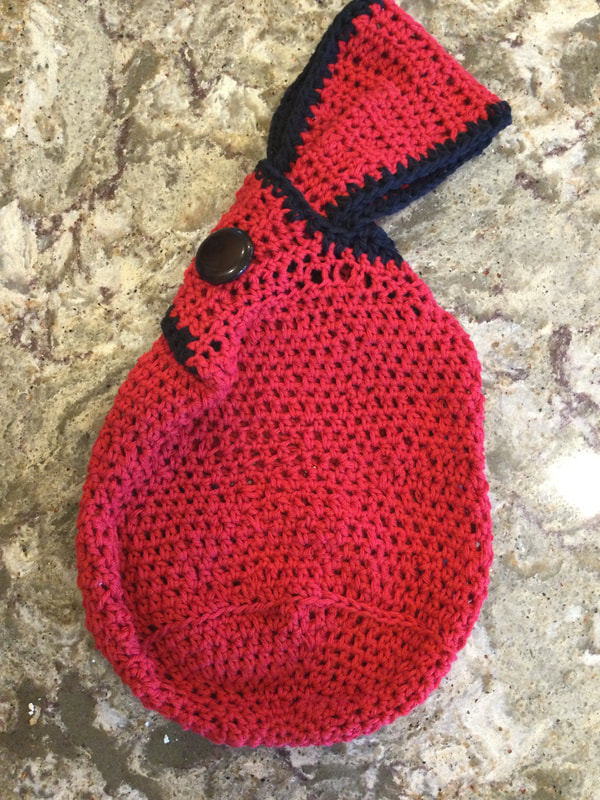
The Crocheted Bento Purse is simple to engineer. You can simply crochet a rectangle in which the height is 1/3 of the length.Then fold the piece so that you end up with a V shape opening. For the red purse I used a half double crochet, stitched on the black loop only to create a ridged texture. The navy white, orange, and turquoise purse was created with a striped rectangele. For complete instructions see http://www.lilcreates.com/lillians-blog/crocheted-bento-purse. You can use a manufactured or a crocheted handle. Another strategy would be to crochet 3 decorative granny squares. Sew the squares together to make one long rectangle. Then fold the piece and sew up the open edges. The white orange and pink purse was constructed from solid granny squares. The white, black, and turquoise purses were made from a simple extended clustered granny squares. It was fun to crochet circles in several colors before adding rows that would transform the shape into a square.  The Japanese Crocheted Knotted Purse is one of my favorites. Once you insert the larger handle through the smaller loop the purse closes on itself. Also when you slide your hand through the larger handle you hand is free to do other tasks. Last year I crocheted the purses in bright spring colors. This year I added a red and white striped version a brown piece to wear with neutrals and a red purse that is edged with black. Since I wear a lot of black and white, it will be nice to have a lively accessory with a pop of color. For complete directions, see http://www.lilcreates.com/lillians-blog/crocheted-knotted-japanese-purses
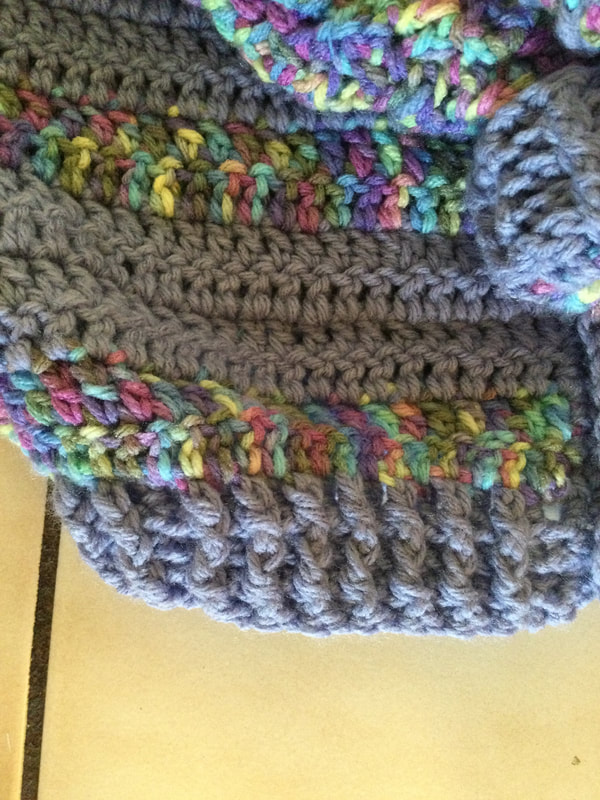
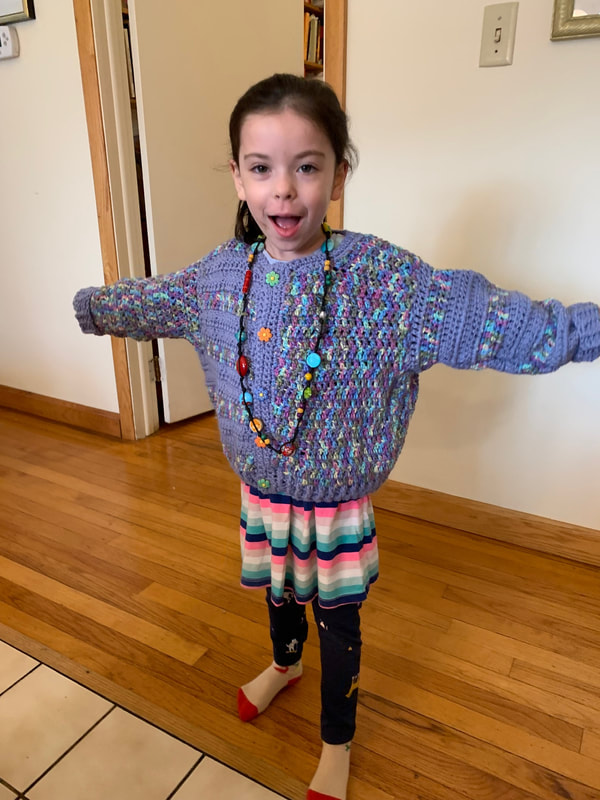
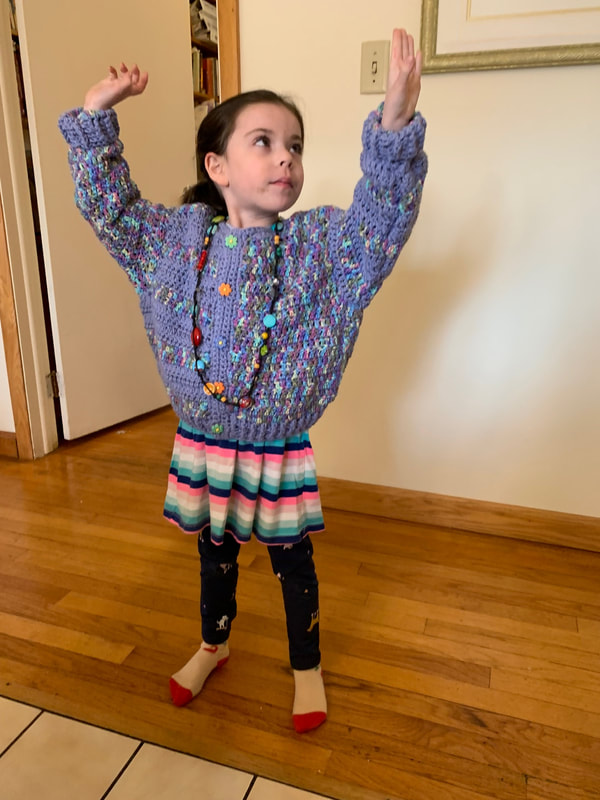
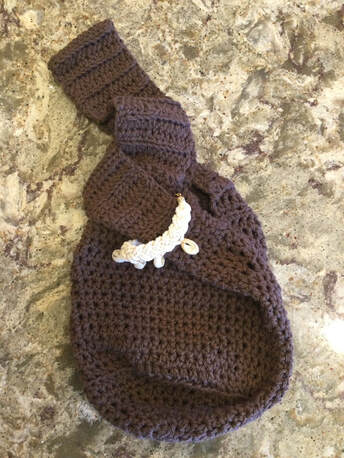 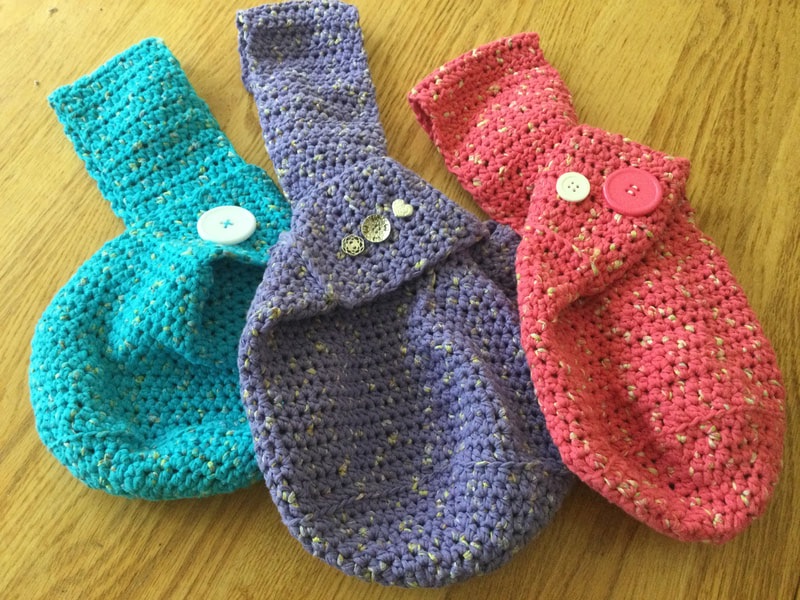 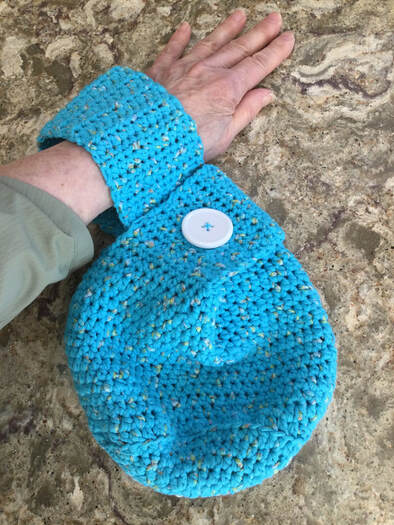 The new designs begin with the pouchlike bag I crocheted for the Japanese knotted purse. For the first project in a light sage green cotton yarn, I crocheted a horizontal slit a few rows before the top on one side of the bag. To produce the slit, I crocheted 9 stitches in half double crochet, chained 10, skipped 10, and continued crocheting in half double crochet (HDC) to complete the round. In the following round, I did the HDC as before until I reached the chain. Then I crocheted 10 HDC onto the chained strip before continuing on in the main body of the purse. I crocheted an additional two rows before fastening off. On the back side of the purse opposite the opening, I began crocheting the strap by picking up and crocheting 10 HDC along the top row of the pouch. The strap would be about 16 long before it was doubled and attached to the inside of the top row. To close the purse, simply insert the handle into the slit and pull up. A design feature was added to the front of the purse by crocheting a 4 inch strap that was doubled and sewn a few rows below the slit. Before folding the little strap, I slipped a craft bracelet onto the strip. I also added a coordinating heart silver button to the surface. 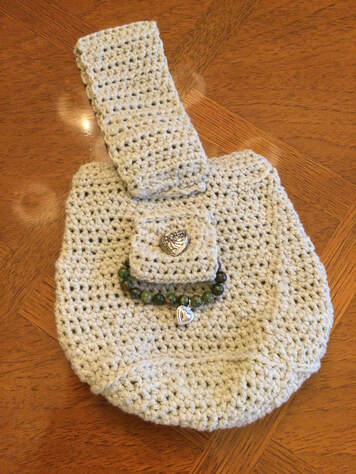 For the second bag, I crocheted a pouch with a black lower portion and an off white upper portion. For this piece the decorative element was the two tone handle. This handle was crocheted horizontally along the length and then added to the purse. A simple brown leatherlike button ws added to break up the space and create interest. 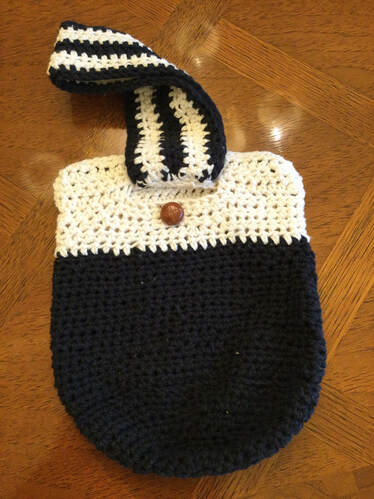 The final purse alternated black and taupe yarns. At the top I added three rows of black . At this time, I stopped crocheting on the front of the purse and continued on the back for 5 rows before making a slit on the back of the purse. I continued for for 4 more rows in black and topped off with two rows of taupe to complete the flap. This time I crocheted and attached a doubled 16 inch strap to the front of the purse. To close, I slipped the handle through the slit and placed the flap onto the front of the purse. To secure the flap, chain a loop in taupe to the top of the taupe layer and add a large coordinating button to the front. 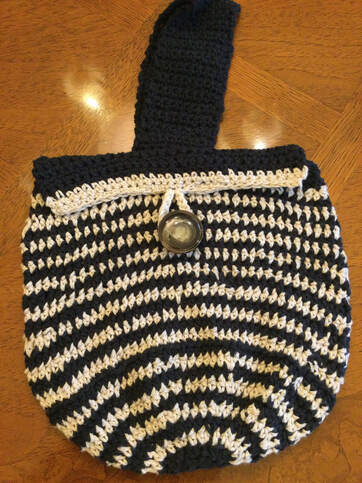 These crocheted cotton purses are fun to make with endless creative possibilities. They provide a delightful inexpensive gift or a stylish, unique addition to your wardrobe. Thank you for your reflections and feedback. I welcome you to join me on my stitching adventure.  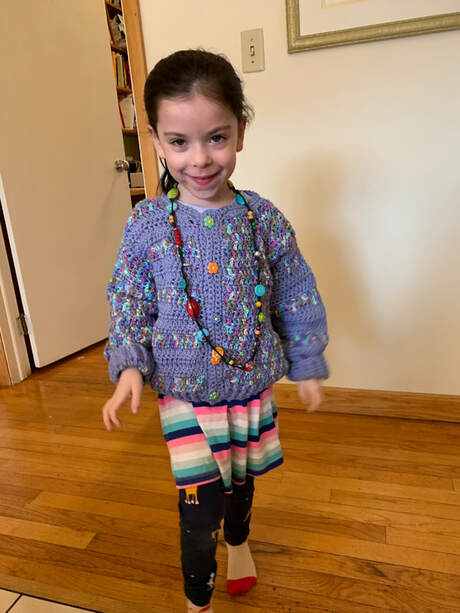 When seeking a new project, I frequently like to find ways to showcase basic stitches in different ways or to try out intriguing color combinations. I had just completed a shawl project which left me with a large partial skein of O' Go worsted yarn in the Frosted Blueberry color way. The yarn reminded me of irises, but it needed something more to bring out my spring spirit. The Back To School Cardigans Free Pattern by Yarnspirations provided me with the opportunity. Now I just needed a multicolored yarn in coordinating colors to make the sweater. Luckily, I had 1 skein of a Red Heart variegated worsted yarn in my stash. The blue in the variegated yarn was the exact match for the solid color skein. The pink turquoise, and ivory provided a bright, but subtle contrast. 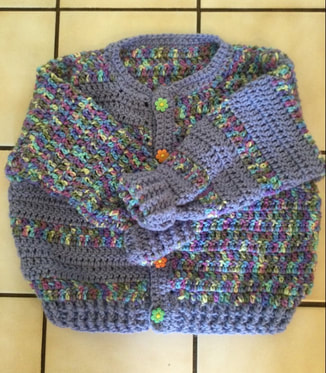 Yarnspirations classifies this pattern as a beginner skill level. The pattern is crocheted with worsted weight yarn . A G or an H hook would be used for the ribbing. An I hook is needed for the body. You need turn to the back of the pattern for the exact yardage: Using Red Heart yarn, you need 1 skein of approximately 290 yards of solid. They call for 2 skeins of variegated yarn at 232 yards each or 1 skein of any variegated yarn that yields about 450 yards. I was crocheting a size 6 garment. I had enough yarn in my super saver skein to need only one skein of variegated yarn. There were several hundred yards of blueberry yarn left over from my last project. While I crocheted my sweater in colors suitable for a young girl, the directions could easily be modified with navy and cream or green and camouflage that would work for a boy. The pattern includes directions for sizes 2-8. 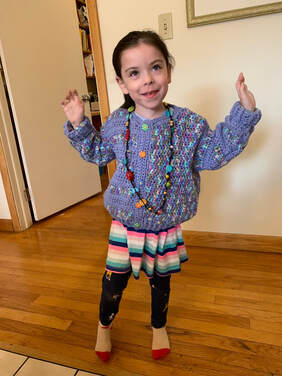 The back and two fronts are each crocheted separately with a double crochet stitch. The pattern makes playful use of the two color palettes. The back and left front are crocheted in the variegated yarn. On the right front front broad stripes of the solid color alternate with the narrow stripes of the variegated yarn. Since the left front was done all in variegated yarn, the left sleeve uses the striped pattern. Since the right front used the striped pattern, the right sleeve is done entirely in the variegated yarn. All borders and ribbing were done in the solid color. This cardigan style calls for a fitted shoulder rather than a dropped shoulder. After each section the directions call for a rib stitch created by alternating Front Post Double Crochet with the Back Post Double Crochet. I preferred stitching or crocheting up the shoulders and the sides before adding the ribbing to the entire bottom. The sleeves are crocheted from the bottom up. After a side seam is sewed to form a tube, the sleeve tube is fitted into the armhole. It is helpful to pin the center top to the shoulder seam and the sleeve seam to the center of the armhole before pinning in the rest of the sleeve. As with the body of the sweater The FPDC/BPDC was used to create the ribbing effect. The neck band is crocheted before the button bands. Instead of the double crochet suggested in the directions I used a single crochet stitch and just added an additional row of stitching. For me it was easier to provide sufficient structure for the button holes.
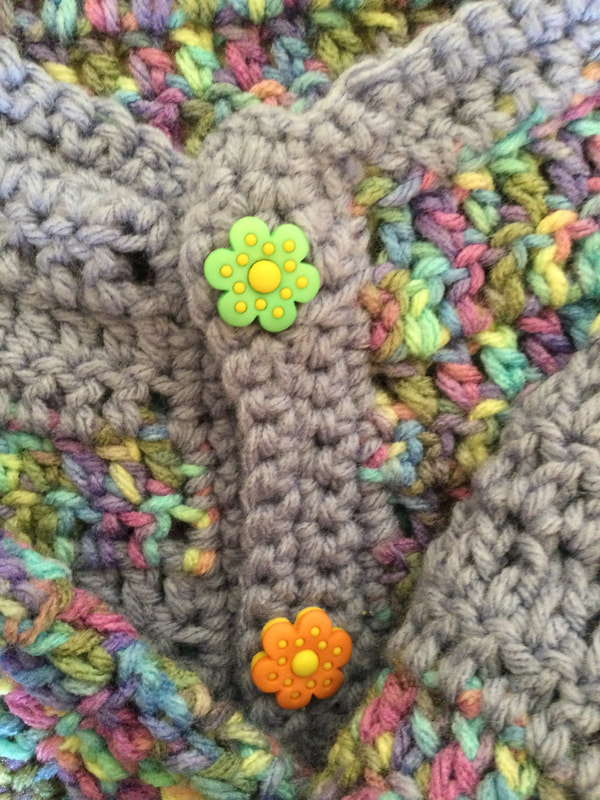
A very special set of buttons from my stash provided just the right touch to complete this project. The flowered buttons in 3 different shades mirrored the colors of the varigated yarn. As you can tell from the photos, my granddaughter was delighted to wear her new sweater. In general, I found the pattern easy to follow and made notes for my simple modifications to be available for future use. The garment is a bit roomy at present, but she can easily wear it into next fall. She wears a size 5, and her wardrobe is full of size 4 sweaters. Thank you for your support, feedback, and reflections. I welcome you join me on my stitching journey.
 Fellow knitters, as promised I am sharing my experiments with knitted cowls that you can use to add style to the simplest outfit. By experiments, I mean that none of the cowls featured in this article came from a single specific pattern. My process included reading through many knitted cowl patterns to establish realistic size and stitch counts for completed cowls. Then I combined stitch patterns that I have used successfully to produce other garments. Now that I have taken notes and have examined the finished pieces I can move on to make changes in size and pattern. I have had a lot of fun and am eager to share my work with you.  My ribbed cowl was knitted in the round with a self striping worsted weight yarn on #8 cable needles. The piece measures 9 inches high and has a circumference of 22 inches. Cast on 130 stitches. To produce the cowl, begin with 6 rows garter stitch (knitted) The stitch pattern is a rib with a 4 knit 2 purl repeat. To increase the circumference add in multiples of 6 for the 4 knit stitches and the 2 purl stitches. Since the piece is knitted in the round, you just continue with the same stitch pattern until you have the desired height. Complete the cowl with 6 rows of garter stitch. 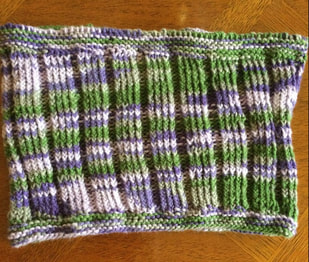 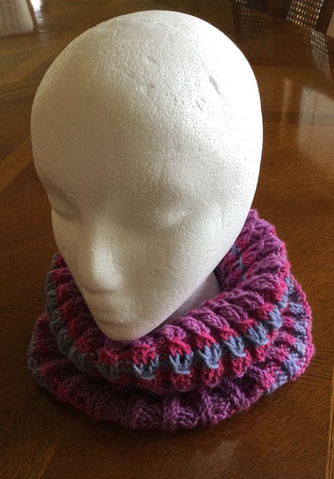 1 love the texture of the bamboo stitch cowl. I have used this stitch to make fingerless gloves and scarves. The cowl is 8 1/2 inches high with a circumference of 20 inches. However the stitch is quite stretchy which makes it very comfortable. The piece was knitted with a #3 merino self striping yarn on #* cable k=needles. Place marker at beginning of row, The 4 row repeat pattern continues as follows: Row 1: *Slip 1, knit 2 Pass the slip stitch over the two knitted stitches. Purl 2.* Continue to end of row. Row 2: *Knit 1. Add 1 stitch before the next knitted stitch. Knit 1. This addition replaces the stitch lost be slipping a stitch over the two knitted stitches in row 1. Purl 2.*Continue to marker. Row 3: Knit. Row 4: Knit. Cast on 130 stitches. There is a 5 stitch multiple to add or decrease stitches.The first 6 rows will establish the rib. Knit 3 stitches Purl 2 stitches. Starting in row 7 begin with the stitch repeat. I knitted 9 4 row pattern repeats. Complete cowl as you began with a 6 row rib of 3 Kinit 2 Purl. The finished cowl was cozy and soft. If I were to repeat the pattern, I would probably add ten to twenty stitches for a looser fit. 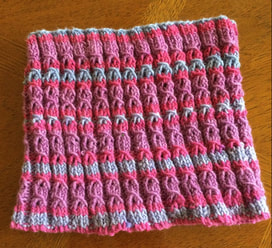 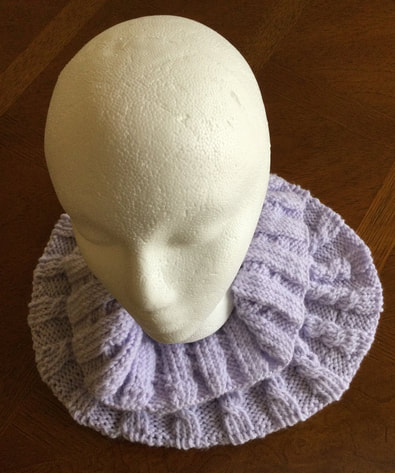 The final cowl was probably my favorite. The pale lavender Impeccable worsted from Micheals was knitted on a #8 cable needle in the round. The design feature for this cowl was aC4 cable stitch. To produce this stitch, slip 2 stitches on a cable needle.in front of work. Knit the next two stitches. Knit the two stitches from the cable needle. How to Knit the 4 Stitch Cable is a helpful You Tube Video that can guide you through the process. Cast on in multiples of 8. I cast on 160 stitches for my piece. Place a marker before the first stitch. To establish rib, I knitted 4 purled 4 around to end for 4 rows. Pattern sequence is as follows: Row 1: *Follow steps for C4F or cable stitch with 4 stitches in which you hold the cable needle to the front. Purl 4* and continue around. Rows 2-4 Knit. Continue with sequence until you have the desired height. Endwith 4 rows of knit 4, purl 4 ribbing. I enjoyed this simple cabling. In future cowls I may wish to work on more complicated combinations. 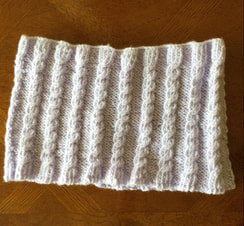 Creating a cowl is so satisfying as the project can be completed quickly and the creative possibilities are endless. After my initial experiments I am encouraged to try new designs during the autumn or winter months.
As always I appreciate your reflections and feedback. Thank you for joining me on my stitching journey. 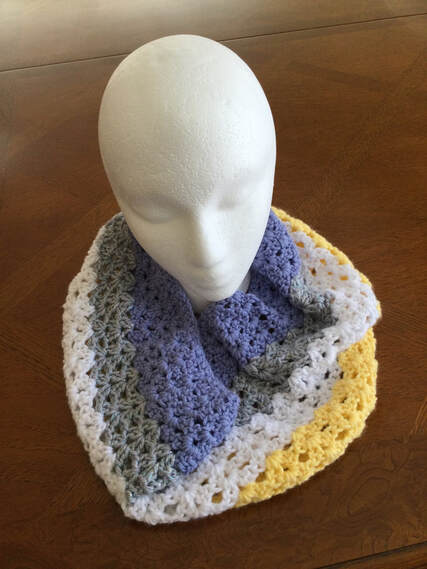 With spring just around the corner, we still have time to accessorize an outfit with the textures and colors of a crocheted cowl. I have considered crocheting cowls for awhile, but suddenly I had a window of time between projects. Since each of the cowls in the article can be completed in a day or two of full time crocheting or a week of sparetime crafting, these pieces fit right into my schedule. I began by surfing the internet or scrolling through Pinterest or Ravelry for pictures of pieces that were attractive, relatively easy to execute, and which would use only the wool and hooks that I already had on hand. The first photo that caught my eye was the Frosty Forest Cowl, a free pattern from 5 Little Monsters (https://www.5littlemonsters.com/2019/01/frpsty-forest-cowl.html). The pattern instructions call for 4 shades of yarn in the same color family from dark to light and an I hook (5.5mm). The texture of the double V stitch was appealing. I followed the basic design, but made a few changes. I did not have 4 shades of one color on hand, but I decided to dig into my large piece scrap pile for 4 colors that would compliment each other. I ended up with 4 rows of Frostberry from left over from a shawl, 3 rows of Sparkly Silver left over from a child's ballet shrug, 3 rows of white, and 4 rows of yellow. While I made the initial chain with 90 stitches using the I hook, I switched to the H hook for the body of the cowl. I did try using the I hook throughout, but I did not like the presentation of the stitches. Using a slightly larger hook for the initial chain kept the piece from being too tight at the bottom. 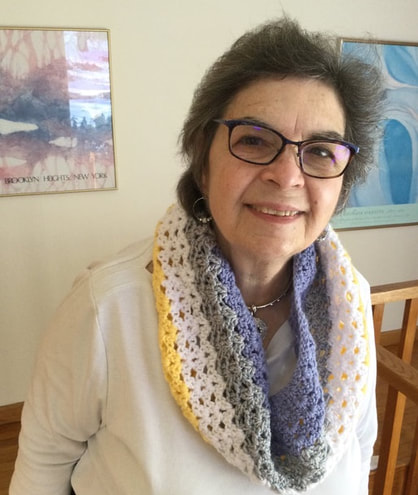 If you prefer crocheting a flat piece, you can crochet a rectangle and then sew the short sides together. In this case, chain 90 +4. Row 1:Make the first double crochet in the fourth chain fromm the hook. Crochet another DC in the same chain. Skip 2 chains. In the next chain stitch, crochet 2 DC, Chi 1, 2 DC in the same stitch.( This stitch is called a Double V Cluster.) Skip 2 chain stitches.* When you are 3 stitches from the end, skip 2 chain stitches and crochet 2 DC in the last stitch. Turn your work. Row 2: Chain 3. Dc in the same space. Crochet your first Double V cluster in the chain 1 space of the cluster from the previous row. Continue across the until you get to the las 3 stitches. Crochet 2 DC in the same last space. Rows 3-14 Follow instructions for row 2. If you wish to change colors, you will make the change by stopping the final DC of the row when there 2 loops on the hook. Lay the contrasting yarn across the hook and pull through the loops to complete the DC. Turn your work Chain 3 with the new color and proceed with instructions for row 2. Leave tails of about 4-5 inches of old and new yarns and tie together. Then you will weave in ends when the piece is finished. 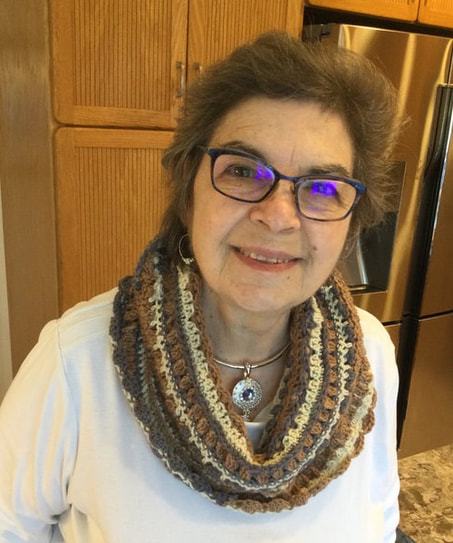 My second piece was the "Layer Cake" Lace Cowl from Kirsten Halloway Designs. I chose a multi-tone self striping Cozy Merino Wool(Driftwood Multi) with an H hook (5.0 mm) . The cowl comes in many sizes, but I chose to start with a 120 stitch chain to crochet the piece in the round. The set up sequence includes 8 rows of different stitch patterns that achieve the lace effect. Then you repeat rows 3-8 four more times before ending with the scalloped row 3. The piece was interesting to crochet end not too difficult to follow. If I were to use the pattern again, I would like to try a solid or a tweed so that the stitches instead of the color would be the focus of attention. 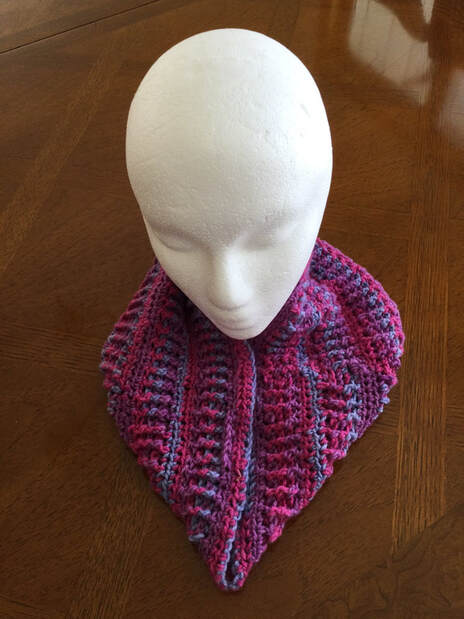 I saw the photo for the final piece before I located the pattern. I really liked the style and use of sttiches and texture. This was another cowl crocheted in the round on an H (5.0 mm) hook. I decided to wing it and figure out the stitch and row combinations as I went along. My yarn was another skein of Cozy Wool Merino but with shades red, plum, and lavender. My basic attempt included a 120 stitch beginning chain, followed by 3 rows of HDC and then 4 rows of Front Post Double Crochet alternating with Back Post Double Crochet. By changing off sections, I had 4 sections of HDC and 3 sections of the vertical stripes of the Front Post Double Crochet/Back Post Double Crochet. Eventually I found the pattern from the photos. Brooklyn Cowl by Demi Sharpe is a paid pattern found on Ravelry. It includes sizes toddler through adult and is accompanied by a matching headband. This cowl is larger than my version as it begins and ends with the Front Post Double Crochet/ Back Post Double Crochet sections. 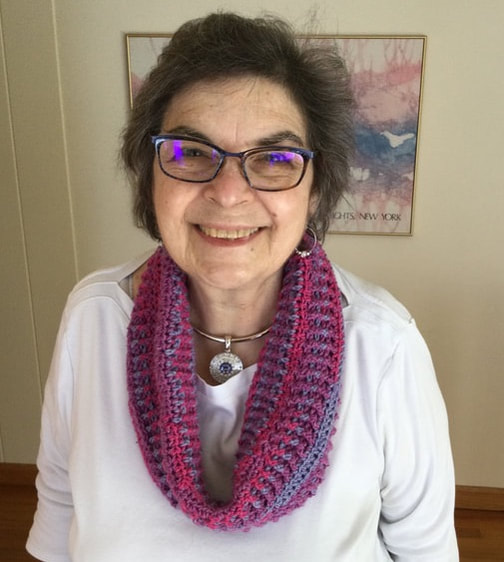 Although I am wearing a white long-sleeved t in the photos, I can easily enhance the look with a black or colored t shirt or sweater. The project was engaging and called on me to be creative. While working with these crocheted cowls, I was encouraged by the positive remarks of my friends to work on knitted versions. Please look for my knitted cowls in a future post.
As always, I appreciate your feedback and reflections. I welcome you in doing me on my stitching journey. 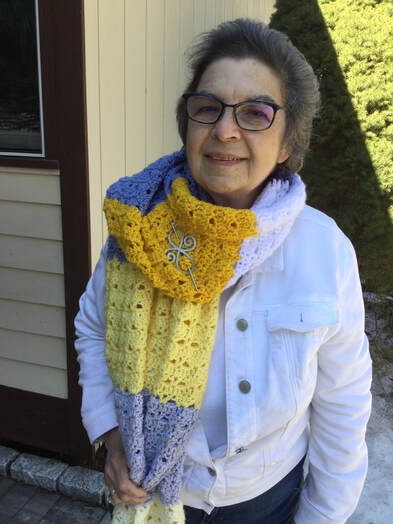 Since my local chapter of Threads of Love organized in 2009, members and participants have produced more than 900 pieces. The shawls, lapgahns, and children's blankets are donated to Yale New haven Hospital and to the St. Raphael Campus so that cancer and other seriously ill patients can receive a warm hug and caring wish This chapter was orgainized by Sarah Blum, a former chaplain of St, Raphael Hospital and has been administered by Elaine Klein for members of the Or Shalom synagogue and interested participants in the general New Haven area. We passed our 500 mark in 2016 and hope to reach 1000 in 2022. Shawls and blankets for men, women, and children have also been sent throughout New England and across the country when we hear of friends and friends of friends who would benefit. Before COVID, our in person meetings were larger, but we continue to drop off pieces on collection dates 3-4 times a year for wrapping and distribution. Each piece includes a caring message for the recipient during times of health problems. At our last meeting we reached 911, but I was later called on to leave a newly crocheted piece for an elderly lady in physical rehab. With the addition of these two shawls our group total was now 913. Our group typically generates 18-21 pieces at each collection date. Therefore with a bit more effort we can reach our 2022 goal of 1000 pieces by the end of the year. The shawls featured in this article were made from Yarnspirations Caron Big Donut Yarn. Usually this yarn sells for about $10-$11 per skein. While the yield is 502 yards per skein, I have been reluctant to indulge even though I was attracted to the yarn. However when the price was reduced bu 50% at a local large craft store, I picked up a bunch. Once it is opened the tangle free quick start O'Go worsted yarn is easy to use. It unwinds without any difficulty and you do not have to search for an inner or outer thread. This is not a self striping yarn. Instead, there are 5 blocks of interesting color combinations.  My first shawl was a rectangle piece in Sea Foam colors, crocheted with anI (5.5mm)hook. I used most of two skeins. However, one of the sections was a bright teal. While the color worked well for the center of the piece, it would be awkward to continue and place another teal black at the end. I cut off the bright block and am using it for other projects. While the Autumn Symphony pattern is usually worked in bulky yarn increased the chain stitches from 43 to 63 to achieve multiple of 4 +3. After the initial set up the double V stitch was repeated throughout the shawl. I also crocheted a triangle shawl with alternating Double crochet and open mesh sequences. The Autumn Symphony Shawl is a free download from fiberfluxblog.com.
On a subsequent shopping trip I found another donut in light yellow, pale blue, gold, light periwinkle, and navy. Since there was not enough yarn on the wheel to complete an entire shawl, I bought a compatible skein of Impeccable in Ivory for 285 yards, My plan was to crochet the Quinley Sideways shawl with ivory sections at both ends. The Quinley Sidesways Shawl has a 2 row repeating pattern. In the first row you double crochet across the row. In row 2, V stitches are separated by 3 skipped stitches to alternate with shells. .Since the color block arrangement on the donut wouldn't work in its original form, I unwound, cut and rewound each section into separate balls. I rearranged the color blocks so that the light yellow would not be next to the ivory, and the navy would be in the middle of the shawl. At this point I realized that I needed blue to balance out the shawl and took some yardage from a Frostberry wheel. The finished piece is 21 inches deep and 63 inches long. It is an ample cover up that is quite cozy. The Quinley Sideways Shawl is a free download for AllFreeCrochet.com 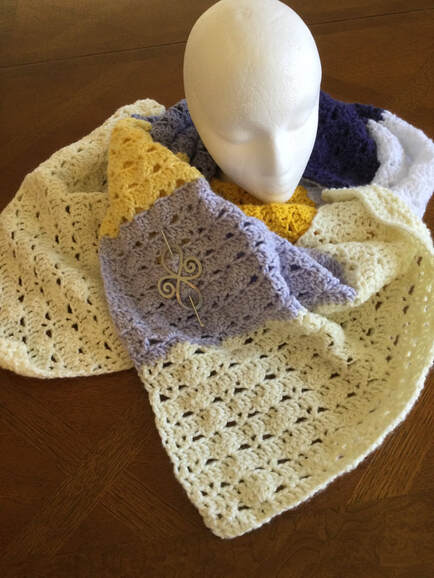 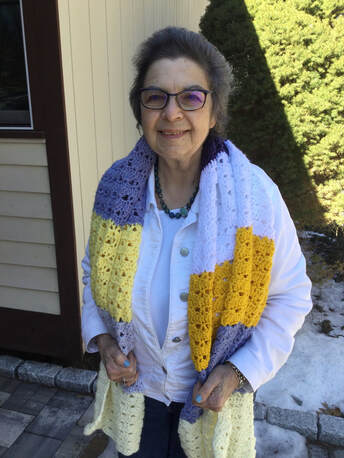 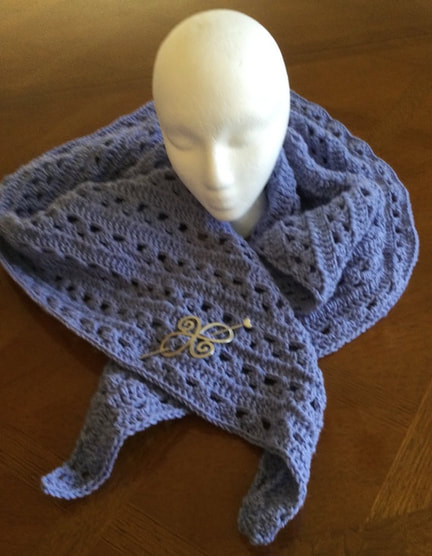 The final piece for this project was a triangular Amorous Shawl by Katja Loffler. This pattern is a free Ravelry download, I used the remainder of the Frostberry wheel from the previous shawl and part of a secondwheel to create a piece that was 29 inches deep and 68 inches from tip to tip. The piece is worked with an I hook (5.5 mm) from the top to the bottom. Increases are made in the center and both sides. Once the 9 row set up is established, 6 rows are repeated until you are saitisfied with the size. There is combination of closed and open work to create an interesting texture. An attractive feature of this piece is the front post double crochet stitch. By turning the shawl over to the reverse side, this stitch creates a raised ridge. This detail makes for a creative and attractive shawl.. A shawl pin enables the wearer to style the shawl in many ways. 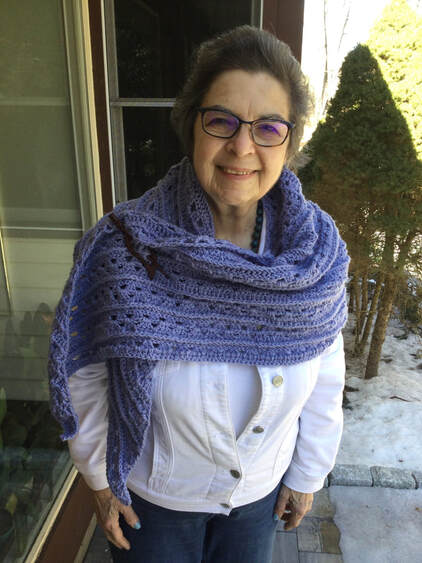 I am proud of my shawls, but I need to take rest for a bit to develop other projects. My goal for 2022 is to donate a total of 20 pieces. I put in 3 in January. I added another 2 in February. Have 2 completed another 1 in planning stages for March and April.. That makes 8. That means that I will take on12 more pieces from April through December. It is unambitious plan, but I can do it even though I will be working on other projects and skills in between my shawl and blanket making.
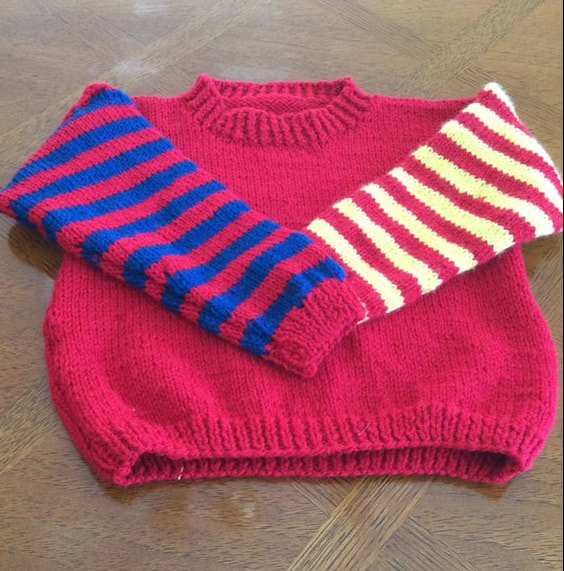
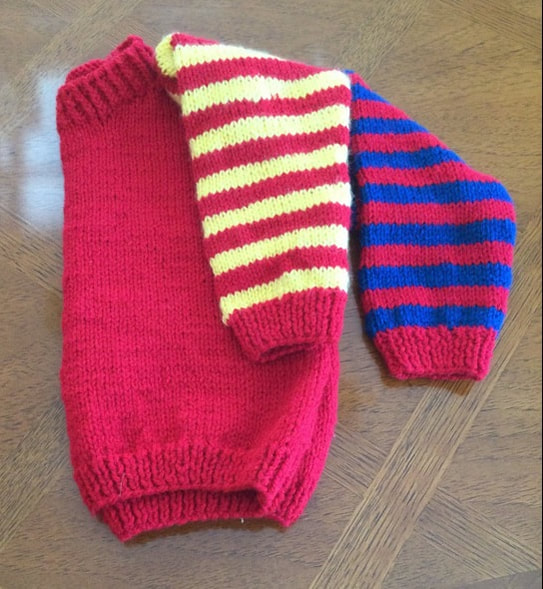
I welcome you to join me on my stitching journey. I appreciate your reflections and feedback. 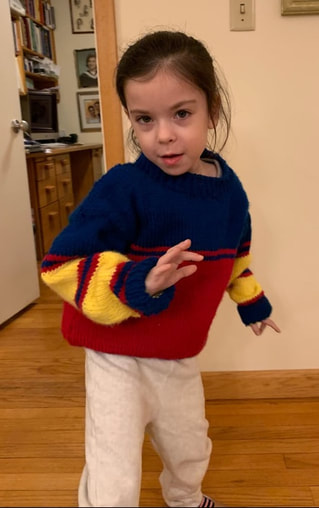 With so many interesting pictures of commercial sweaters to buy and patterns for making my own sweaters I was determined to try my hand at creating interesting sweaters with bold sleeve striping as the featured accent. Since my three granddaughters like primary colors, I decided to discover the many ways I could use red, blue, and yellow to produce varied results. By knitting with the same three colors to make three different sweaters, I hoped to have a cohesive body of work as I played with striping effects. My yarn choice was Read Heart With Love, a #4 Worsted. Needles were #6 for the cuffs and neckband and #8 for the body of the sweater. Pattern sizes 4 and 6 were worked with the Cascade Yarns Pattern Cherub Aran Zebra Pullover (W464). The size 8 sweater was worked with the pullover sweater from Bellish, a computer app that is no longer available. In retrospect, I wish that I had just enlarged the size 6 pattern to increase fro chest, body length, and sleeves.
The size 4 pattern for the simple roomy crew neck pullover was worked with a red body, cuffs, and neck band. The pattern called for flat knitting of the separate front and back which would later be stitched together. While the pattern showed broad stripes of the same colors, I decided to knit one sleeve with red and blue stripes and the second sleeve in red and yellow stripes. Instead of knitting the sleeves separately and stitching them to the body, I took the final stitch count and picked up stitches on the designated armhole and reversed the process. Instead of increasing stitches from the cuff up, I decreased stitches from the top of the sleeve to the cuff. in this way my sleeve seam is smoother and I can easily adjust for sleeve length. I was pleased with the striped effect and eager to try a new combination on my second sweater. 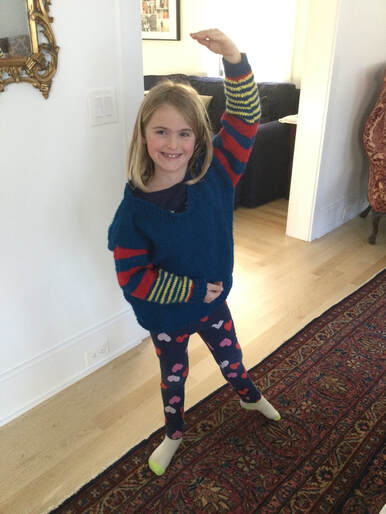 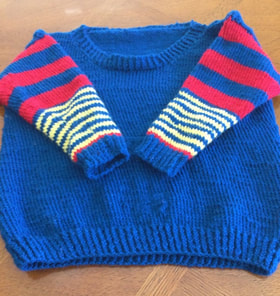 The second sweater in size 8 was worked with a blue body, cuff, and neck band. This pattern called for knitting the body in the round from the bottom up. After separating for the armholes, I knitted the upper back and front. Directions were given to produce the front and back necklines. Then I sewed the sweater together at the shoulders. I picked up the number of stitches for the top of the sleeves and knitted the sleeves in the round through to the cuff. This process enabled me to create as I knitted along. I used 5 broad stripes in red and blue for the upper part of the sweater. Then I transitioned to yellow and blue for the narrow stripes at the lower part of the arm. I carried the yarn along as I changed colors when appropriate. Note I added a narrow strip of red near the blue cuff to tie the colors together and to make a more dramatic effect.  By the time I got to the third sweater (size 6), I really had to force myself to go on mes. Again, I was back with Cherub Aran Zebra Pullover, As with the first sweater, I omitted the zebra pockets on the front of the sweater. Now, I had to challenge myself to produce a new stripe combination, still with the same three colors. While each of the first two sweaters had a solid color on the body, for the third sweater I split the body to knit in red to the armhole and then change to blue to the neck. To create interest i added a thin stripe of the contrasting color just above the bottom ribbing and just below the armhole. I was looking for a bold result. As with the other two sweaters, I connected the shoulders and picked up the stitches at the armhole. By starting with the same blue as the chest, the sleeve and body looked seamless and continuous. The thin stripes of red, blue, red started just below the blue upper part of the sleeve broke up the yellow portion in the middle and at the bottom near the blue cuff. I have to admit and that I reconstructed the sleeve a few times before I got the desired effect.  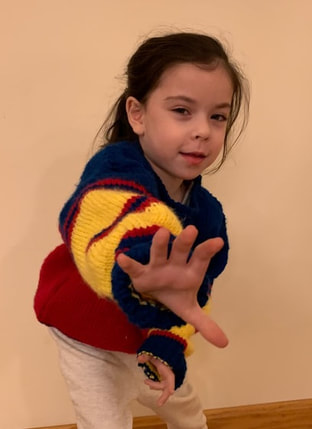 To create these or your own original striped effects, you can use the pattern featured in this blog or any pullover sweater. I think that a roomier style works best with the worsted wools I knitted with, but that can be your personal choice. Let your imagination go wild and enjoy your stripes. I am proud to have completed the three sweater project with creativity and style, I am relieved that I can deliver the pieces, and take my pictures for my blog and website. The subject of striped effects still intrigues me, but I will lay it to rest for a while. After crocheting the 3 ballet barre sweaters for my last blog post and knitting these sweaters with the interesting striped sleeves, I think I have learned a lesson. Creating three coordinated pieces for one article requires several weeks of work. Since I like to write as well as knit or crochet, I may need to discipline myself to produce fewer pieces on a theme when I consider what I will write about. However,I have said the same words before only to cast caution to the winds before launching a new vision.
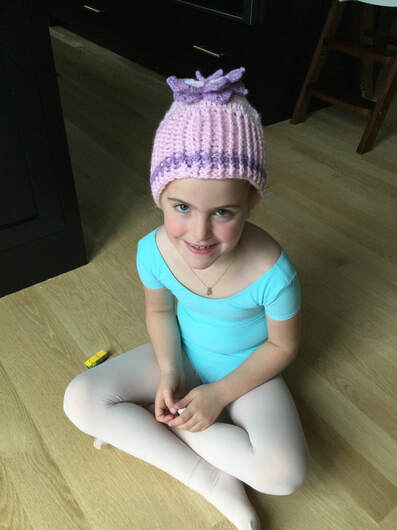
As always, I welcome your reflections and feedback. If you have knitted pieces with interesting stripe work, please share your photos. Please join me on my stitching journey. I continue eo enjoy my evolution as a fiber artist.  As a very fortunate grandmother of three delightful girls (plus 2 wonderful teenage boys) I have wonderful models who are my muses for so many creations; Now that all three girls have started dance programs, the front tied At the Barre Shrug designed by Diane Moyer for Yarnspirations is the perfect accessory for these "budding ballerinas." The free pattern is also shown on Ravelry and Pinterest. Although the directions called for Red Heart Sparkle Soft, this yarn is no longer available. Therefore, I substituted Caron Simply Soft which was a good fit for sparkle and weight. I started with a sparkly silver for the oldest girl. Then I made the next shrug from a sparkly white. The youngest child requested a blushing pink. The Simply Soft yarns come at the lighter end of the worsted (#4) spectrum of yarns, but they worked well for these delicate sweaters since I wanted to allow for freer movement. While they would probably not wear the sweaters as they danced, these accessories could easily be slipped on so that they did not get chilled after their lessons. 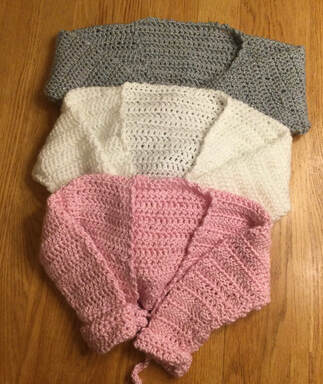 The size range for the pattern is child 4 through child 10. The sweaters are crocheted with size I (5.5 mm) hooks. The body of the shrug is worked in one piece beginning with the lower back edge. The sleeves are worked directly onto the body. Most of the sweater is crocheted in double crochet. Special stitches include dc2tog (double crochet 2 stitches together), FDC (foundation double crochet), FSC (foundation single crochet), and a Picot edging. Instructions are provided to make special stitches. I found it necessary to go on You Tube to see a video on how to make the foundation stitches, but I got the hang of it with practice. Since the foundation stitch combines the initial chain and the first row, you can just separate the steps if you find it too difficult to execute the foundation stitches.  Since the pattern is reversible, just select the side you prefer before starting the sleeves. By crocheting the sleeves right into the body, the sleeve placement is smooth. With right side facing place markers on both side edges of front and back from 2 to 5 inches depending on size. This will leave from 5 1/2 to 7 inches between the markers. A handy diagram with measurements helps you to visualize sleeve placement and construction. When the sleeves are done crochet a Picot edging to create a finished look. 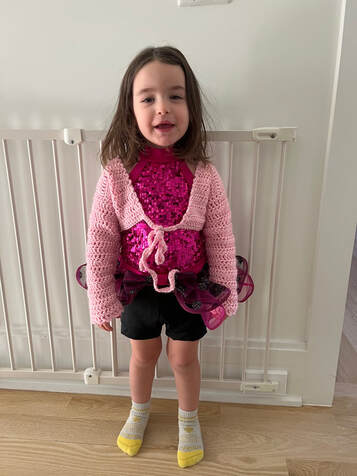 To construct the garment, fold the piece in half to match the front to the back of the sweater. Pin along the short side seams and along the sleeve. I used a neat blanket stitch to make my seams. With the double crochet stitching I found that crocheting the seams or using the mattress stitch did not provide necessary structure. I prefer blanket stitch to whipped stitch as the seam has a more finished look. 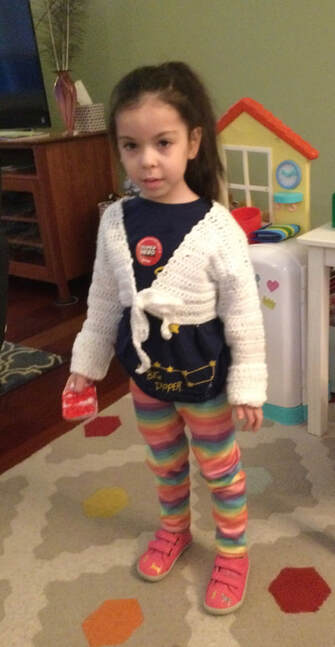 Place the sweater right side facing you to start with a single crochet in the lower right corner to begin the Picot edging. You will be working in the ends of the rows as you go up the right front edge, across the neck and down the left side. Ties are crocheted to each side of the front sections. The pattern calls for FSC (foundation single crochet) followed by 2 additional rows of single crochet. 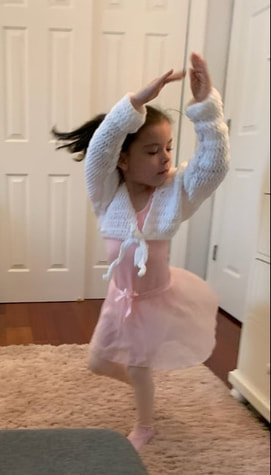 The free Yarnspiration patterns are wonderful to work with. The patterns are concise and are easily printed over 2-3 pages. Yarn weights, yarn yardages, gauge, and finished measurements are listed. Directions are clear and special stitches are explained. Photos and diagrams help to visualize the finished piece. 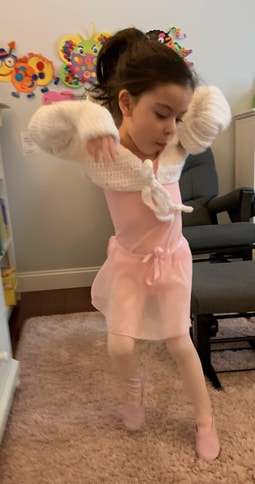 My girls were delighted with their new ballet shrugs. If there is a young dancer in your family or friend group, I encourage you to try this project. The sweaters do not take long to finish and are relatively easy to make. As always, I appreciate your feedback and reflections. I invite you to join me on my stitching journey.
 As knitters, we sometimes start with a pattern and search for yarn. At othermtimes we begin with the yarn and search for the pattern. When I was gifted two large skeins of DK weight yarn in two different shades of pink, I knew I wanted to make a piece that would suit one or more of my granddaughters. With the exception of my earlier infant sweaters, I don't usually knit with DK (#3) yarn as the projects take longer to complete, and I like the feel of worsted (#4) or sometimes chunky (#5). However the soft pink tones challenged me to try something different. On a visit to my local independent yarn start (Yarn Barn in New Haven, Connecticut, I found the pattern that called my name. Sirdar Calyso Double Kbniuitting Pattern #4297 is a cropped tri-color cardigan with a single button closing. I added some DK white to the yarn I had on hand, and I was on my way. Needle sizes are US 3 (3 1/4mm) for the ribbing and border and US 6 (4mm) for the body of the sweater. The back and front, and sleeve pieces are knitted separately from the bottom up. Then they are joined at the shoulders. The pattern calls for the ribbed border to be knitted before the sweater is completely put together. I prefer to sew all parts together first. The last step is the embroidery. I used the photo guide on the pattern cover to show me the placement. 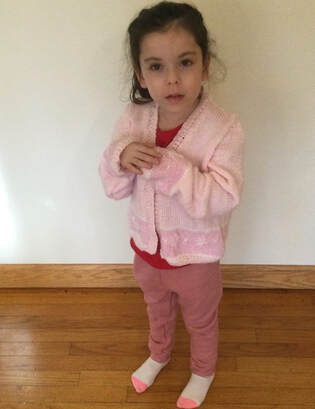 The picture on the cover portrayed a girl in a lime green sweater that was decorated with narrow bands of yellow and a wide band of sky blue. Lime green and yellow flowers were embroidered onto the blue band. Yellow and blue flowers were embroidered onto the body and back on the green sweater. The designers even paced a blue square bordered with yellow on the back of the sweater. A green and blue sweater was embroidered onto the center of the square. For my color placement, I used the palest pink for the body of the sweater, white for the narrow band, and a slightly darker pink for the broad band. Following the scheme of the pictured sweater, I embroidered, light pink and white flowers onto the broad band. I made a few changes in the sweater, because I was not able to create the intarsia square on the back. I knitted with light pink up the entire back. Also, I added colored bands to the sleeves. I chose not to embroider flowers on the body of the sweater for a simpler look. A simple pink rose button closed the sweater at the v- neckline. The delicate embroidered flowers add an extra dimension to the sweater. Please note, that the narrow bands are actually white, although they may not appear that way in the detail photo. 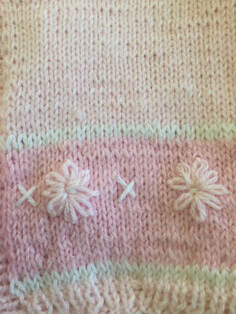 I made this sweater in a size 5-6 for my petite 5 year old granddaughter. The sweater fits, and is roomy enough take her through the spring. Since it is lightweight, she can wear in on top of a long sleeved t-shirt for a bit of extra warmth indoors during the cooler moths. Since it is lightweight, she can wear it under her winter jacket, without feeling too bunched up. 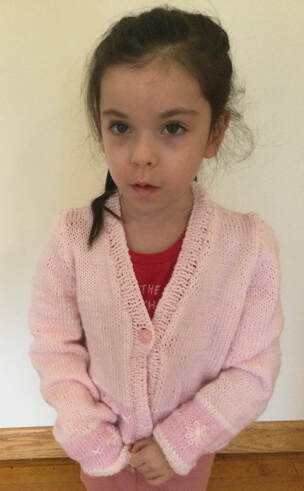 Her three year old cousin frequently requests sweaters in her favorite color pink. Luckily, I have enough yarn left to make her sweater as well. this time I will switch to use the darker pink for the body of the sweater, and the lighter pink for the bank. Instead of white, I will pick up a delicate blue or green for the narrow bands and parts of the flower. I haveyeat to decide whether to tackle the intarsia square or the additional flowers on the body of the sweater. Friend of mine employs the intarsia technique all of the time, and I know that she would be able to help me. Since it takes me a long time to knit in DK I am unable to show off my ideas for the sweater with the new color placement this time. I am currently working on another 3 sweater project progress) at a time, but I wandered to showy readers the possibilities of the color swap. When I finish to new sweater, I will add the pictures to this article I have adde floral embroidery and facial details to the mittens pictured below. I look forward to combining the two fiber arts for projects in the future.  Readers, have you combined embroider with knitting to embellish your projects? I would like to see your photos. I welcome you to join me on my stitching journey. As always, I welome your feedback and reflections.
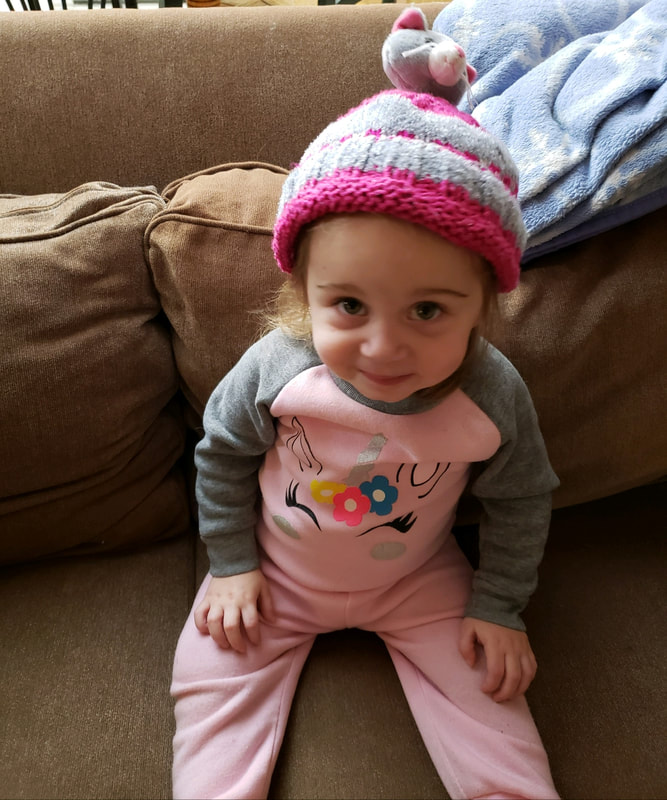
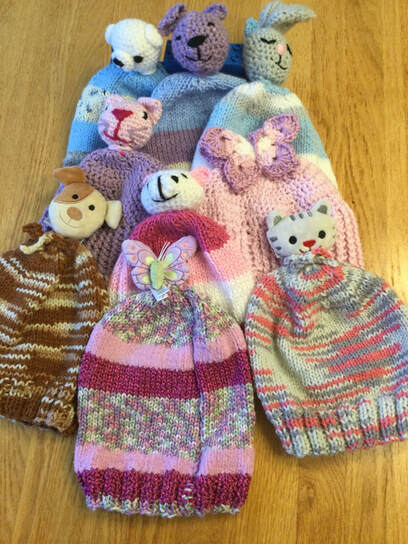 A whimsical topper can transform an attractive, but simple hat into a creation that brings a smile to children and all those who are young at heart. While reorganizing my yarn tubs I came across several kits from DMC that I had purchased several years ago when they were on sale. I decided to knit them up and gift them to my grandchildren and to my friends' grandkids. While the kits were called Lil Toppers, I found on research that DMC had changed the name to Top This. Kits range in price from $10 on Etsy to $13.49 on other sites. Lion Brand also sells a set of 4 Sesame Street themed hats for $31.99 with Big Bird, Oscar, Cookie Monster,
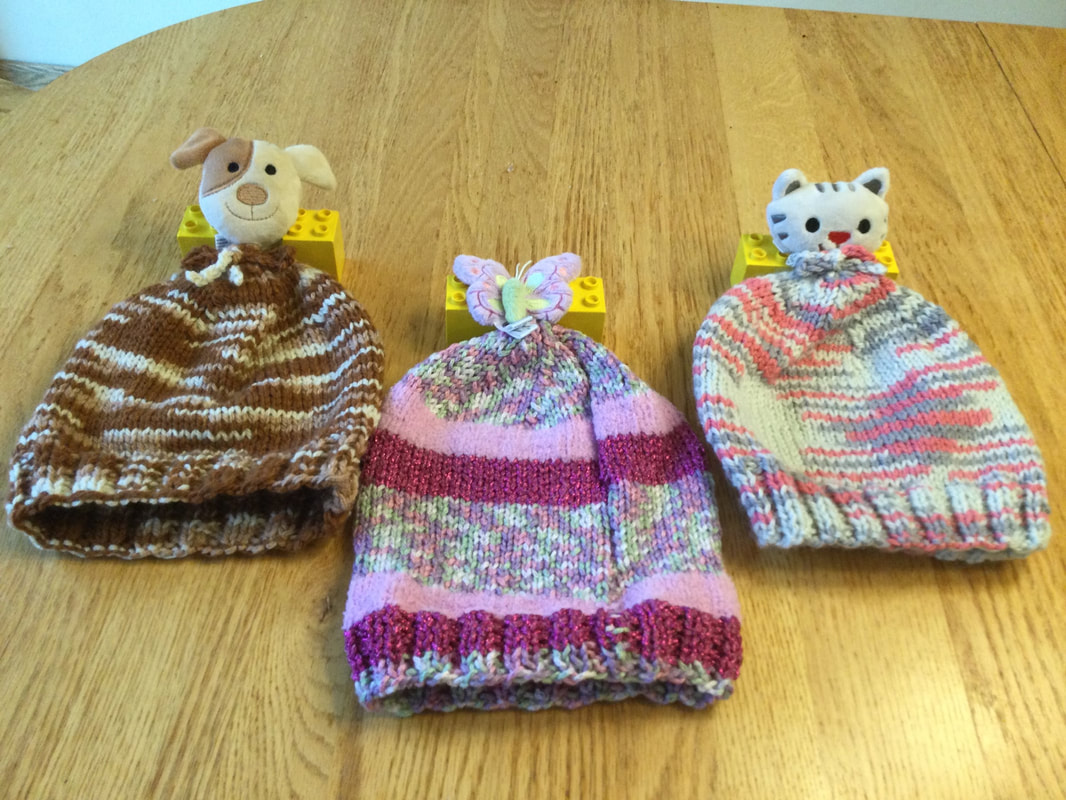
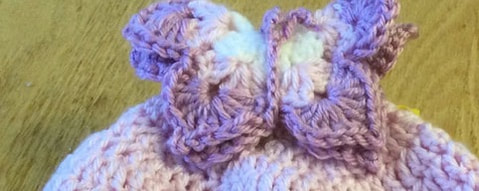
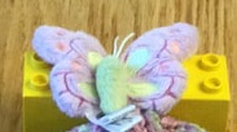
While I may not be able to execute the detail of the manufactured hats, I wondered If I could create toppers with my scraps and knit or crochet coordinating hats from skein ends at almost no additional cost to me. My first attempts were the teddy bear toppers that attached to knitted beanies. Any standard hat pattern will do. Using worsted weight yarn I cast 72 stitches on straight needles. Knitted a2x2 rib for about 1 1/2 inches and continued with stock and knit. Check standard hat charts for length before making decreases. When I attached the critter to the crown I placed 1 1/2inch button under the surface so that the figure would be secure. Make sure that the button has large holes so that you can get the yarn needle through . The ready-made kits include a foam circle for this purpose. My first attempts were teddy bears. I found it easier to crochet the heads than two knit them. Row 1:I started out with 6 single crochets in a magic circle Row 2: sc 2stitches in each sc. (12) Row 3: sc 2 stitches in first stitch. sc in next stitch. Repeat around to join in first stitch of row. (18). Mark beginning of row with marker. Move marker up as you crochet through the rounds. Row 4: sc 2 stitches in first stitch, sc in next 2 stitches. Repeat pattern around. (24) Row 5: sc 2 stitches in first stitch. sc in next 3 stitches. Repeat pattern around. (30) Row 6: sc 2 stitches infers stitches. sc in next 4 stitches. Repeat pattern around. (36) Row 7: sc in each stitch around. Row 8: sc in each stitch around. Row 9: sc in next 4stitches. Make a sc decrease. (24) Row 10: sc in next 3stitches. Make a sc decrease.(18) Row 11: sc in next 2stitches. Make a sc decrease. (12) Row 12: sc in next stitch. Make a sc decrease.(8) Row 13: sc decrease around. (4) Gather stitches and close off. Weave in ends. For ears work the first two rows of body pattern for 12 stitches. For the snout, I worked the first 3 rows of body pattern (18)..Then I stitches around with the same number. The finishing touches were the eyes, nose and mouth. I followed variety of pictures to embroider with black yarn. 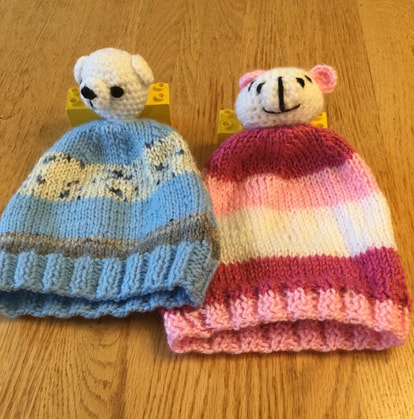 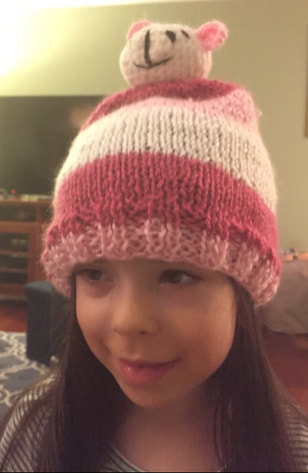 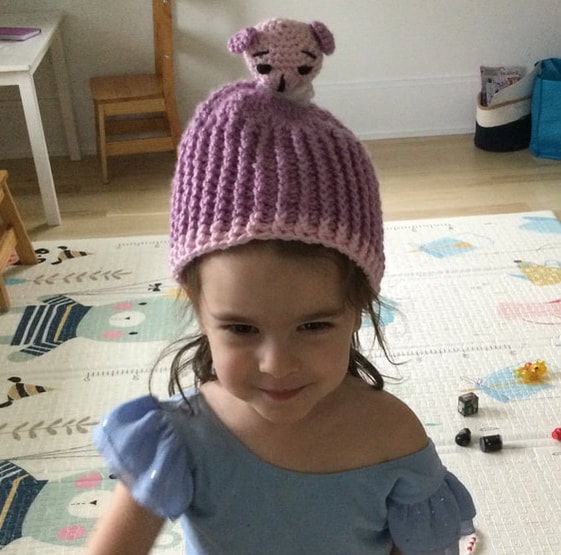 For additional models I researched Loveys which had an animal or figure head with a small blanket. It was an easy transition to use the head to top creative hat. 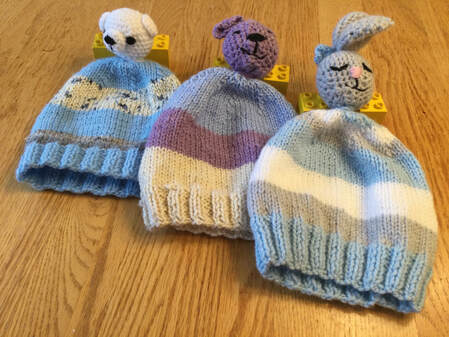 The bunny with the offside ears can be found at Easter Bunny Amigurumi@ravelry.com. Other interesting ideas can be found at Loveys for Boys@tillysome.wordpress.com Please compare the manufactured cat hat with the handmade crocheted hat below. 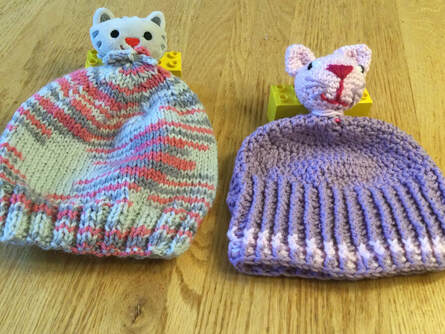 Here are the two butterfly versions.The butterfly from the crocheted hat can be found at How to Crochet Butterfly Video Tutorial at your crochet.com.
 Although I ran out of time to make additional hats for this article, I took the opportunity to explore with a few additional toppers. Here are two examples 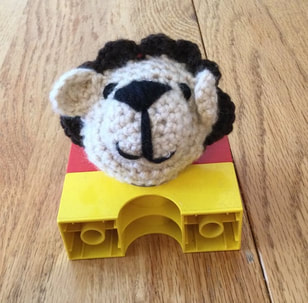  Creating my own toppers for knitted and crocheted hats involves extra research and crochet time, but I really enjoyed creating my own critters for these winter hats. As you can see from the expressions on my models' faces they were also enchanted. I leave it to you DY I (Do It Yourself) or Buy. Both are good options. With the manufactured option. you get more detail and save yourself the time and effort of making stopper. For the DIY, each piece is unique, and the price (almost none) can't be beat.
As always, I welcome your reflections and feedback. Invite you to join me on my stitching journey. Iwouldlove to see your interpretations of hats with critter toppers. |
Archives
November 2022
Categories
|

 RSS Feed