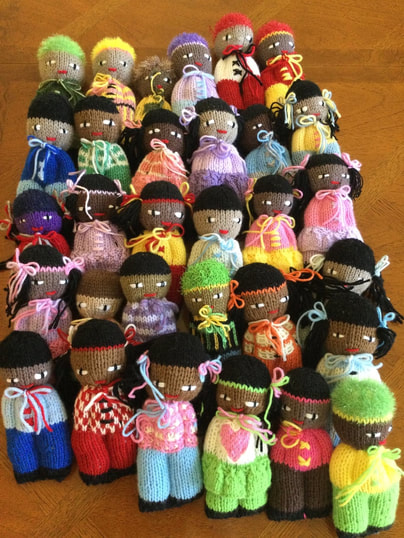
 Since I began writing about knitted comfort dolls in 2018, these articles have been my most popular posts. The original article "Knitted Comfort Dolls Made With Love" traced the origins of the doll from a Canadian soldier whose mother knitted Izzy dolls for children in waitron Bosnia. Since then, Knitting4Peace has taken up the mantel to distribute Peace Pals throughout the world and in the US, anywhere kids are suffering in areas of conflict, natural disaster or from poverty. 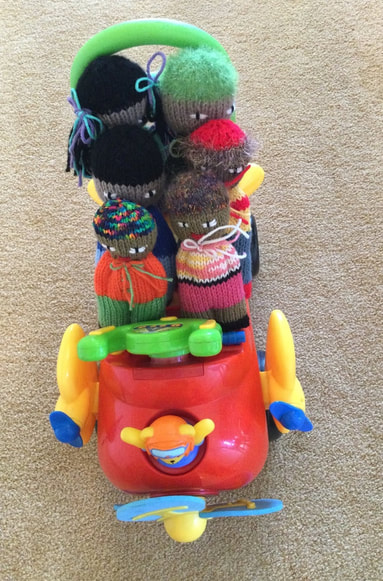 I have updated the dolls in "Knitted Comfort Dolls: A New Look" as I incorporated new hairstyles and outfits from Pinterest and Ethel Braithwaite on Ravelry. This year I am focused on working on new clothing designs to dress to dress up these adorable, colorable creatures. The girl in this handsome couple is sporting a red and white shirt with a double moss stitch to highlight the color and pattern of her shirt. Her companion has hair made from Red Heart Scrubby Sparkle Yarn. 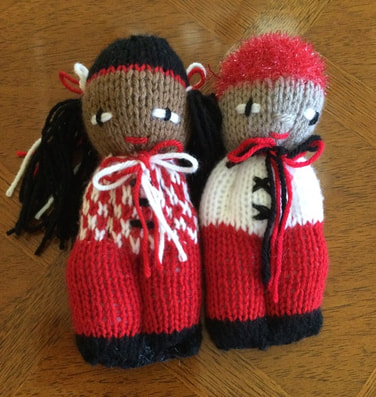 When one of my friends in my craft group contributed some dolls with striped outfits, I decided to add these designs my collection. 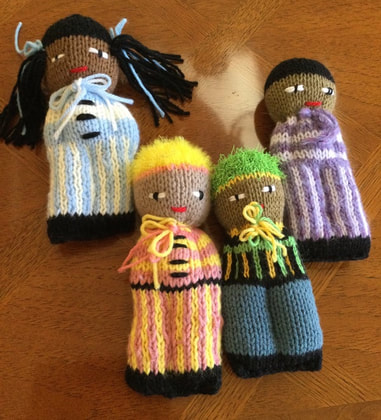 The scrubby hair dolls are so playful, and can be used for either gender or neutral situations. 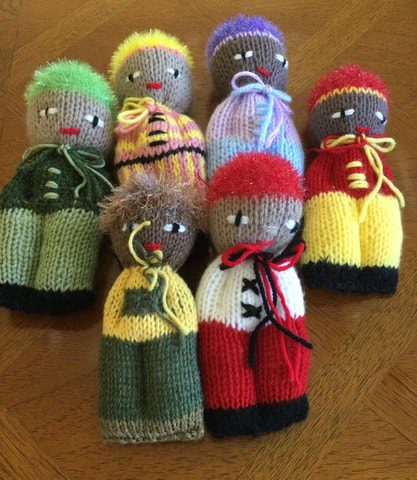 Pink and purple dolls are favorite with the girls. The skirt pattern from Knitting4Peace really dresses up these sweethearts. 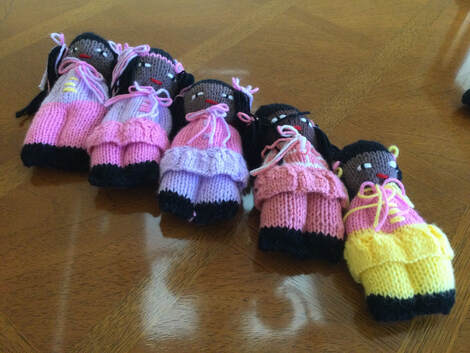 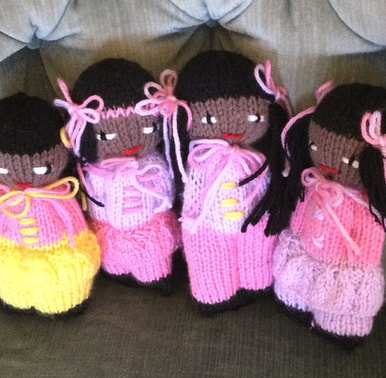 This year I got to try out different stitch patterns as I experimented with the shirts worn by my anew team of dolls. 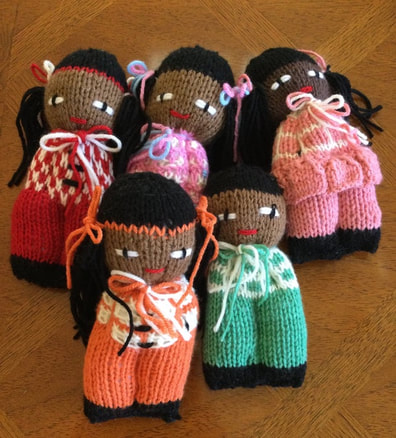 The dolls for this year's collection have beans much fun to design and knit. I hope that you will take chance to incorporate some of these ideas into your own family of dolls. I welcome you to join me only stitching journey. As always, I appreciate your reflections and feedback.
1 Comment
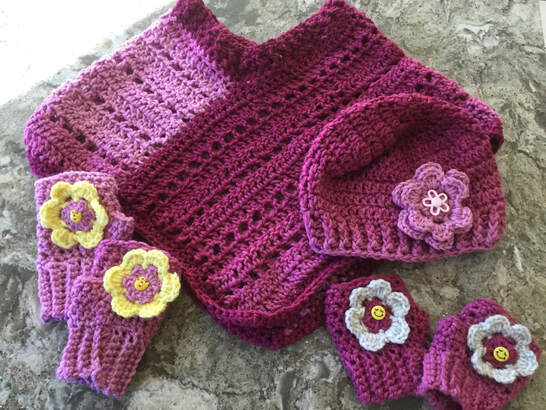
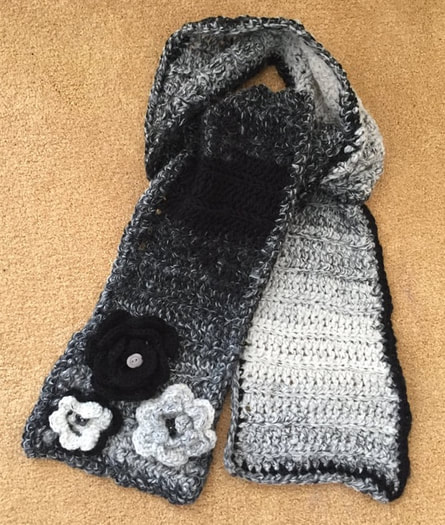
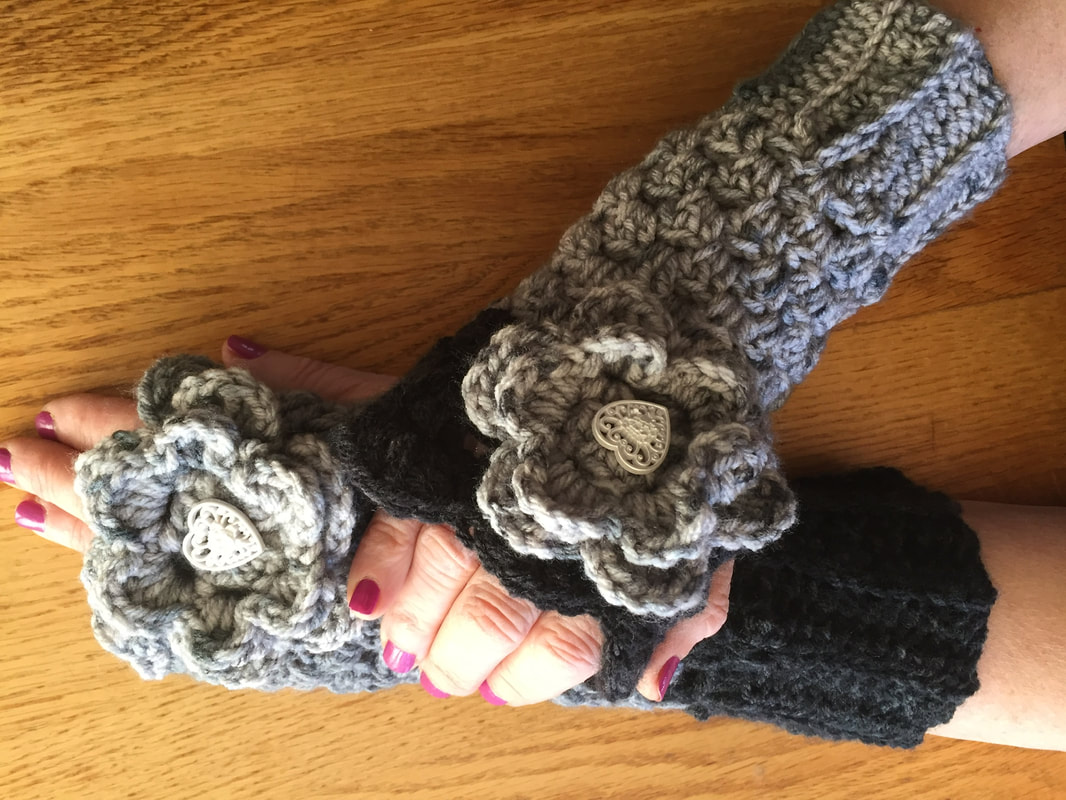
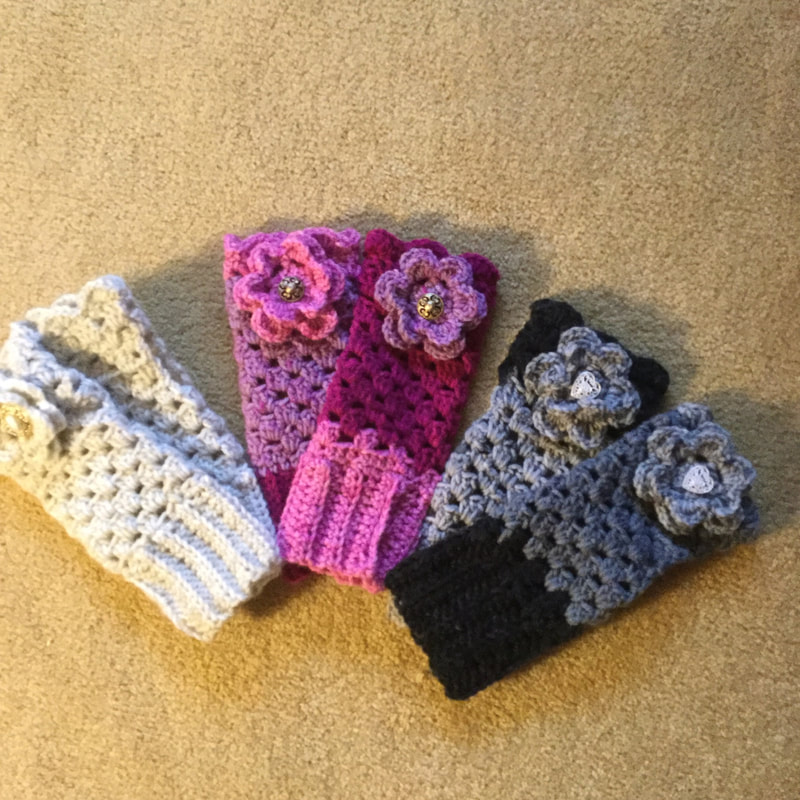
 During the past year I have found myself drawn to ombre yarns as manufacturers have expanded their stytles and color choices. I just love the way the colors blend into one another from light to dark gradients. While I originally thought the term ombre referred to different hues of the same color, I have found that several yarns have used this blending technique with more than one shade. Each is beautiful in its own way. When I began researching for this article, I was surprised to realize that I had actually crocheted with ombre way back in 2017 (http://www.lilcreates.com/lillians-blog/crocheting-adventures-in-ombre). Using Red Heart Super Saver Ombre, I crocheted a toddler sweater and hat set in blue denim, a scarf with flower decorations in grey-black tones, and a toddler poncho and hat in rust-like shades. At that time, I was also creating with Lionbrand Scarfie and Sweet Roll Cakes. Ombre yarns are fantastic to work with in crocheting mismatched fingerless mittens.
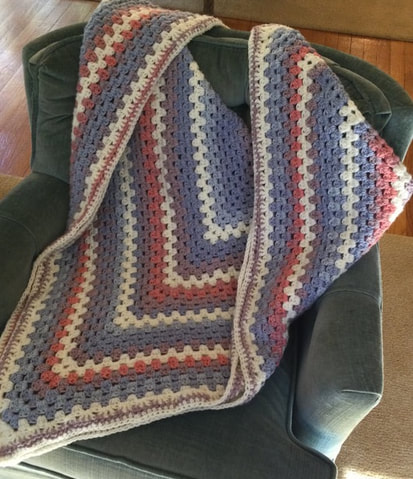
  Most recently, I crocheted a throw with an artistic border that I donated to my local chaper of Threads of Love. 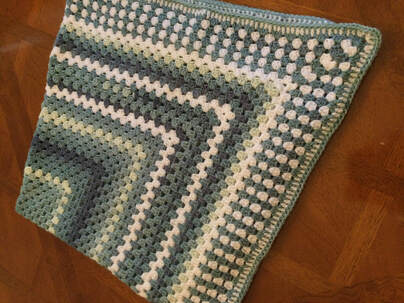 However, when I came upon Caron's Jumbo Ombre in shades of blue to blush and coral, it was true love. I just had get my fingers into those skeins to crochet an additional throw for my charity. The colors reminded me of Sedona in Arizona where coral cliffs stand out sharply against the bluest sky. The Caron ombre contains about 100 more yards than its Red Heart counterpart and is somewhat softer. After crocheting a large center square, I extablished a pattern of two rows of off-white with 5 rows of ombre in an extended Granny Square Throw. A single round of half-double crochet in off-white finished off the piece. Of all the throws that I have made, this piece was probably my favorite. Unfortunately, the color and pattern did not coordinate with my furnishings or I would have kept the throw for myself. Still, I am cheered at the thought that an individual in need of a warm hug will take joy from this special piece. 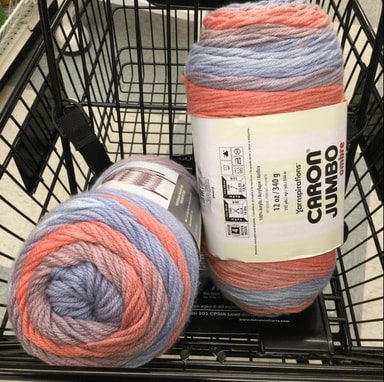 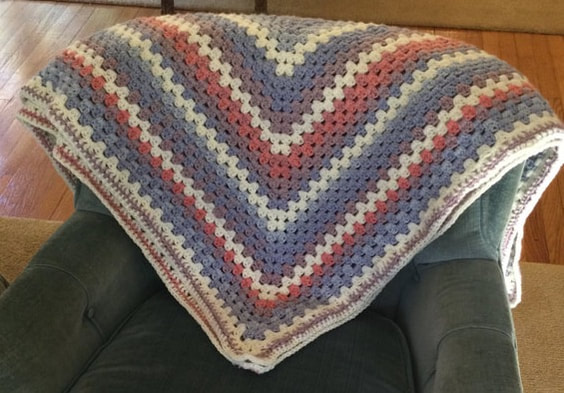 Lion Brand Mandala Ombre is also a worsted weight. This yarn is perfect for the shawls that I make to accessorize my wardrobe or to donate to cancer patients. Two skeins of 344 yards were sufficient to crochet a lovely draped shawl in the in the Dewdrop Shawl Pattern (http://www.lilcreates.com/lillians-blog/free-crochet-scallop-wrap). I like to wrap the shawl and fit the ends together with a shawl pin. While most of these skeins come in multicolored ombres, I crocheted one shawl in Harmony in denim shades and another in grey-black tones labelled Cool. Felicity includes magenta, medium pink, dusty coral pink, and elephant gray and is waiting for my hooks maybe my needles. 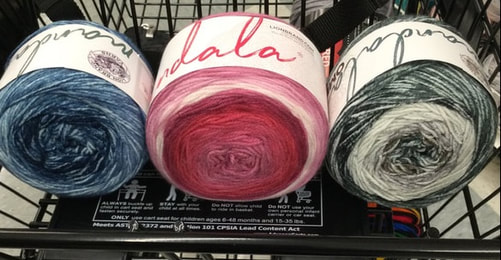 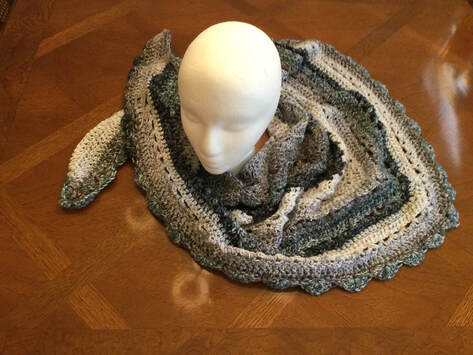 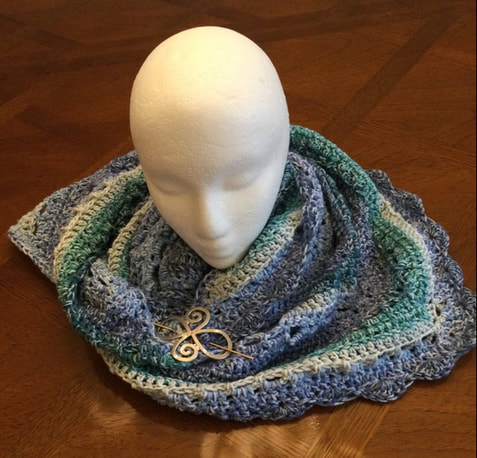 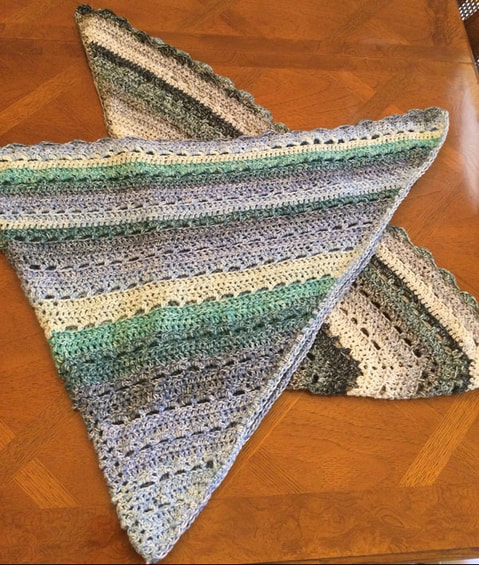 Have you caught the ombre bug? Please share your experiences or photos in the comments. I appreciate your feedback and reflections. As always I welcome you to join me to on my stitching journey.
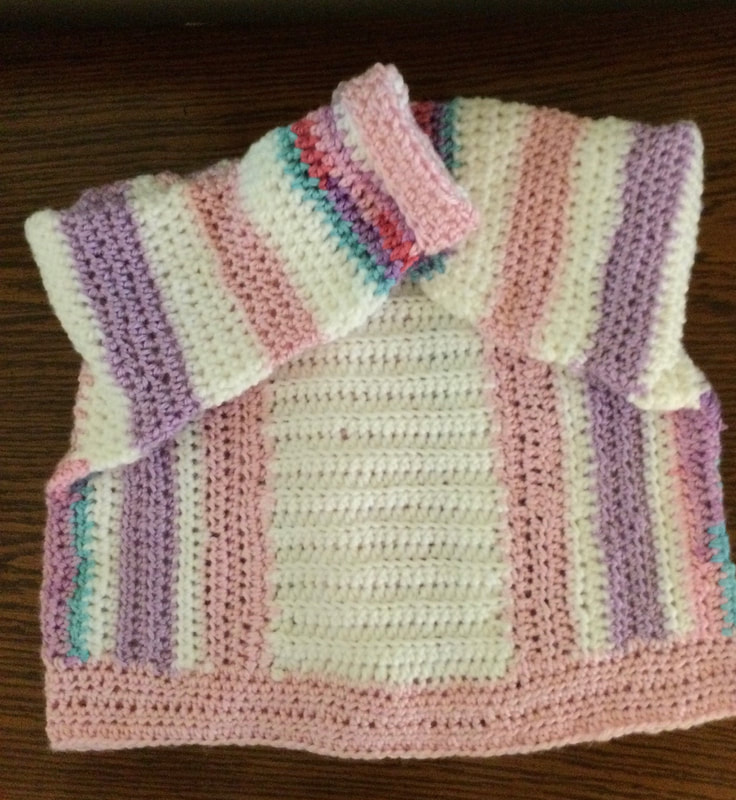
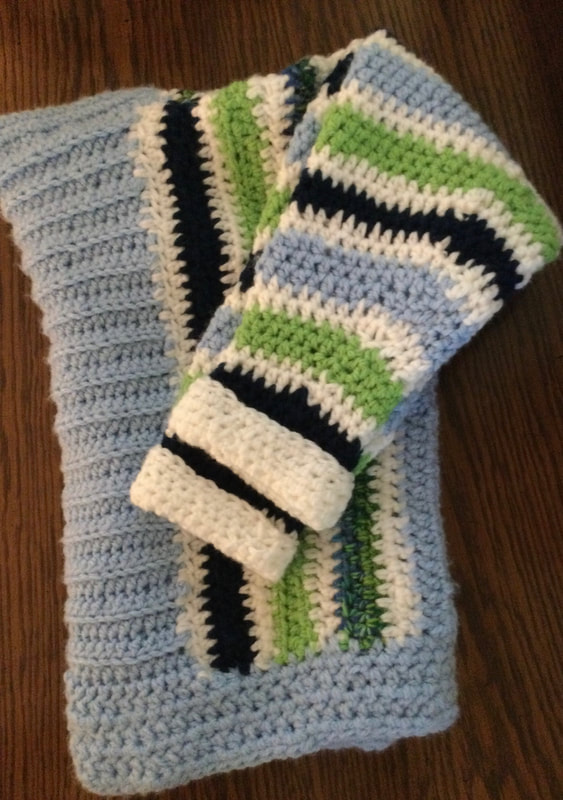
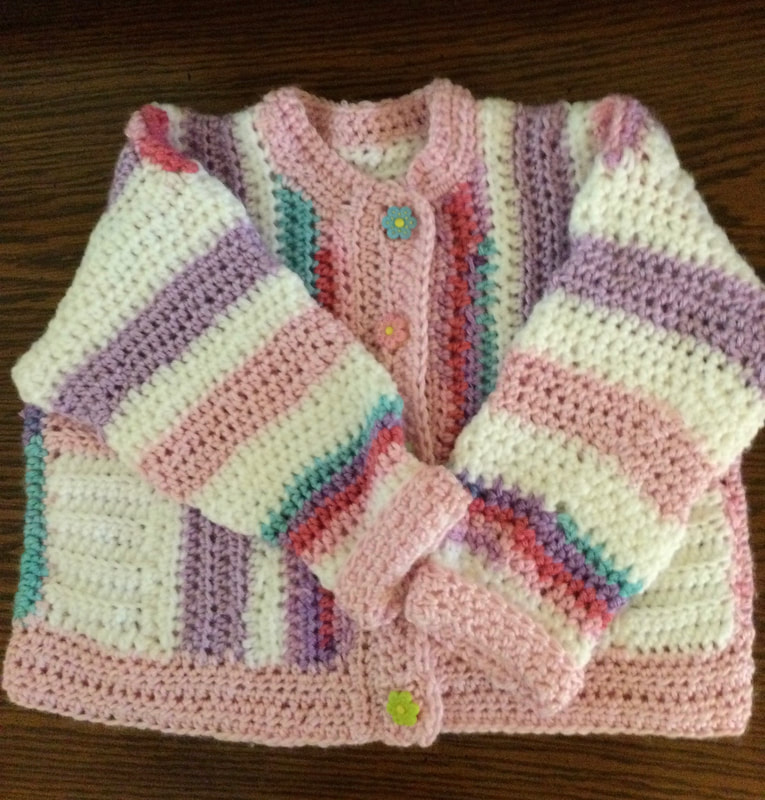
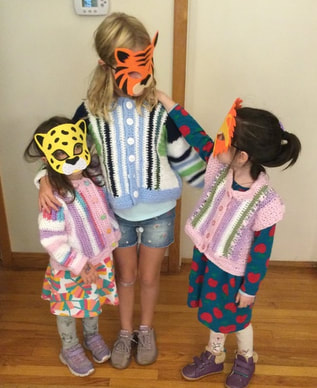 The highlight of our holiday family gathering was my granddaughters' fashion parade. Donned in their animal masks and individually tailored crocheted, freeform. striped and patchwork cardigans, they posed for photos and gleefully marched the length of the hallway and returned through the living room. Their parents and grandparents cheered and encouraged them as they paraded through the house in their new sweaters. 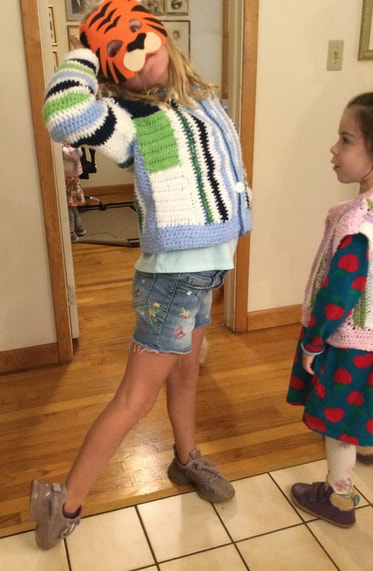 Having mastered the knitted form of these freeform cardigans, I switched my focus to explore crocheted versions. (http://www.lilcreates.com/lillians-blog/embracing-colors-and-stripes-to-design-a-girls-knitted-cardigan).Still compiling colors and stripes, I wanted to crochet to create my designs. Each girl chose her own colors. I worked worked without a pattern, using their measurements as my guide while adding several inches of positive ease for a roomy fit. 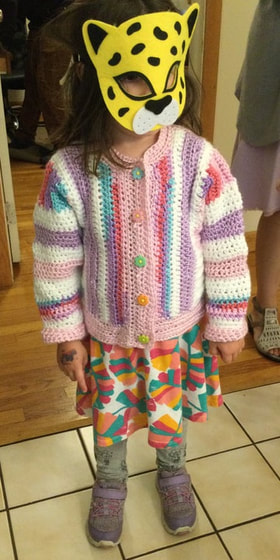 This post started as three separate articles. However, since the process was similar in designing each piece, I decided to combine my efforts to explain the process. Then I could add details that were specific for each piece. I would be crocheting cardigans in sizes 4 and 8. The vest was crocheted in size 6. 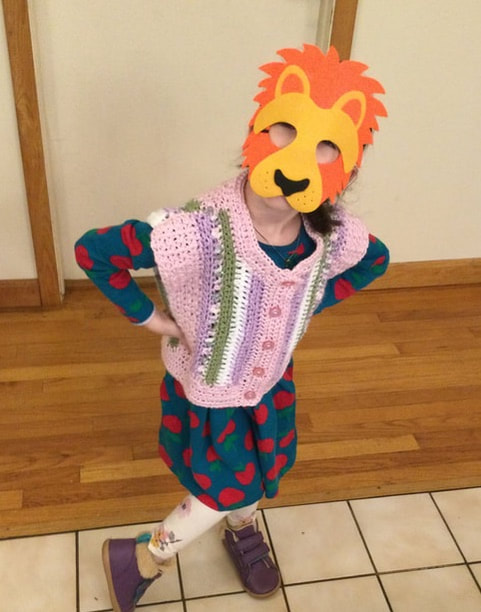 Each piece begins with a rectangular panel that stretches from thence to the bottom ofd the garment. The size 4 was crocheted in white in HDC on the back loop only. The size 8 was crocheted in light blue, using the same stitch. The size 6 was crocheted in a V stitch in pink yarn.
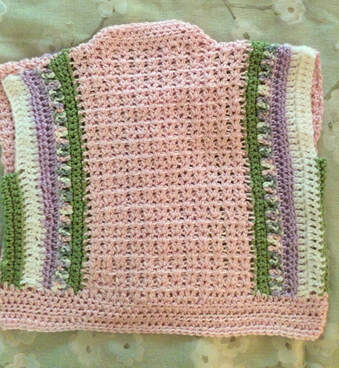 Nest, I turned the back panel 90 degrees and picked up stitches along the length.of the panel. Stripes in the child's chosen colors were crocheted on each side on each side of the panel. Size 4 were done in pick, white, purple, and a pink-purple variegated yarn. Size 6 was done in pink, sage green, white, purple, and a multi-colored yarn. Size 8 was done in light blue, navy, white, multi-colored, and neon green. Once I reached almost 1/2 of the circumference, I added a shorter section that reached from the bottom of the back to just below the armhole. This section was the transition to the front.
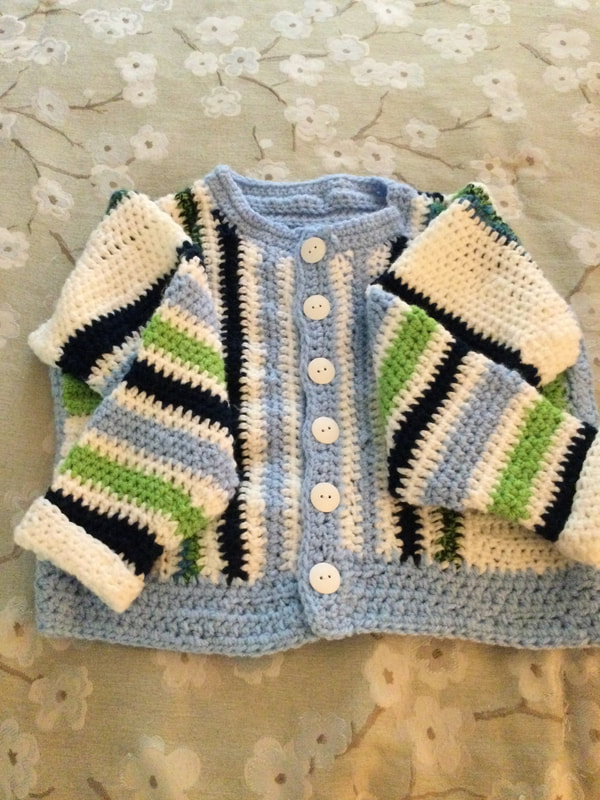
 To make the front, I had to start with a piece that was separate from the rest of the garment. For sizes 4 and 8 I crocheted a 2 inch strip that used 3 colors in blocks. The size 6 was done in pink. Then I crocheted the strips to the side piece from the bottom up. This process enabled me to form the armhole. I turned the work again to crochet about 3 more stripes before working on the neckline. decreasing a stitch in the next 4 rows, I repeated the steps on the other side of the sweater. At this point I crocheted the shoulders with right sides together so that I could pick up stitches around the armhole that would be crocheted in the round. These directions relate only to sizes 4and 8. sweaters. Since I made the size 6 with yarns left over from the size 4 sweater, I was running out of the pink yarn, My friends in my craft group suggested that I leave the piece as a vest since the armholes had a neat edge. The 5 1/2year old granddaughter already had several knitted sweaters, and the vest idea really appealed me. For the size 4 cardigan,I picked up 50 stitches, and for the size 8 cardigan,I picked up 60. I placed a stitch marker at the starting point so that I identify rounds. For each sweater I decreased one stitch before and one stitch after the marker at regular intervals until I reached the desired sleeve length. The sleeves were crocheted in striped in HDC. I alternated white with colors for contrast.
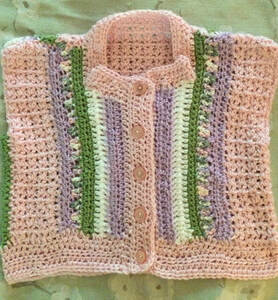
Before I could crochet the button bands I crocheted the neck/ collar in single crochet (sc) for 3 rows. The borrombandswas crocheted in HDC for 5 4ows. To form the left button band,I picked up stitches along the length of the sweater each crochet 4 rows in sc. Buttonhole placement went on the right side and was determined by the number of stithes. Row 1: Pick up and sc crochet stitches along the length of the front. (sc) Row 2: Crochet 2 stitches, *skip 2. Crochet number of stitches needed for sweater. For size 4 sweater repeat from * 3 more times . For size 8 sweater repeat from * 4 more times. Skip 2 more stitches for last button hole. Size 4 had 5 buttons, and size 8 had buttons. Row 3: Crochet in sc across. Make 2 stitches in the skipped space. Row 4: Crochet in sc across. To strengthen the buttonholes, I used a tapestry needle to sew buttonhole stitches around each buttonhole. 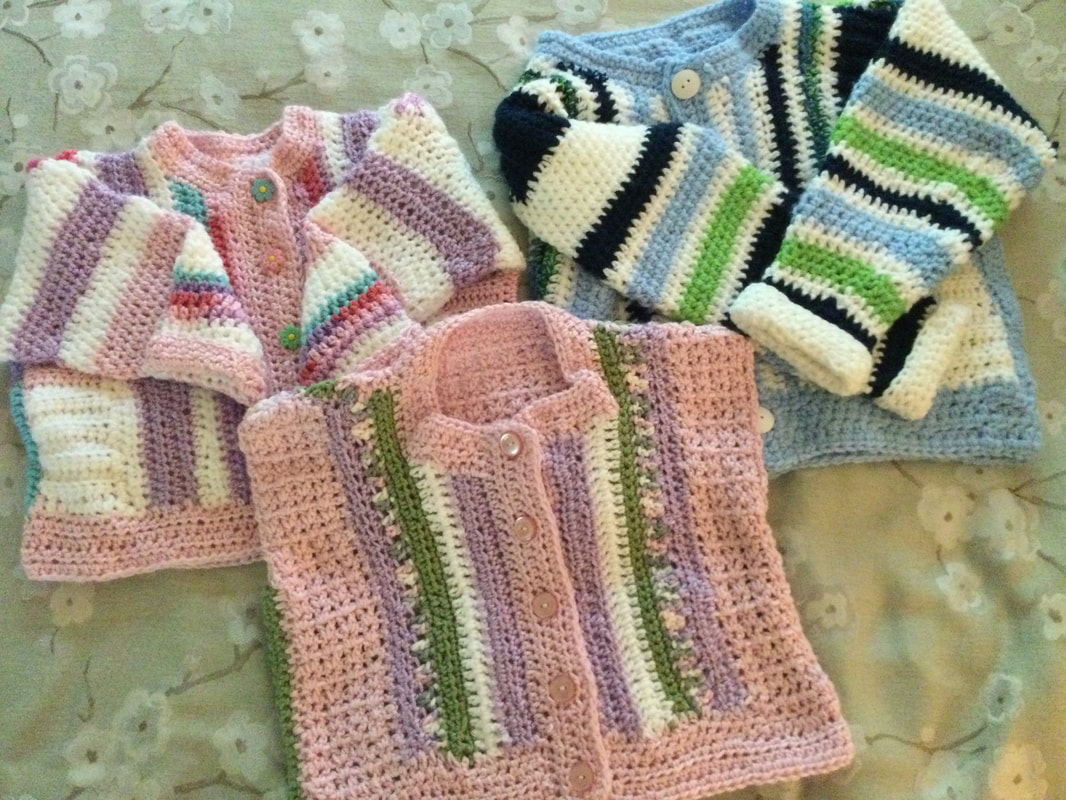 The girls were delighted with their sweaters. The youngest who is sometimes resistant to wearing and being photographed in the sweaters I make for her, wore her sweater for the entire evening. The oldest struck dynamic poses and asked me to make a vest similar to the one I made for the 5 1/2 year old. This gal was eager to wear her sweater to kindergarten. As I had been working without a pattern, each time I designed a sweater, I became more accurate. The lessons I learned from ny knitted versions served me well.
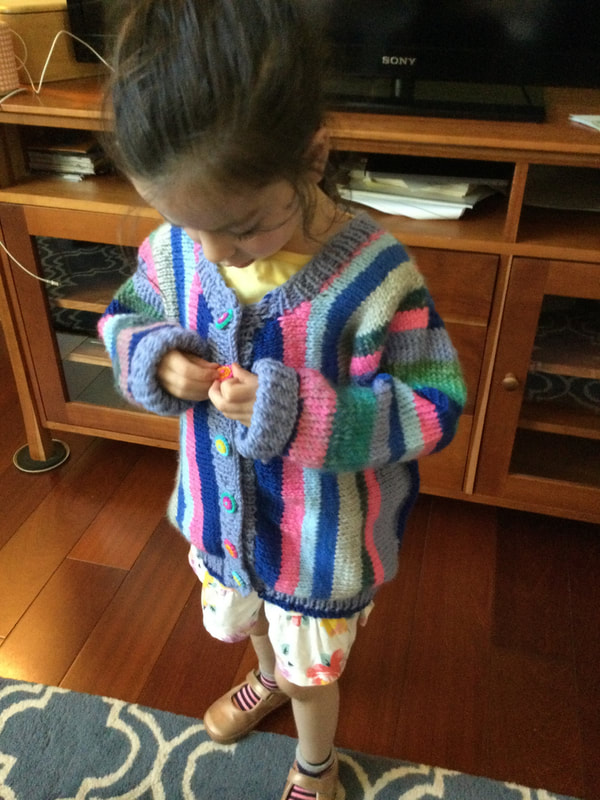
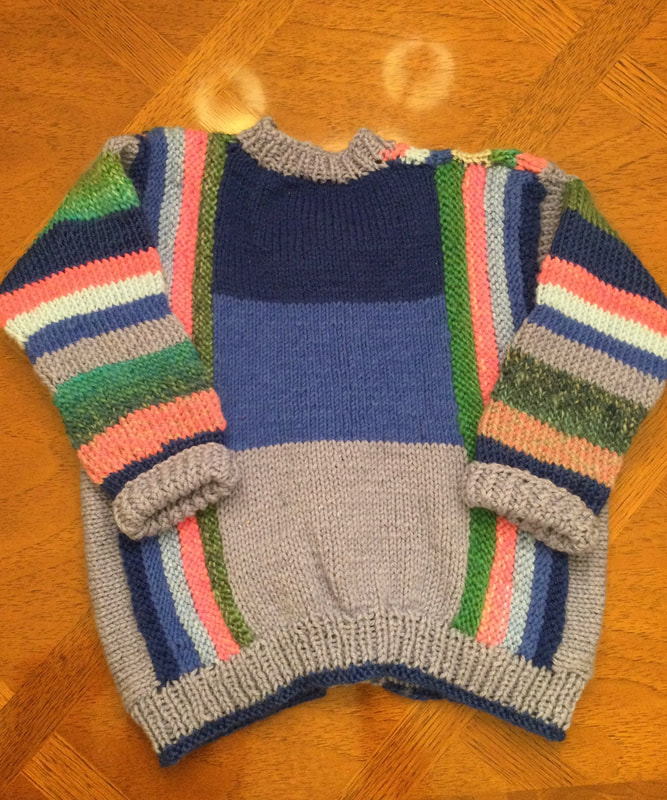
I called these designs freeform, but they were still done with stripes and rectangles. While scrolling through the freeform designs on Pinterest, I found panels that were done with swirls, curves, and oddly shaped pieces that were joined together to form panels and sections of sweaters. Since I have several other projects that need my attention, these designs will have to wait until Itime when I do not have so many other crafting commitments. However, these freeform designs will remain on my future todo list. As always, I appreciate your reflections and feedback. I welcome you to join me on my stitching journey. 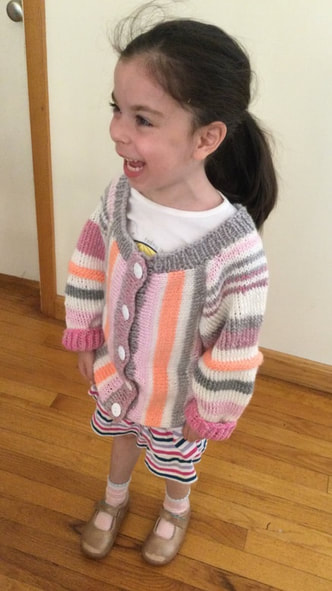 I just love the way stripes and colors play with each other to create fantastic sweaters and cardigans.The works of many artists, especially Stephen West (West Knits), have inspired me to interpret the process of joining the vertical and horizontal knitting to produce sweaters of my own. The model that I frequently use is my darling 5 1/2 year old granddaughter who is growing into size 6. Using her measurements and a sweater that I had already knit for her as a base, I launched my first project. It wa great to incorporate my scraps to bring out pops of color. Remnants of a neon pink-gray multi, light pink, tangerine, and white made for a cheerful combo. 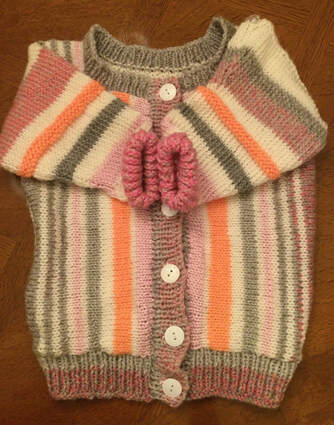 Since I ws constructing my piece entirely without pattern, it would be creative experiment -- a kind of knit as you go effort. As I knitted, I added stripes based on contrast and the amount of yarn I had available. I started with an 8 by 11 inch tall white seed stitch panel. Then I turned my work 90 degrees and picked up stitches along the length so that I could work horizontally. Stripes that created welts were purled in grey, pink, tangerine, and white on either side of the back panel. A wider short strip in grey multi made for the transition to the front in shorter rows that allowed for the armhole. Stitches were cast on so that the front of the armhole would match the back. On the front I continued to add stripes that coordinated with the back. For the sleeves, I picked up 60 stitches and knit in the round alternating white with colored stripes The beginning of a row was marked so that decreases at regular intervals could be made before and after the start of the row. The collar, bottom bands, and the button bands were ribbed in pink-gray multi. 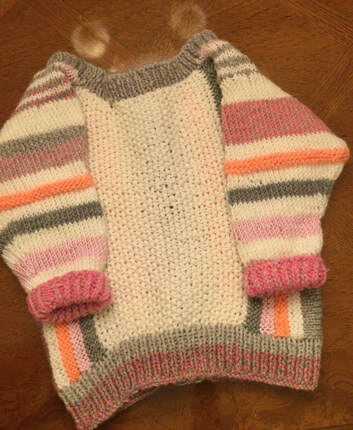 As a first effort, I was generally pleased with my sweater. I loved the way the stripes and colors played with one another. The sweater was slightly larger than my granddaughter's size frame, but was consistent with the other size six sweaters I had knit or crocheted from a pattern. She is growing and will be wearing this piece into the spring season.
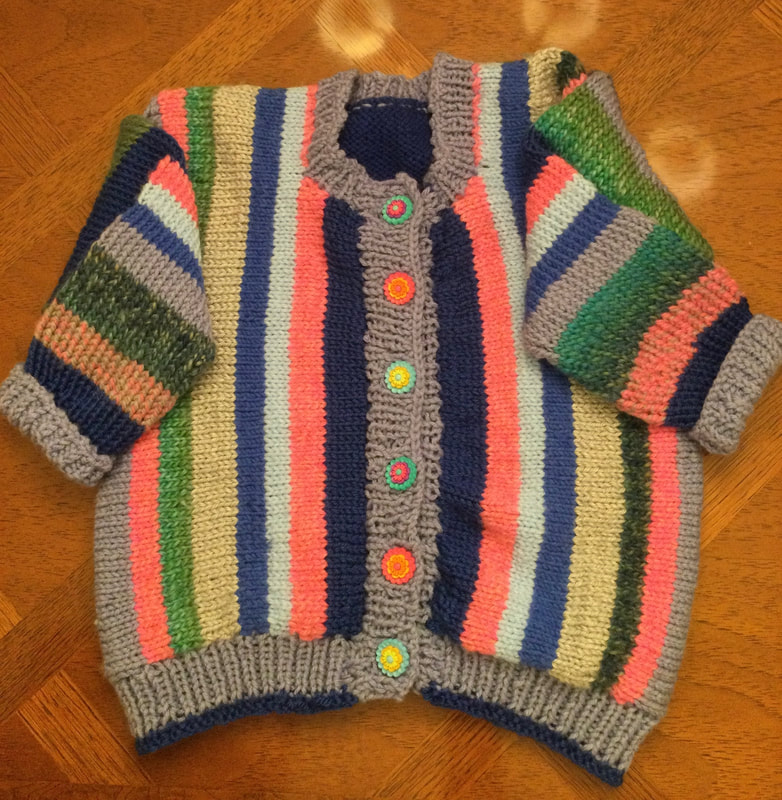
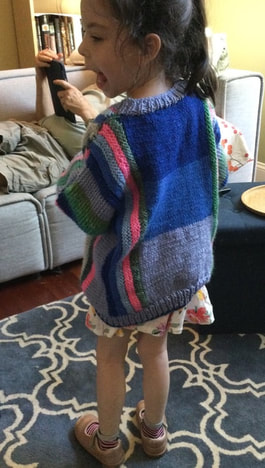
This time I started with 3 narrower color blocks, knitted in stock and net, in grey-blue, medium blue, and dark blue. When I turned my work the stripes were knitted in blue green, neon pink, grey blue, medium blue, and dark blue on both sides of the black. Grey-blue was used for side and underarm. Again, I played with an array of stripes to form the shoulder and front. Decreases were made to form the neckline. As in the first sweater,I pickled up about 60 inches from the armhole to make the sleeve. The sleeves were knitted in the round with stripes in the same colors as the body of the sweater. I put a stitch marker into the beginning of the rows so that I could make decreases at regular intervals before and after the marker. The cuffs, neck, bottom, and button bands were ribbed in grey-blue.When I ran out of grey-blue yarn, I just added a few rows of dark blue to get the correct length.
The neckline of this sweater was better fit as I made the shoulder at least 1 inch wider on both sides. However, what made this sweater exciting were the fantastic buttons that used most of the colors in the sweater and highlighted the stripes. I could not resist them.
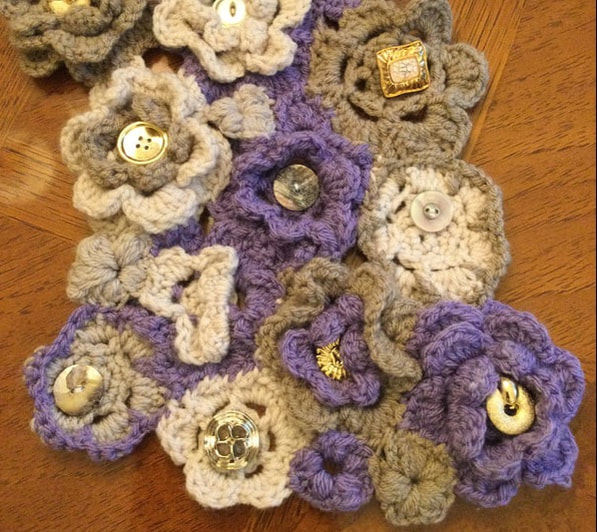
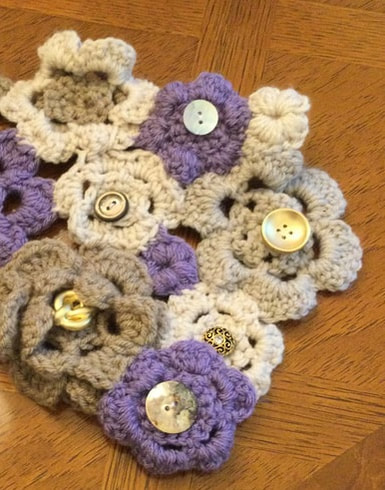
i thoroughly enjoyed this knitting adventure, since I did not know how either sweater would evolve when I started to knit. Now I plan to expand this process to a crocheted version. Please remember folks, the development of these sweaters was a process and not a specific pattern. I hope that you will try to experiment on your own. I invite you to join me on my stitching journey. As always I appreciate your feedback and reflections. 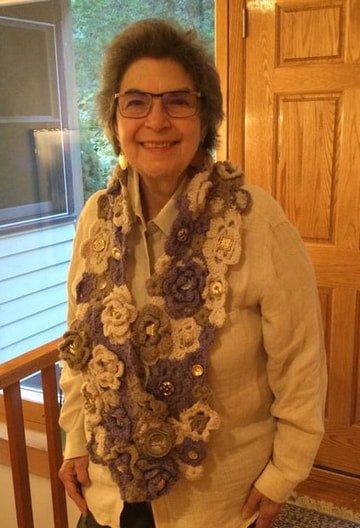 My crocheted floral scarf was created as a freeform 3D piece from individual motifs that were joined to form the finished piece.The original inspiration was a Lacy Floral Scarf featured in Noro Knitting Magazine #4 (2022).It was crocheted with a single skein of Noro Sock Yarn that's a #2 weight in bright jewel tones. While I applied the process to create my scarf, I changed just about everything else. I incorporated muted hues in worsted weight yarns. The original scarf was 5 inches wide and 44 inches long. I needed amore substantial piece as I am taller, ands I needed enough flowers to fill in a 7 inch wide scarf that would be 57 in ches long. Creating the scarf starts with crocheting the individual flower motifs in bud, small, medium ,and large sizes. I started with the number of flowers recommended in the original scarf, and added flowers as I constructed mown.. I ended up with 20 large flowers, 7 large open work flowers, 6 medium flowers, 16 small flowers,and 22 tiny buds. Surprisingly, my local Dollar store has added a yarn section. The selections of Premier Just Yarn worked well with my project. I used about 3 linen and 3 taupe. Then I added lavender Impecable yarn from Michaels that I had in my stash. I worked with a G+ (#7) hook to create my floral motifs. 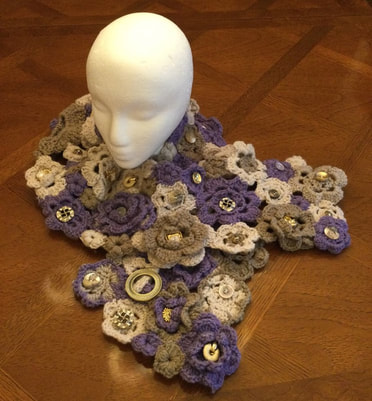 In the beginning I followed directions for the flowers suggested in the magazine, but I found that I preferred to work with my favorite flowers that I have used for many projects through the years. My flowers yielded different textures so that the scarf had a 3D aspect. Since I crocheted from memory, I had to look for flower patterns that would provide my readers with simple accurate directions. The large and medium flowers were similar those found on Pinterest: Free Crochet Flower Pattern at stitching-together.com. As these flowers can be made in one, two, or three layers they worked well in my design and enabled me to use more than one color in some of the individual flowers. I also created a large flat motif that allowed changes in texture and design. The bud was similar to Easy Puff Flower Free Crochet Pattern also found on Pinterest.
Now I had a pile of flowers that I would combine to create my scarf. I lay the pieces out on my kitchen table as I combined sizes, textures, and colors. I started with the larger layered and flat pieces and filled in with the medium and small. When there were holes, I added buds to fill in the area. When I reached the original 45 inch length, I calculated that I would needed more flowers to add 6 inches to each side. That meant I would crochet about 8-10 more large flowers, 4-6 more medium blossoms, 4-6 more small bits, and about 10 more buds.Building the freeform scarf was an evolving process, and I moved pieces to develop contrast and balance. Since I wanted to remember the location of each flower if I had put the work aside before I finished sttching the flowers together, I took several photos to ensure that I would get the exact placement. To connect the flowers, I sewed with an overhand stitch with yarn from the flowers. When possible I sewed with yarn that was used in the specific flower. As the colors were all muted, and there was ample texture, most of the stitches seemed to disappear in the work. The finished piece measured 5 inches below my waist. The scarf had a lot of body to it and hung straight. I used a simple shawl pin to close the scarf with style. 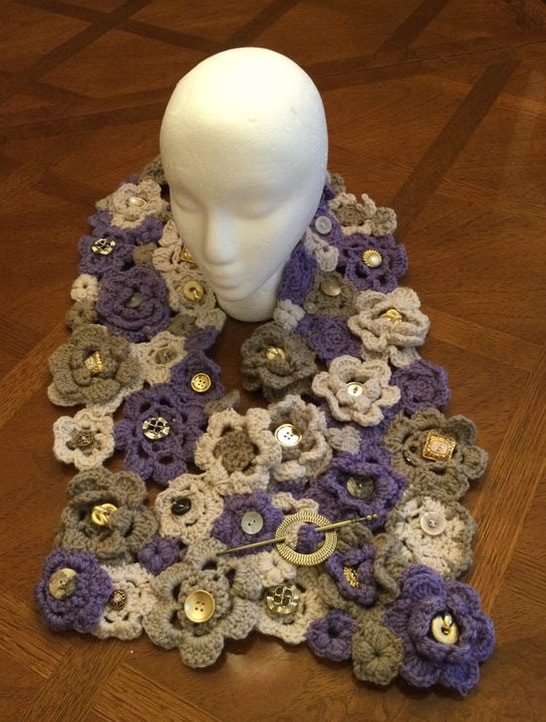 Still I was not finished. The muted colors needed some pizzaz. I dug into my extensive button collection and obtained many different gold tone, natural shell, and other different buttons.. I extended the scarf to its full length and sorted the buttons by color, size, texture, and interesting features. This was another part of the freeform process. I felt as though I was painting as I placed the buttons on the flowers. Since it would be difficult to pick up the scarf and buttons if I had cleen up before I finished, I alloted about 2 hours for this process. However, I took photos of my button placement since I had to lift my working edge as I secured the individual buttons. I was thrilled that I had so many different buttons in my stash. They were just the right accent to the scarf add light and dimension to my creation. When winter comes I will be ready with my sculptured f scarf. I enjoyed the challenge and process of creating this piece without a specific pattern in a freeform design. It was a process rather than a definite set of directions. I seem to be entering a new stage of my crocheting and knitting career. In subsequent articles I will be featuring freeform sweaters that I created for my granddaughters.
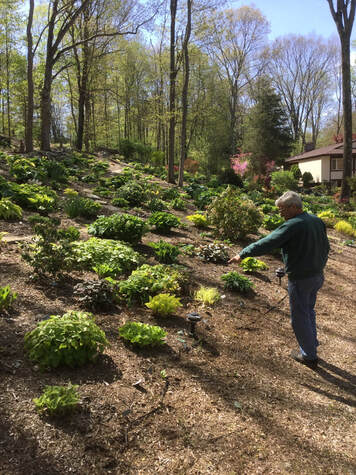
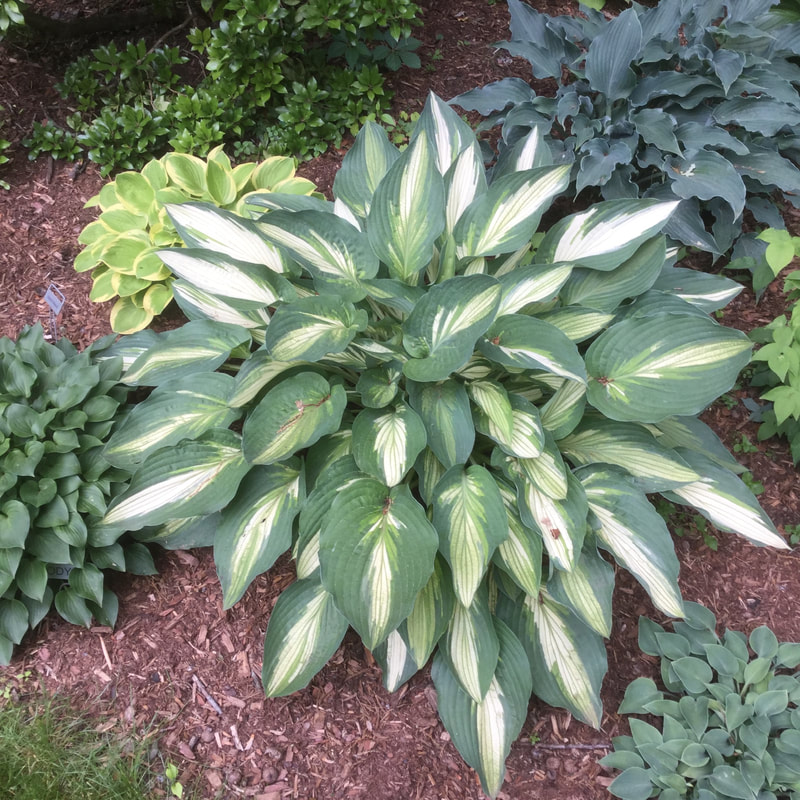
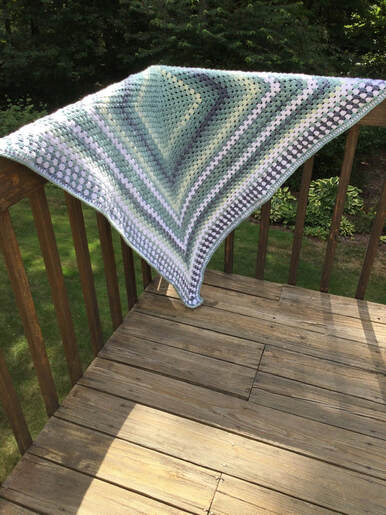
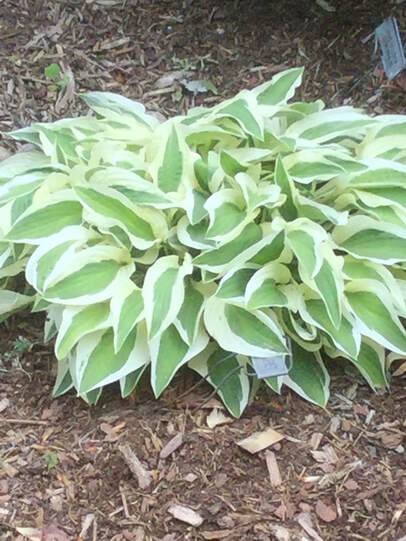
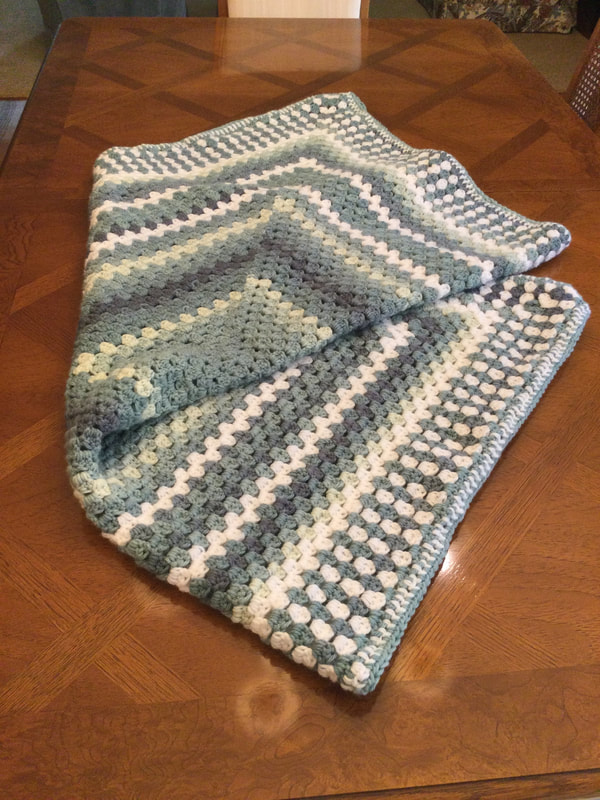
As always, I appreciate your reflections and feedback on my work and the creative process. I welcome you to join my stitching journey. If you decide to make your own freeform floral scarf, i would love to see photos of your work. 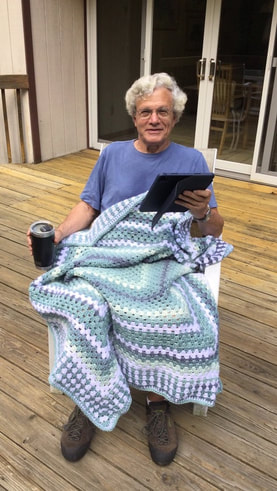 Each growing season I celebrate the joy and spirit of my husband's lush garden and how it inspires my stitching creativity. Last year I crocheted a queen size extended throw for my begin shades of sage, taupe, bone, and variegated hues. This year I was gifted 2 large skeins of acrylic Caron Jumbo Ombre (595 yards( that ranged from the palest green to the deepest blue-green. I also knew that I would use strategic rows of Joanne's acrylic Big Twist (380 yards) in white to provide contrast. The green hues and the white rows mirror many of the leaves of the of the Hostas in our garden. Whether I look out any window in my home, eat dinner on the raised deck, read in a shaded area under the porch, or drive in or out on our long driveway from the house, I marvel at the beauty of his evolving creation. I just hope that my crocheting and knitting do it justice.
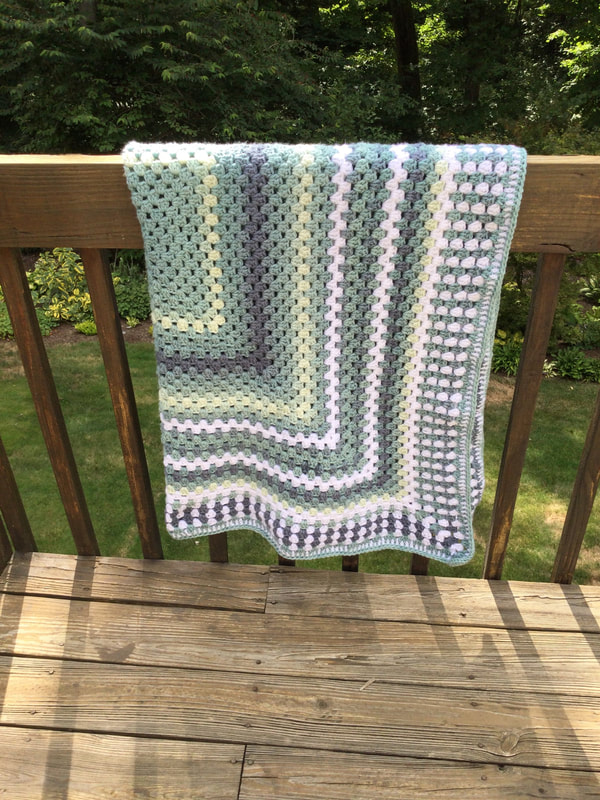
As with many of my extended Granny Square Blankets, I start with a concept, but the design emerges as I stitch. The ombre yarn includes several gradient hues, and I crocheted most of the first skein into a 24 inch square without having to change yarns. At this point, I included 2 rows of white for contrast. As the design began to evolve, I decided to crochet 5 rounds green ombre followed by two rows of white. I planned to repeat this pattern, but I was concerned that I would be playing Yarn Chicken.. I worried that I would not be able to complete my creations I envisioned it. Luckily, my trip to Joanne's was successful, and I was able to buy a third skein of the Caron Jumbo Ombre and a second skein of the Big Twist White. Now I had the freedom to execute my piece without any shortcuts.
There are two parts to my artistic 4 inch border that gives a snap to my throw. First, by alternating single horizontal rows of green ombre and white, I can achieve alternating vertical rows of green and white that surround the main portion of the blanket. The ideal number of rounds is 7, starting with the dark color, following with white and going back to dark green, etc. It is counterintuitive to think that I can achieve alternating vertical rows by crocheting alternating horizontal rows, but it works. I finish the border with a single round of white in Half Double Crochet (HDC) followed by single row of the green ombre in HDC. The way the stitches merge is magic. 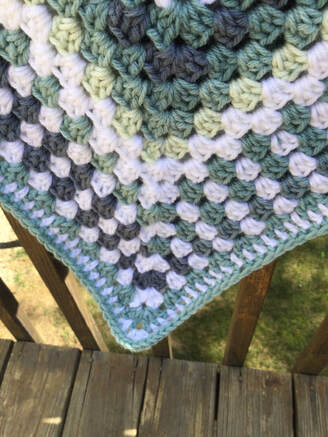 The completed throw measures 52 inches square. It will be donated as a men's throw to my Threads of Love group for our October collection. I enjoyed working with the ombre yarn as I can incorporate several gradient shades without having to change skeins as I did with my previous blanket. Although I usually crochet with Red Heart Ombre, I was pleased with the colors. textures, and ease of stitching with the Caron Jumbo Ombre. I believe that this throw measured up to the standard of my husband's garden. I will be proud to display it until our collection date. I can see several more ombre projects my future.
Although I provided a sequence of color design in my narrative, it may be easier for the crocheter to follow a specific pattern list of rounds and color changes. Most of the throw is crocheted in an Extended Granny Square that uses clusters of 3 double crochet stitches (DC) Begin with 24 rounds of ombre that measures approximately 24 inches on a side. Crochet 2 rows rounds of white. Crochet 5 rounds of ombre. Crochet 2 rounds of white Crochet 5 rounds of ombre. Crochet 2 rounds of white. Crochet 1 round of ombre. Crochet 1 round of white Crochet 1 round of ombre. Crochet 1 round of white. Crochet 1 round of ombre. Crochet 1 round of white. Crochet 1 round of Half Double Crochet (HDC) in white. Crochet 1round of Half Double Crochet (HDC) in ombre. 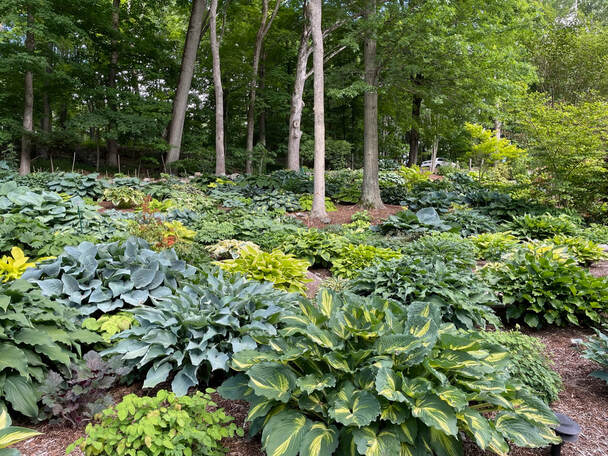 As always I appreciate your reflection and feedback. I welcome you to join me on my stitching journey. Although I used green ombre in my piece, there are so many possibilities open to you with different combinations of ombre yarn. If you decide to try your hand, I would love see a photo of your work.
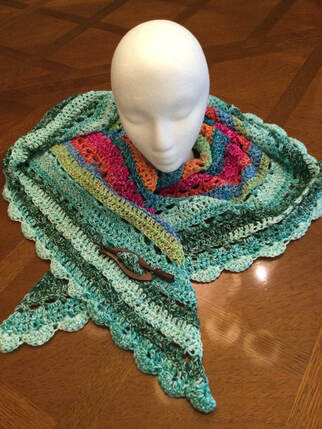 My version of the Crocheted Dewdrop Shawl also known as the Spring Scallop Crochet Wrap was designed by For the Frills. It was created using 2 skeins of light worsted weight Lion Brand Mandala Ombre in the Happy and Zen color ways. While there is some overlap in the shades of the two skeins, the Happy skein is generally in rainbow lollipop colors, while the Zen skein is cooler turquoise to darker blue green. Strands of white run through each skein so that the two skeins can easily be worked toegher. The body of the shawl was crocheted with a J (6.0mm) hook. The scallop border was crocheted with an I (5.5mm) hook. The Crochet Dew Drop Shawls is an ideal piece for spring and summer. The colors are bright and cheerful. The piece is substantial and drapes beautifully, but the yarns are lighter end of the worsted category. The shawl measures 68 inches wide and 26 inches deep. For the original pattern, see: https://forthefrills.com/spring-scallop-crochet-wrap-free-pattern. 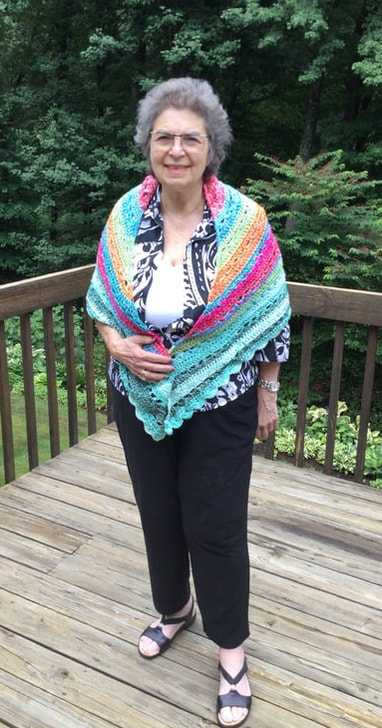 The Dewdrop Shawl was actually my fourth attempt to integrate these yarns into one piece. My first two attempts were a gradient boomerang knitted style. By alternating the warmer and cooler color ways, I had hoped to achieve an interesting swirl of colors as the self-striping yarns played with one another. The pattern called for #8 needles , but after knitting for about 10 inches, I found my work to be tiny and insignificant. Even after I frogged the piece and switched to #10 needles, I was not happy. Therefore, I switched to crocheting an asymmetrical triangle by alternating two rows of warm and dark colors as I increased on on one side to form the shawl. The colors were networking for me. When I found the Dewdrop pr Scallop Crochet Wrap, I knew I could start with the Happy Yarn and complete the piece with the Zen yarn.This top down shawl has an airy style. After the initial set up, there is generally a 4 row sequence.1} Double Crochet 2) Chain and Slip Stitch 3)Double Crochet in chain 4)Double Crochet. Increases were made in Chain 3 + 2 in first stitch and 3 DC in final stitch. The piece was also enlarged by crocheting DC-Ch2-DC in the center. A lovely scallop on two leg sof the triangle is the finishing touch. 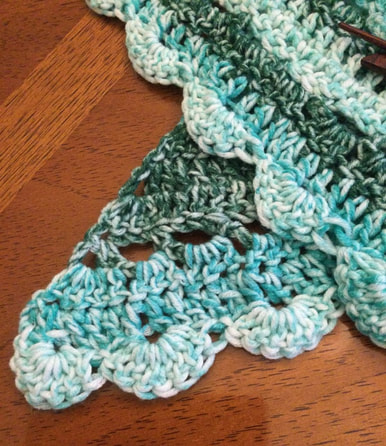 I adapted the creator's design in three ways. 1)I started each row with a chain 3 instead of a ch 2 so that the shawl would lay flat and the wings would not turn up. 2)I used two coordinating skeins of Lion Brand Mandala yarn instead of an ecru or other spring color.. 3)I began the scallop with a skip 2 stitches instead of a skip 3 so that there would not be a gap near the edge. I crocheted the scallop with an I (5.5mm) hook instead of a J hook. 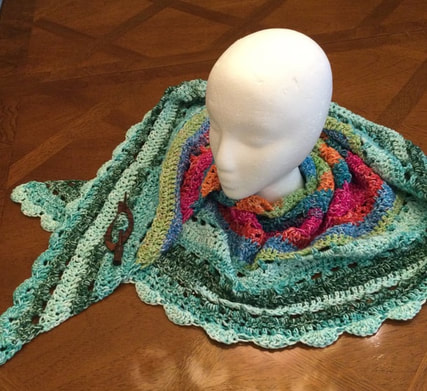 I am thrilled to donate the Spring Scallop Wrap fo my local chapter of Threads of Love as we knit and crochet out way to 1000 pieces by December 31, 2022.I am proud that I persevered as I struggled to find just the right pattern for these delightful yarns. The piece is designed to put smile on the face of the woman receiving it.
As always I I appreciate your reflections and feedback. Have you ever kept exploring until you found just the right pattern for a particular yarn at hand? While I usually start with a pattern and find the yarn to work with it, in this case I reversed the process and started with the yarn. I welcome you to join me on my stitching journey. I hope you will enjoy crocheting this delightful wrap.  The boomerang style shawl offers infinite possibilities for pairing colors within a simple design framework. Yarnspiration's FREE pattern Brighten My Day Knit Wrap designed by Nanch J. Thomas provides clear directions for a beginning knitter while producing a piece that would do any crafter proud. . On a recent trip to Walmart of all places, I was attracted to the worsted weight Polo Red Heart Super Saver Stripes (236 yards). The colors spanned a range from tourquoise to purples to raspberry before repeating the sequence. When I examined the label I saw the design that was shown in this Yarnspiration pattern. Since I already had large skein of worsted black, I felt that I would not be in total violation of my mission to use up my stash. I already had the light blue button-down shirt that was worn by the model, and the self striping yarn just flew into my cart.  The finished piece was approximately 71 inches in wingspan and 18-20 inches at its deepest part. That made it long enough to wrap around and tie or to secure with a shawl pin. Materials included a 7 oz skein of solid Black Red Heart Super Saver Worsted Yarn and a 5 oz skein of Polo Stripe Super Saver Yarn. Knitting was done on a size 10 needle. The piece would work well on 14 inch straight needles, but I prefer to work with specialty wooden cable needles by Knitter's Pride. These needles were smooth ,lightweight, and particularly useful for knitting during a long airplane flight. The pattern was easy to follow. Directions were few and only covered one side of an 8 1/2 x 11 sheet of copy paper. After the set up, there was a 4 line pattern sequence with two lines of the solid followed by two lines the self-striping yarn. All work was done in the garter (all knit) stitch. For the first half of the wrap, increases were made on the first solid row. When the piece reached approximately 60 stitches the process was reversed I made my wrap with 65 stitches as i wanted a slightly deeper area at the peak. Decreases were made every four rows until there were only five stitches left, and the stitches were finished off. For specific directions, see the free pattern. 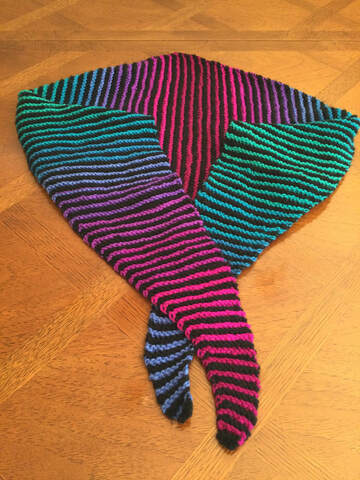 The Free Yarnspiration Pattern was easy to access by entering the name Red Heart Brighten My Day Knit Wrap in the search bar of my I Pad tablet or computer. Yarnspiration provides an easy download. While the first half of the scarf was completed at home, the remainder the completed on vacation. The two long flights to and from Denver plus the airport wait time gave me ample time to finish my work. 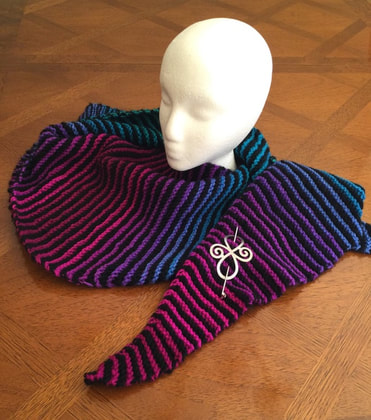 While I chose to create my wrap from black and blue- purple-raspberry hues, the color combinations for this piece are infinite. While I wear a great deal of black clothing, others may prefer a warmer or lighter accessory. Consider making this wrap with white and pastels, brown with autumn shades, purple with pinks, navy with white and blue tones. The possibilities are limited by your imagination and chosen color palette.
After making so many shawls, hats, mittens, dolls, and blankets be donated to charity,t his is the second piece that I have kept to accessorize my own wardrobe. I am looking forward to pairing my wrap with the blue shirt I mentioned or with a black blazer or winter coat. As always I appreciate your reflections and feedback/ I welcome you to join on my stitching journey. 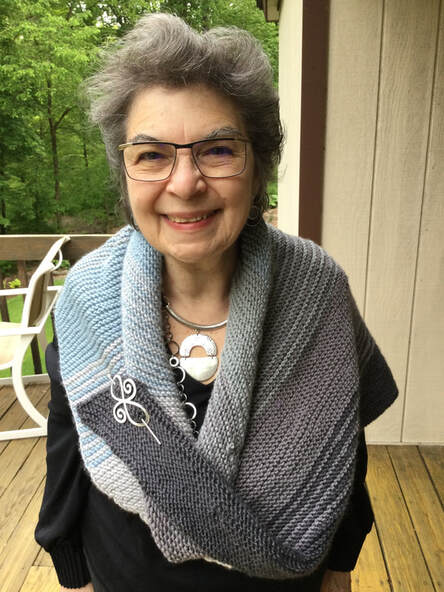 Several years ago I sold an asymetrical three color solid and striped shawl at a holiday fair. My customer looked so stylish in the garment, and after some negotiating, she walked away with a beautiful piece at a bargain price. The pattern was a purchased design from the Plymouth Yarn Company that was 46 inches long and 20 inches deep. (Homestead Tweed: Striped Diagonal Shawl) it was simple to create since the entire piece ws knitted in the garter stitch. I really admired my piece, but the length was too small for me.  Several years and many projects later, I rediscovered the pattern and decided to make a shawl that I could use to accessorize light weight jackets and sweaters. I ended up with a piece that was 65 inches long that could easily be draped, tucked and closed with a shawl pin. In order to accommodate the extra length, I had to include a total of 6 shades of white to dark gray tones that grew into 11 sections of solid and striped areas. In some ways I stayed true to the pattern. I started with a solid pice for 36 rows with increases in row 1 of a two row pattern sequence. In the second row I slipped stitch purl wise and knitted to †he end of the row. At the beginning of the new 36 row section, I introduced a new very light grey in 2 row stripes. There was much more contrast in the original pattern. However, I chose to extend the color selection by introducing gradually darker hues as I moved up the shawl. Each solid space of 36 lines was followed by a striped section that introduced a new color. Then the new color was knit for 36 solid lines 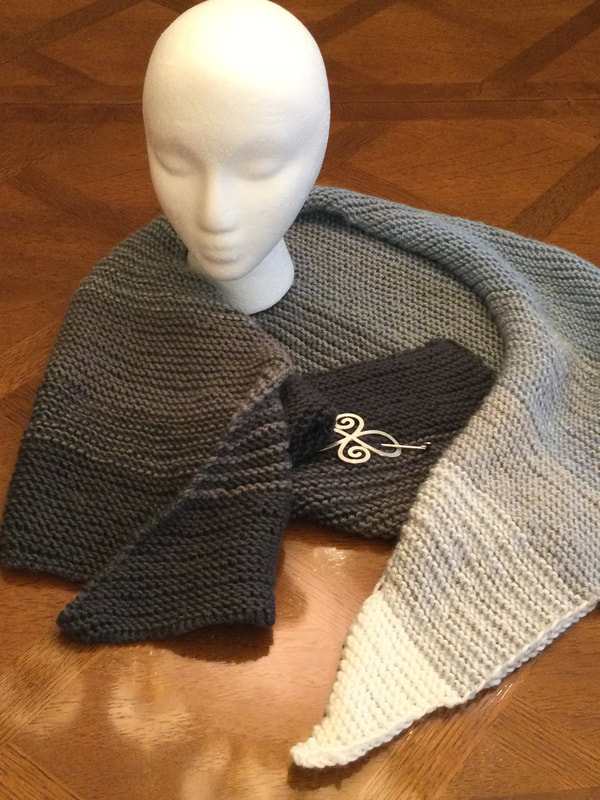 This was a real stash buster as I dove into my bins for as many tones of grey that I could find. I did not want to include a black stripe, and I was pleased that I could finish my shawl with the darkest of greys. The shawl was easy to execute, but I ran into an unexpected problem from time to time as I seemed to have a tendency to drop stitches. While it is easy to pick up stock and net dropped stitches, garter stitches change each row as the knitted row is purl on the back. Alas, I found myself frogging a few lines from time. After the second time, I resolved to examine each line before I went onto the next. While it took extra time the short term, I saved myself a great deal of aggravation. 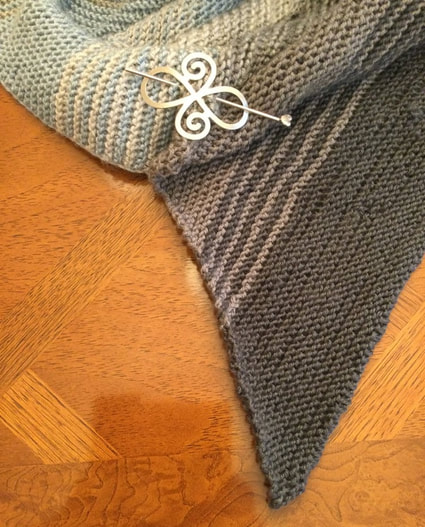 Since knitting my assymetrical shawl, I have come across several different asymmetrical free patterns online. I am quite proud of my shawl, but I have been sorely tempted try a version with two contrasting self striping yarns,. Since, I do not have that yarn in my stash, I would be undermining my resolution to use up the yarn I have on hand. Yet, I do have a large skein of about 600 yards of black yarn that I could contrast with smaller part skeins that I could match up.
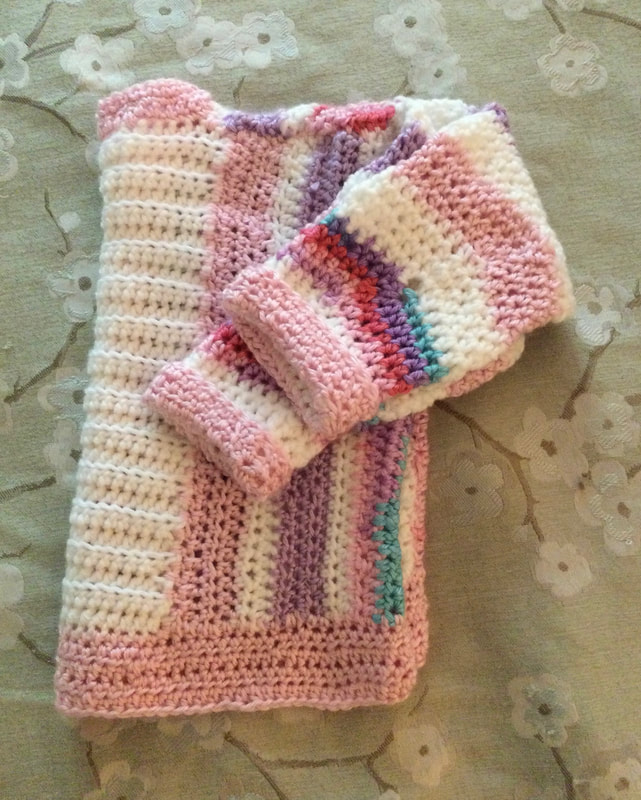
Since my last article, I have created two girl's sweaters from yarn scraps and several pairs of girls' and women's mittens. My hands seem to itch to be busy. Thank you for joining me on my stitching journey. I appreciate your reflections and feedback. 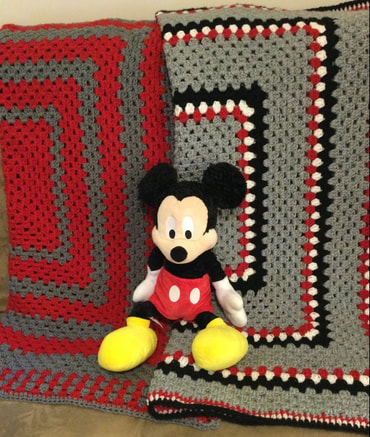 I am quite proud of the three blankets that have evolved from my stash busting efforts. As I noted from my previous post, my goal was to create pieces while including large quantities of yarn from my extensive stash.The main criteria for each blanket was that I had to work with the yarn that I already had on hand. The designs evolved as I sought attractive combinations. The available yardage for each color helped to determine the eventual design. I like to work with the extended Granny Square, and there are infinite design options that are available to me. 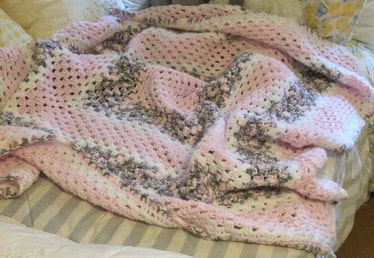 Project 1 A variegated Red Heart Super Saver in pink, white, green, and lavender was the driving force for this piece. I also happened to have a Caron pound yarn in a pale pink and several partial skeins of white that matched the colors in the variegated yarn. The Extended Granny Square started with 8 rounds of of pink, followed by 2 rounds of white and 6 rows of variegated yarn. The sequence was repeated, ending in 2 rows of white. The final edging consisted of 1 row of pink in Half Double Crochet (HDC) followed by 1 row of variegated in the same stitch. The completed blanket was a 40 inch square which would work as a blanket for a girl or a lapgahn for a women. I donated this piece along with the shawls from my previous post. 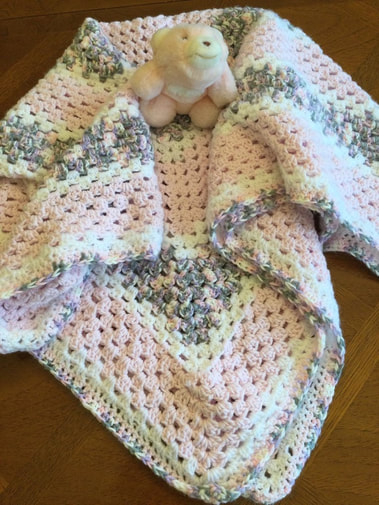 Project 2 This 42 inch blanket or lapgahn is suitable for a boy or a man. It started with 8 (135 yard) skeins in red worsted Just Yarn that I bought from the Dollar Store. I was drawn to the color and the delightful hand feel. I bought all the red skeins that were on the shelf, and I had 1080 yards of for the project. Now I needed a pleasing contrast for my blanket. I did not want go the patriotic route in red, white, and blue. Luckily, I was able to pick up two large skeins of dark grey RedHeart yarn when I bought my shawls to the collection site for Threads of Love, Frequently people support our cause by donating unused yarn to our synagogue. Since I did not have to buy the yarn, I felt it qualified for inclusion in my stash busting mission. I started with an 8 round square of red, followed by 2 rounds of grey and 4 rounds of red. Then I had to determine if I would continue with the same sequence or whether I wanted to increase the number of grey or red rounds as I continued with the blanket. I brought the piece to my Craft Group at the Woodbridge Center and posed the question to my fellow knitters and crocheters. I was especially interested in the views offer expert gentleman knitter as the proposed blanket or lapgahn was designated for a boy or man. We finally decided to stay with 4 red rounds, but I would inrease the number of grey rounds by one after each red bunch. After my last set of 5 grey rounds, I realized that I was running out of yarn. Therefore, I would stop making solid sets of rows and begin work on the edging. When you crochet the Extended Granny Square, you can achieve vertical stripes if you alternate two colors for several rows. Since, my last group was done in grey, I began the edging with a round of red clusters. I followed with a row of grey and then one of red. I had enough yarn for 5 total rounds. The piece was finished with a single round of grey in Half Double Crochet. 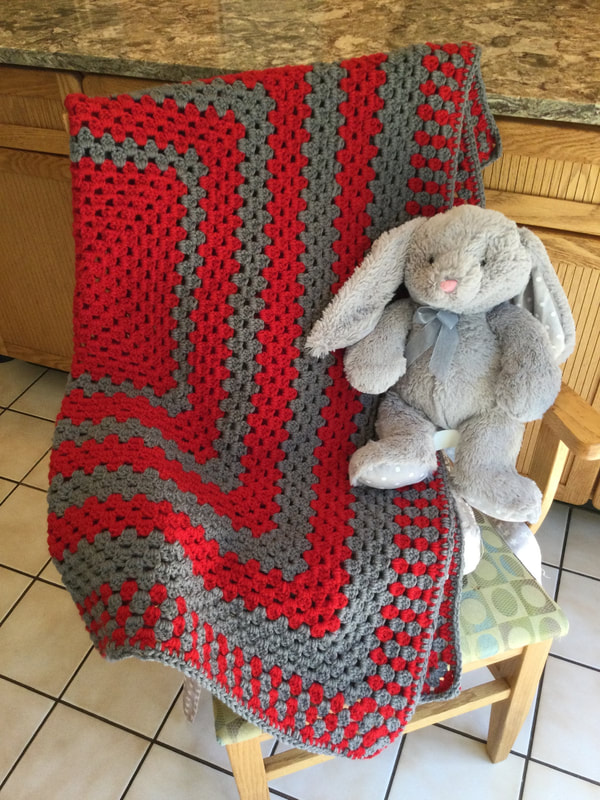 Project 3 The 8 skeins of grey worsted yarn from the Dollar store had 115 yards per skein. The 920 yards were also designated for a boy's blanket or for a man's lapgahn. When I placed the pale grey yarn next to contrasting colors in my bins, the white and black spoke out to me. I still wanted a pop of color, and so I bought out the cherry red. The initial square was made up of 10 rows of grey. The contrast sequence was 1 round of red, 1 round of white, 2 rounds of black, and 6 rows of grey. I had planned to follow the sequence two more times, but I ran out of grey yarn after round 5 oof the last grey section. Therefore, I transitioned immediately into 3 rows of HDC in red, white, and black as I had done for the larger granny stitch cluster rows.The completed piece ws 42 inches of cozy comfort. 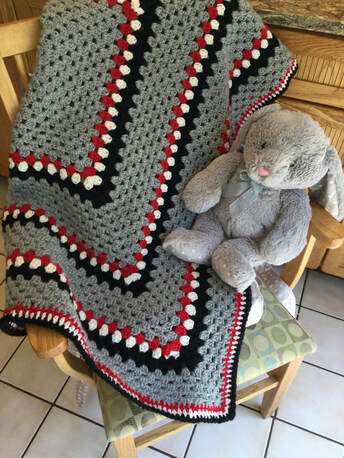 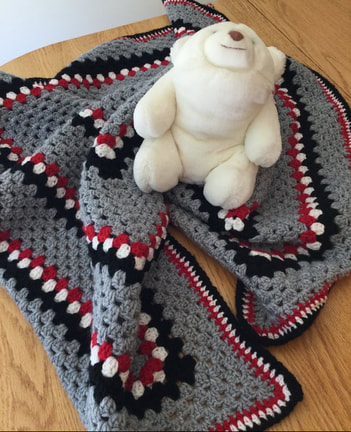 My stash busting mission used a significant amount of yarn: 1 large skein of varigated yarn, 1 pound of pink yarn, 2 incomplete white skeins., 8 skeins of red, 2 large skeins of dark grey, 8 skeins of light grey, and partial skeins of red, white,and black. When I look back to the skeins used from the previous article, I had made a significant dent in the yarn that was overflowing from bins and assorted shopping bags. White I donated the girl's blanket, I decided that I would donate the red and grey blanket, but keep the grey blanket with the red, white, and black accents. I like to have pieces on hand when I need to come up with a gift. After all of this stash busting, I was further motivated to reorganize all of my yarn. Most of it was useful, but buried. Some belonged to a bygone era. Others just did not fit color palettes that I enjoyed. After dumping all remaining seven bins on the floor, I sorted by color and weight. Two other piles remained: the give-away pile and the throw-out pile. I brought the giveaway pile to my craft group and most of it was taken. I tossed the throw-out pile and and remainder of the give-away pile. Now I have just 5 bins and no stray shopping bags of yarn. Best yet, I have planned my next 3 large project since I have grouped all of the colors and I know how much I have have of each skein as well as the coordinating colors. 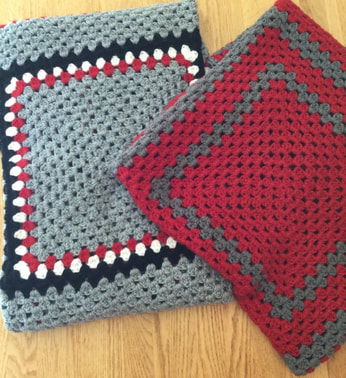 Thank you for your reflections and feedback. As always, I welcome you to join me on my stitching journey.
|
Archives
November 2022
Categories
|

 RSS Feed