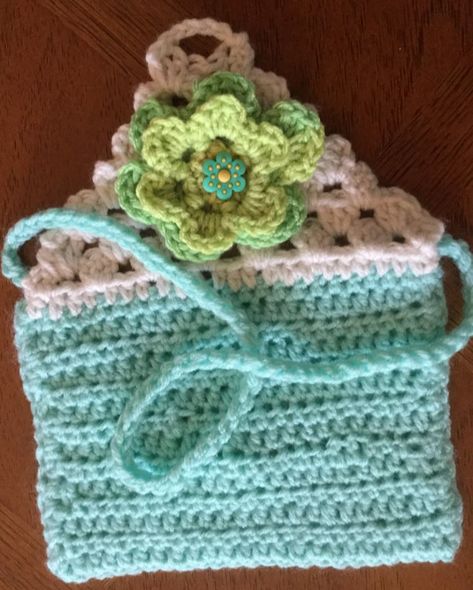
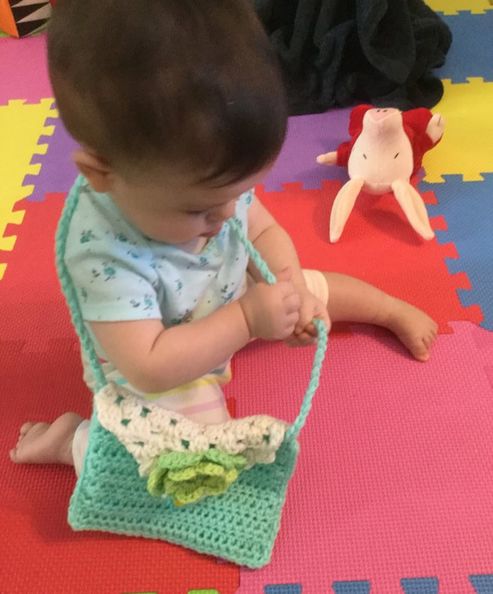
 Our blond, curly headed, two year old guest wanted to shop like mommy,. With a big smile, she selected a bright pink crocheted purse decorated with a pink and white crocheted flower from my stash of hats, headbands, loveys, and purses. I was "tickled pink" that she was so easy to please. A month later, her mom showed me pictures of her daughter in her grown-up, dress-up play clothes. As I was preparing for the autumn holiday fair season, I decided to make several other purses as a draw for my youngest potential customers. A few weeks ago, I started working in a focused way to transform my yarn scrap pile into attractive, useful pieces. I could make one or two purses out of the larger balls of yarn, contrasting flaps, out of medium balls, and varigated yarn flowers or contrasting two layered flowers from smaller amounts of yardage. As a gift to my to fellow crocheters, I decided to share my original pattern. As you can see my granddaughter already has her eye on one of my special editions. CROCHETED GIRLS' PURSE FREE PATTERN Materials: Main Color: Worsted Weight Yarn (#4) If you don't have enough yarn of one color to make an entire purse, crochet the front and other color for the back. You can also use smaller amounts to crochet striped bands. I also like to make the strap from the same color as the main color of the purse. Granny Stitch Flap: Smaller amount of contrasting worsted. Two-Layered Flower: Varigated worsted or two complementary or contrasting colored yarns Crochet Hook: Size H Tapestry Needle Sewing needle and cotton thread Small button for center of flower 1" size button for flap closure 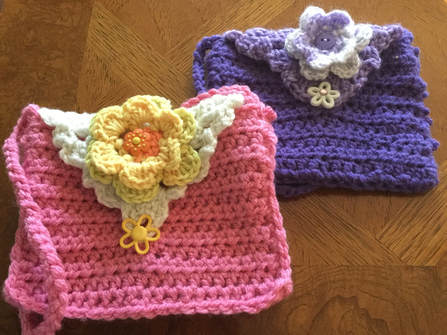 Directions: Pouch:
Flap
 Strap
 Flower and Finish:
 I hope that you enjoy this pattern and that you make many girls happy with your efforts. You are welcome to crochet this purse for your own personal use or for sale. Please do not copy or reprint or sell this pattern. If you make items for sale or post your purses, please reference my site to give me designer credit.
http://www.lilcreates.com/lillians-blog/crocheted-girls-purse-free-pattern. In the near future, I plan to post this pattern on Ravelry.
0 Comments
 Three years ago I was introduced to the Outlander Saga, and like many of my friends I eagerly anticipated each next episode. The story had been published as an 8 book series, but now it came to life on the television screen. I was hypnotized by the passion of the leading characters, Claire and Jaime, and eagerly followed their adventures and perils across the Scottish Highlands. The knitted costumes were created by Highlanders to provide realistic clothing for the 1700's. The movie producers were challenged with keeping Claire and the other characters warm, while creating accurate and attractive wool garments. This third season, as I sat entranced once more, I decided how fitting it would be to join my interest in fiber arts with the Highland mystique. Much to my delight, I found many resources in print and on the internet. 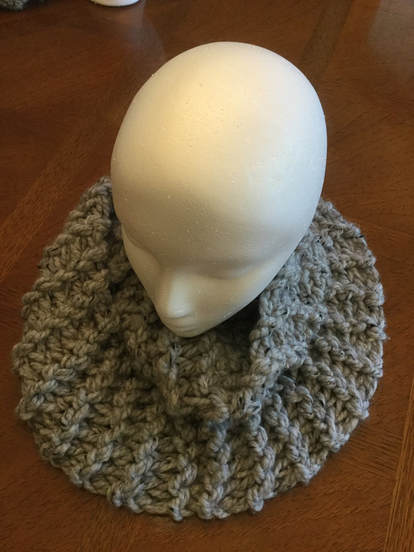 My first Outlander project was Claire's signature "Sassenach Cowl," designed by Kristen Brooks for Highland Knits (Knitwear Inspired by the Outlander Series). The elongated circle is worked with two strands of extra-bulky yarn (#6) on size 35 needles in one long piece. Then the short ends are sewn together. To wear this warm and stylish cow,l wrap the scarf two times around the neck. For specific directions, consult the book published by Interweave.com. For my "Sassenach Cowl" I chose a rustic Wool-Ease Thick and Quick in Grey Marble. I enjoyed watching the ridges develop as I continued to work in garter stitch. However, since the needles were so thick, I felt as if I was working with broom handles. I have not decided if I will sell the cowl at an upcoming fair, gift it to family for the holidays, or keep it for my own wardrobe. I can't go wrong, no matter which choice I make. Even though I can only wish I looked like Claire, the cowl will be so cozy and stylish in the cold weather. 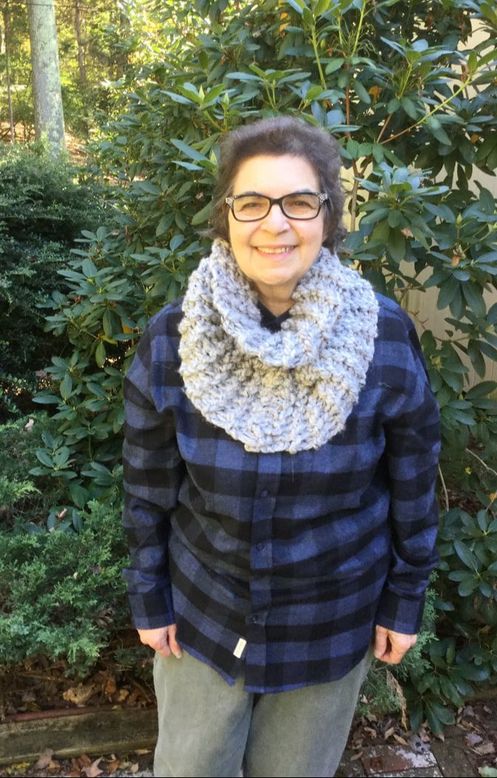 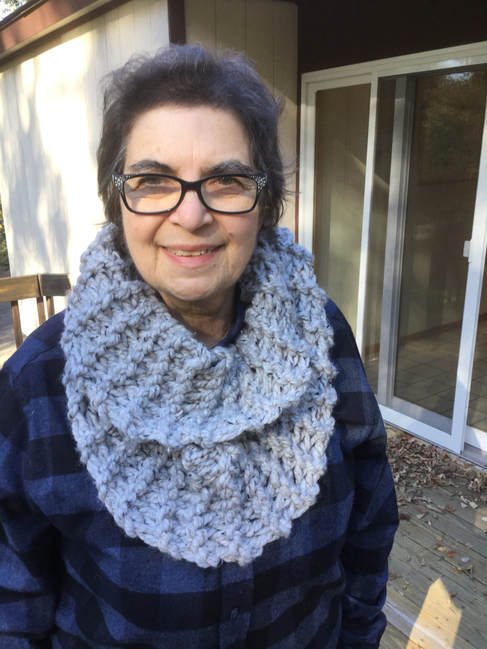 "The Castle Leoch Ribbed Cowl" by Karen Clements is also found in Highlander Knits. It is also worked in extra bulky yarn (#6), knitting with a large circle needles. I added 4 stitches to the 40 cast on to make the piece more comfortable for me. I chose Lion Brand Hometown in USA Norfolk Merlot yarn with a smooth finish that was just right for the 3 K- 1P ribbing. This piece also works off quickly and can be done in a day or two, depending how much time you devote to your knitting. This elegant piece sets off any sweater, cape, jacket or coat. However I found my version to be narrower than the piece shown in the photograph from the book. 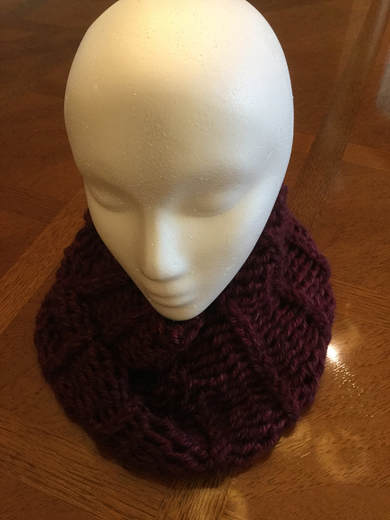 "The Romantic Capelet" by Red Heart is a free pattern that is easily accessed on line (#LW4679). The capelet sits on the shoulders and comes midway down the arm. Instructions are given for women sized small through extra large. The piece features a collar and ties in front. I already have a plaid shirt like the dress worn on the model. Since I have size 17 needles and a K crochet hook, I am glad not to have to purchase them. The yarn I chose for the capelet is Lion Brand Hometown USA Little Rick Granite, a heathery greyish brown with lighter highlights.. This bulky yarn knits easily and does not split.I have not made this style before and I am looking forward to trying out this unique and stylish accessory to accompany my fall wardrobe. 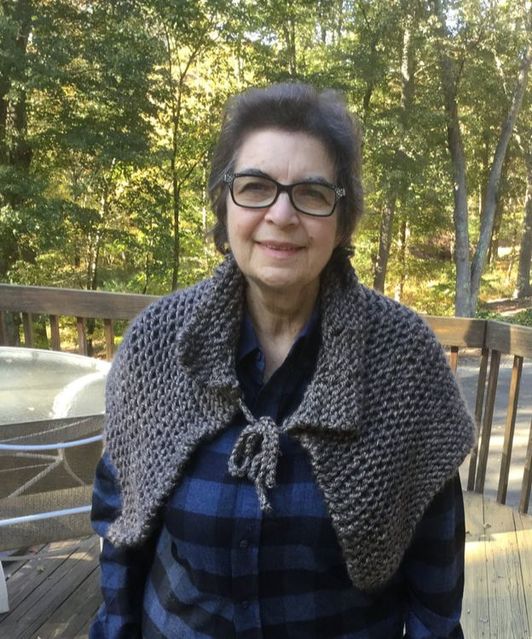 There are numerous patterns devoted to "Outlander Inspired" styles. Lion Brand has specialized in developing patterns as well as kits so that the reader can produce these styles. although the "outlander" patterns are typical knitted, many of these garments can be crocheted in a manner that mimics the knitted stitches. The following link offers several of their patterns. Type the link into your search bar. http://www.lionbrand.com/blog/outlander-inspired-patterns. Pinter also offers a showcase of favorite "Outlander Inspired" styles as well: https://pinterest.com/explore/outlander-knitting/?p=true. In fact, the cowl that I crocheted from the Leisure arts book using Homespun yarn was very similar to the "Outlander Inspired" styles. (http://www.lilcreates.com/lillianssblog/quick-and-trendy-styles-with-homespun-yarn) 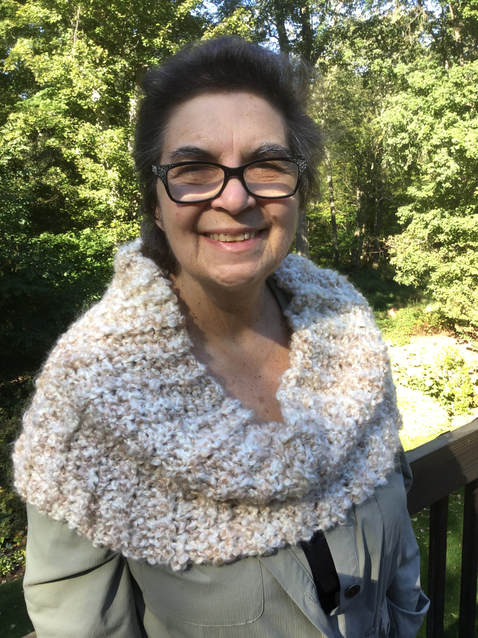 Gauntlets or fingerless gloves fit the bill for keeping hands warm while leaving fingers free to do numerous tasks. I had intended to include some of those pieces in this post, but the article was getting loo long and unfocused. Besides I want to offer my readers some free rustic patterns in addition to published styles I found in my research. As I take a break from knitting my capellet, I am in the process of designing, knitting, and writng about these pieces. My plan is to prepare fingerless gloves and gauntlets much like the cast of
"Outlander" would wear, while offering a contemporary flair. So keep posted for future articles of Lilcreates. Has the "Outlander" craze captured your knitting imagination and creative spirit. Please share your photos and experiences. What is old becomes new again. 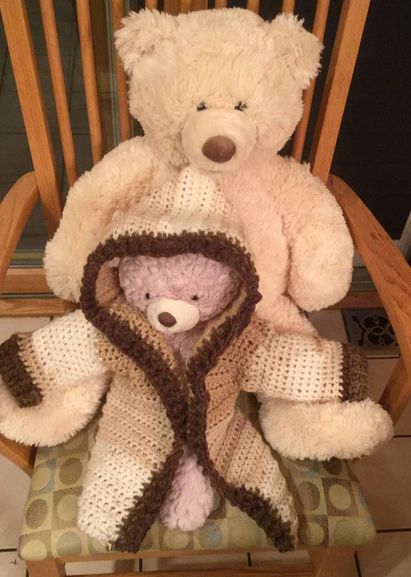 Wonderful crocheted projects can emerge quite unexpectedly. After a week of intense crocheting for my Yarn Scrap Pile Post, I promised myself a more relaxed week. The plan was to focus on one piece and to teach myself one new stitch. I had two skeins of Bernat Pop in Hot Chocolate that I crocheted into a wrap around scarf. Fortunately, the scarf was finished by Wednesday, leaving me the rest of the week to write, photograph, and relax. Unfortunately, the scarf was just not up to publishing standards. Fortunately, I was able to frog the piece, leaving me with two balls of lighter colored yarns and two balls of darker brown. Unfortunately, I was discouraged and did not have a clue as to what I wanted to crochet or knit in the remaining few days of the week to meet my self-imposed posting date. Fortunately, I was able to scroll through Facebook and Pinterest in search of new projects that would fit project criteria for this week. The piece had to be attractive and appealing, contain a new stitch or strategy, look wonderful with my frogged cream and chocolate yarns, and be possible to crochet in a few days. Unfortunately, Many of the projects were too complex for my time frame. Fortunately, I came across The Painted Canyon Cardigan written by Alehsa Konecny for Heart, Hook and Home. I had seen several colorful renditions in adult sizes, but when I came across the self-striped gray version in a 12 month size, I knew I had found my project for the week. As with many fiber artists and bloggers, I have lots of ideas and only so much time to actually crochet or knit pieces to be photographed for posting. Each time I came across this pattern, I promised myself that I would get back to it. This was the time. Unfortunately, I did not have self-striping gray yarn or two shades of gray yarn in my stash. Fortunately, the cream, sand, and brown tone worsted yarns for the Hot Chocolate would look great with this cardigan. I had a J hook. The only stitch I needed for the body of the sweater was the Half Double Crochet. My swatch was true to gauge. All I had to do was go back to the website and I was off. Type hearthookhome.com/painted-canyon-hooded-cardigan into your search bar. Scroll down to correct link. Photos for the adult sizes are displayed. To reach a child size, just select from the list of sizes, and those directions appear. The entire pattern for all sizes can be purchased without ads on Ravelry. 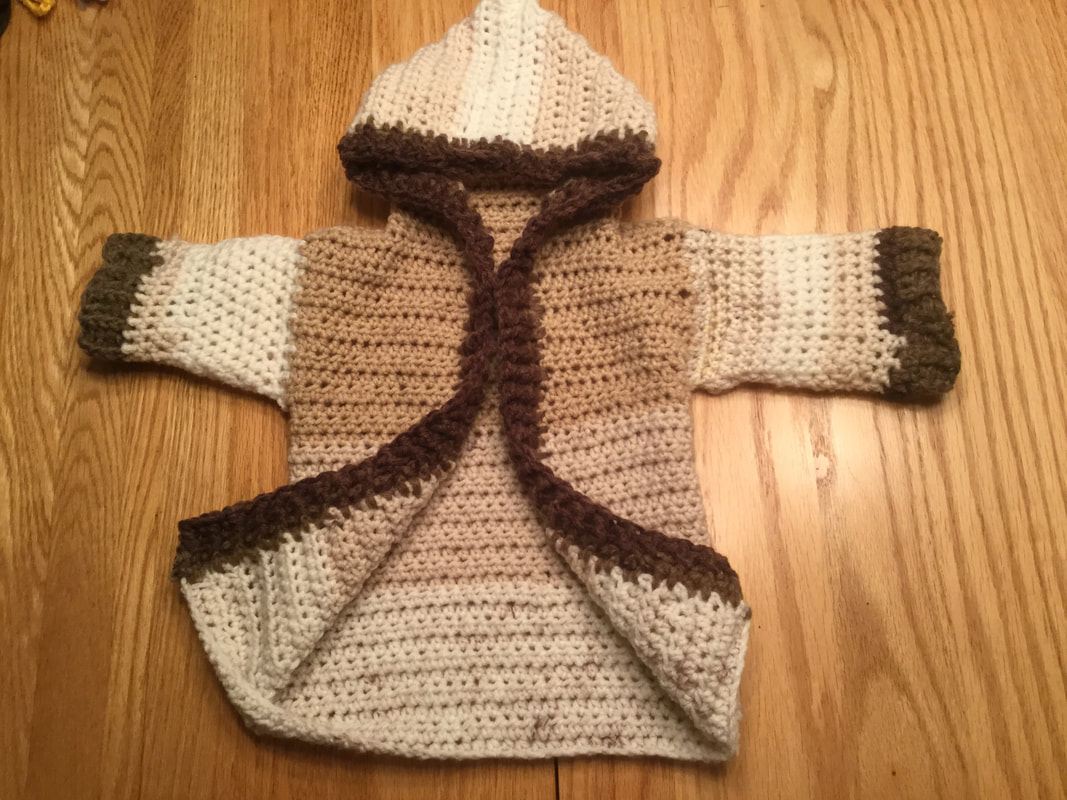 Since I had already separated the colors into dark and light balls for yarn for the scarf project, I decided to follow the same course for the cardigan. I let the creamy and sandy-honey shades fall where they may in crocheting the body and the sleeves.The browns were reserved for the cuff and edging. A YouTube video is helpful for crocheters who want to separate all of the colors for even bands of color. Follow directions and you will end up with a colorful and symmetrical sweater. The same video is also helpful in showing how to sew the shoulders together for correct placement of the crocheted hood. (https://www.youtube.com/watch?v=061ASkM1GB8) 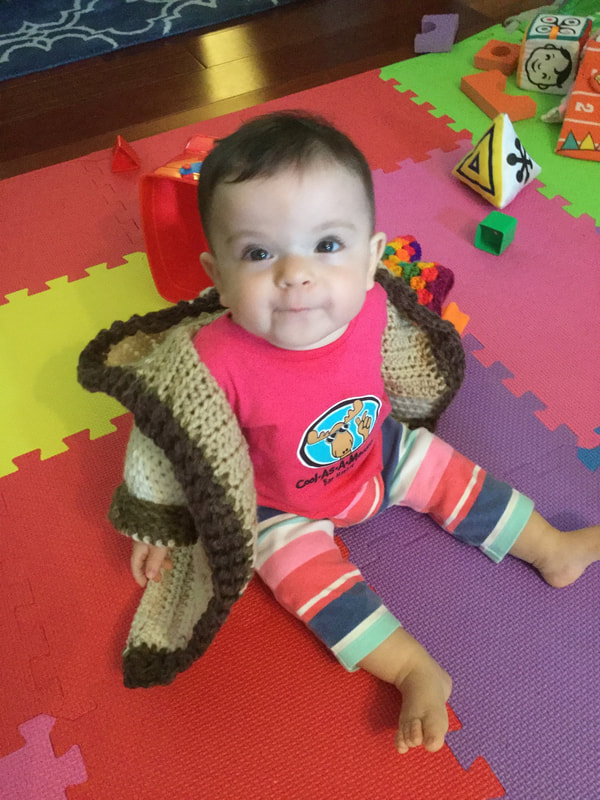 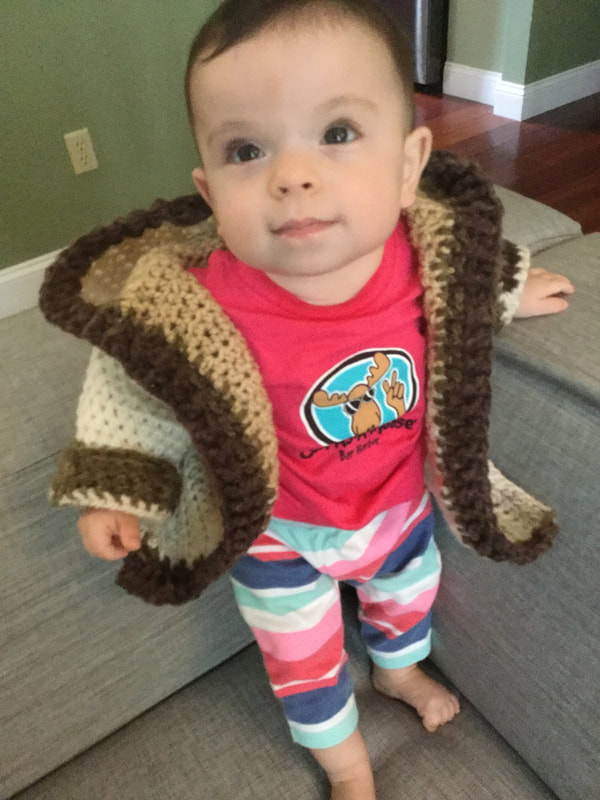 I was proud that I had finally figured out how to crochet front and back post stitches to make a rib that looked like knitted counter parts. Previously, I had only used the front post stitch. The front of the garments would look okay, but the inside had uncomfortable ridges. After watching another video demonstration, my cardigan had the right look and feel. Repeat After Me offers a useful YouTube video for Front and Back Post Half Double Crochet. To make sure the sweater stayed securely in place for a toddler, I plan to add 2 clasps for closing as there are no button holes in the design. In the future, I hope to use yarn with greater color variation in the bands and make precise symmetrical color bands as in the video. A similar effect could be achieved by crocheting with separate complementary or contrasting skeins. Then you would not have to cut up the self-striping yarn. 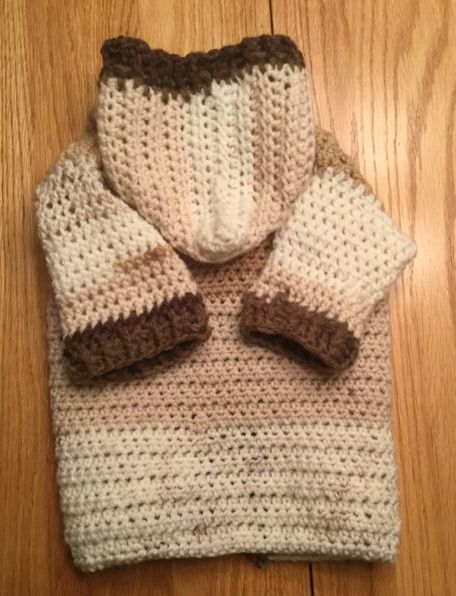 Unfortunately, my light yarn yardage was short by two rows on each sleeve.
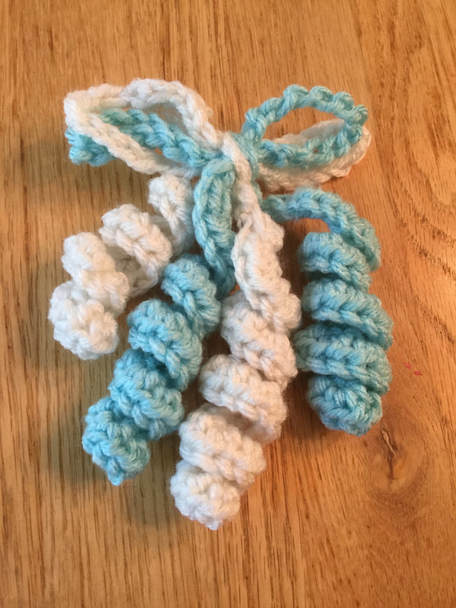
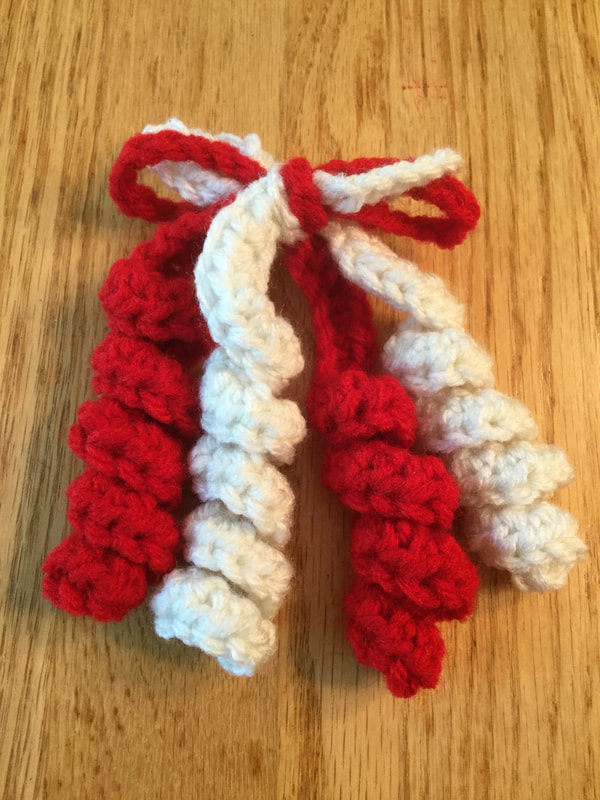
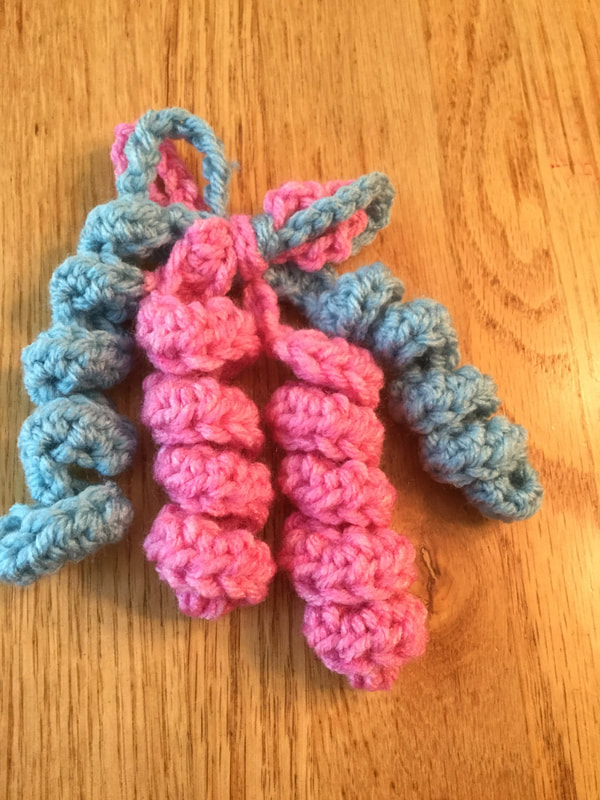
Fortunately, I was able to improvise with the darker brown before transitioning to the Front and Back Post HDC stitches for the cuffs. I still had ample amounts of dark brown yarn, even after I finished the edging that started at the left lower end, went up the side, across the hood, and down the right side to the righter lower end. at the bottom. The finished piece was charming and cozy (as promised in the title), and the workmanship met my publishing standards. The finished cardigan is more like a coat than a sweater. By subtracting a few rows from the body, the silhouette would be more gender neutral. Although I bought the clasps, I could experiment with creating closings from toggle buttons. Another variation might be to add patch pockets to the shortened version. Many thanks to Alesha Honecny and Heart Hook Home for presenting this versatile, and multi-sized pattern to the community of crocheters. Please share photos of your completed Painted Canyon Cardigans as well as hints that you have used to customize this sweater. 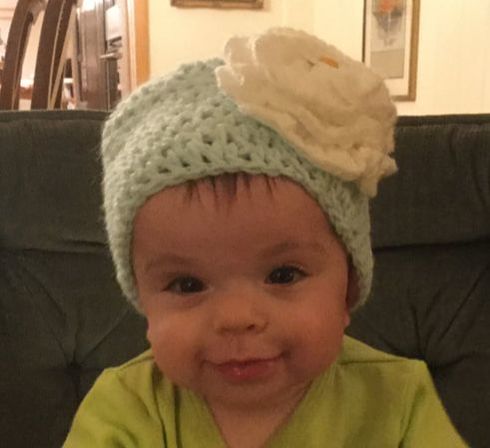 My yarn scrap pile is formidable. Remnants from completed projects are outgrew their original container and now overflowing from a 23 inch long x13 inch wide x 13 inch high bin. Many knitters and crocheters brag or complain about their stashes. I understand those who love their craft and who are drawn to acquire the beautiful new skeins of yarn. While I am apt to purchase some of the new trending fibers, at present I am more likely to buy skeins on sale, when I can envision a future sweater, cowl, blanket, or shawl. These acquisitions do not bother me. I know that once I have embarked on and completed a large scale project, many skeins will leave my yarn storage bins. However, most projects do not use up every last bit of yarn. Scraps vary in size from just a few yards to almost a complete skein. They vary in weight from DK to Bulky and from the lightest and brightest to the darkest colors. Why don't I simply throw away these left-overs? I have paid for the yarn. I might need that color to crochet or knit a stripe, or flower, cuffs, or some other design element. I don't want to buy another skein if I have stockpiled yardage that will do the job. Since I am both a very enthusiastic crocheter and knitter, I have completed many projects in the last couple of years. Hence, I have accumulated a large collection of remnants, and the remnant pile seems to have taken on a life of its own. Last week I was determined to take control of the situation. When I dumped out the bin on top of the desk top, the heap that covered the desk was 15 inches high. The pile also included random crocheted flowers, pompoms, unadorned hats, and a scarf that needed to be frogged for its yarn. Decision time: Do I discard the entire pile, without a care, to neaten up my space, or do I dig in and attempt to use as much yarn as possible in a focused effort to transform the yardage into useful and attractive pieces. The fall craft fair season is gearing up, I decided to make as many small accessories as possible. My inventory includes many beautiful scarves, shawls, hats, and baby sweaters . However, many craft fair attendees are looking for an inexpensive gift. I couldn't even calculate the cost of this left over yarn since I had used the bulk of most batches for larger projects. In essence these materials were a bonus. the critical cost element would be my labor. Making batches of small items can be even more time consuming than finishing off a scarf , shawl, or blanket. At least with these projects, I knew when I was done. Happily, I would crochet the final trim, add the last fringe, or piece together and sew buttons on that baby sweater. I was excited with my accessory boutique plan, but I could crochet or knit endlessly and still not use up most of the scrap pile. Optimistically, I proposed to myself that two weeks of concentrated effort should be enough to make a sizeable dent in the yarn scrap pile. I would work diligently for a week. Then I would take a week off to work on one project and come back for a second week of yarn scrap pile marathon. At the end of that time, I would dump most of the unused yarn. As I causally surveyed the yarn scrap pile, a ball of mint green worsted caught my eye. I had sufficient yarn to crochet a one year old's baby hat. A ball of white would be enough for the rolled lacy flower. If I hoped to make headway on my mission, I would have to use any available time. As my husband and I were joining friends for an outdoor concert, I packed my yarn and lighted crochet hooks along with our folding chairs and picnic dinner. As I tapped my foot to the tribute songs for Bruce Springstein, I was able to crochet my Double Crochet beanie even in the dusk and darkness. Several fellow concert attendees stopped by to watch with amazement as I clicked away with lighted hook. When we packed up to go home, I had finished the beanie. The next day I would make the white flower and affix a daisy button to the center. 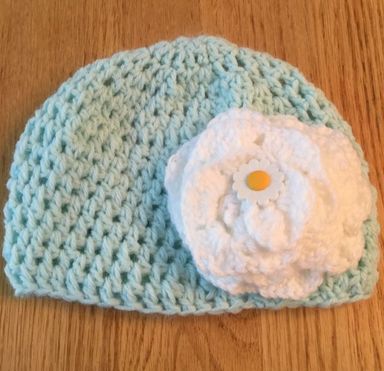 I love fingerless gloves, and the turquoise and light acqua bands from my self-striping baby blanket project would be sufficient for the cuffs and flowers for a new pair. There was also enough worsted black to make the hand in a cluster stitch. I am still working on the directions for this pattern for later publication, but I continue to follow my own writtern directions to make sure that they are clear to a crocheter who is not familiar with the pattern. By Saturday evening, I had attached the black buttons to the center of the flowers. Now I had two projects to show for my efforts. The workmanship was great. The projects were attractive, but I had a long way to go to accomplish my goal.  I still needed an accessory that had sale potential and could easily be replicated. My search of Pinterest's visual data base resulted in two ideas. The first was a set of colorful spiral hair ties for girls' pony tails or bunches. The ties could be used singly or in a combination of two different colors. I had several small balls of yarn with just the right amount of yarn to crochet a tie. Danyel Pink Designs features an easy to follow free set of directions that I was able to execute on the first try. (http:www.danyelpinkdesigns.com/2012/04/crochet-pattern=hair=spirals.html) I will revisit this project as I prepare for the craft fairs, but I wanted to offer several different accessories.
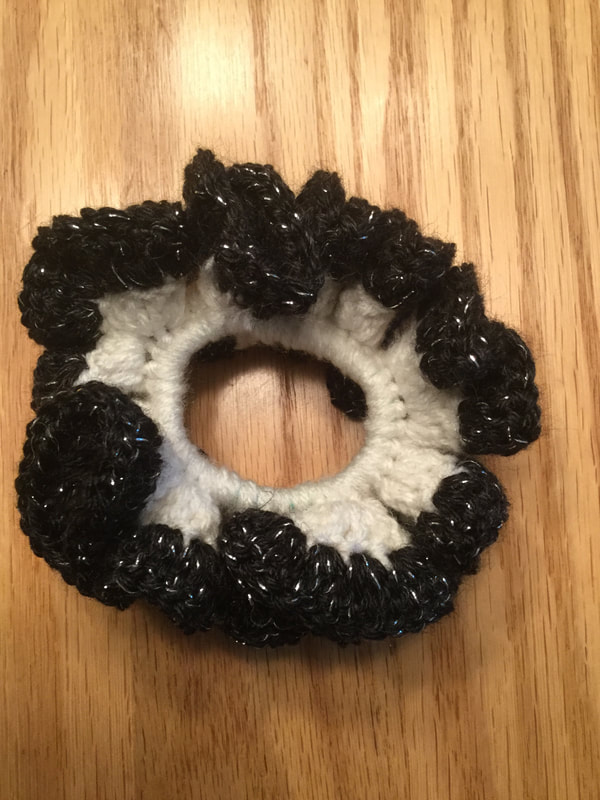
 Hair scrunchies can also dress up a pony tail. There are many different styles. using varying amounts of yarn.One of my favorites is a three line pattern that requires a elastic covered band, yarn, G crochet hook, and a tapestry needle for sewing in ends. In row 1, single crochet yarn around the elastic band and slip stitch to join. In row 2, crochdet 3 Double Crochet stitches in each stitch around and slip stitch to join. In the final third row, again crochet 3 Double Crochet stitches in each stitch around. Slip stitch to join. Fasten off, cut yarn, leaving a few inches, and weave in end. Trim. The finished scrunch is substantial and attractive. As an alternative, I changed the color of the last round to some glitter yarn that i have left over. This will provide a bit of glam to the scrunchie. There are so many varieties to this hair accessory. When i revisit the Scrap Pile Challenge in a couple f weeks, I will offer some new patterns.
My scrap pile also revealed some large store-bought pom poms, star buttons, and two navy beanies. As I rarely have hats for boys, these gender neutral hats now were fixed up to sport their new decorations. I have a few more pompoms left. I probably have some other unadorned hats. I really like this look. 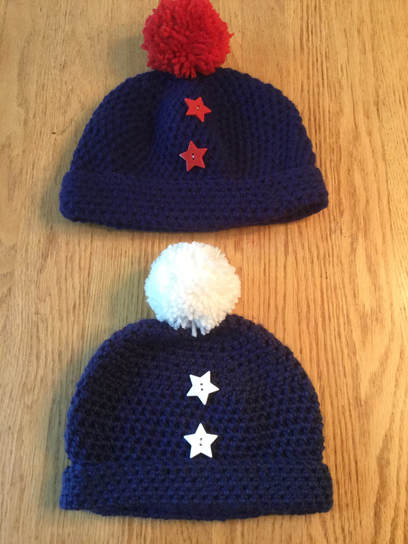 Finally, I spilled out an entire bag of crocheted flowers. After a trip to the dollar store, I was able to attach them to elastic bands or clips. Some of the larger orphan flowers I attached to head bands. You all know about my love for self-striping yarn. I yarn left from my mismatched gloves, to crochet headbands for the flowers in the pile. 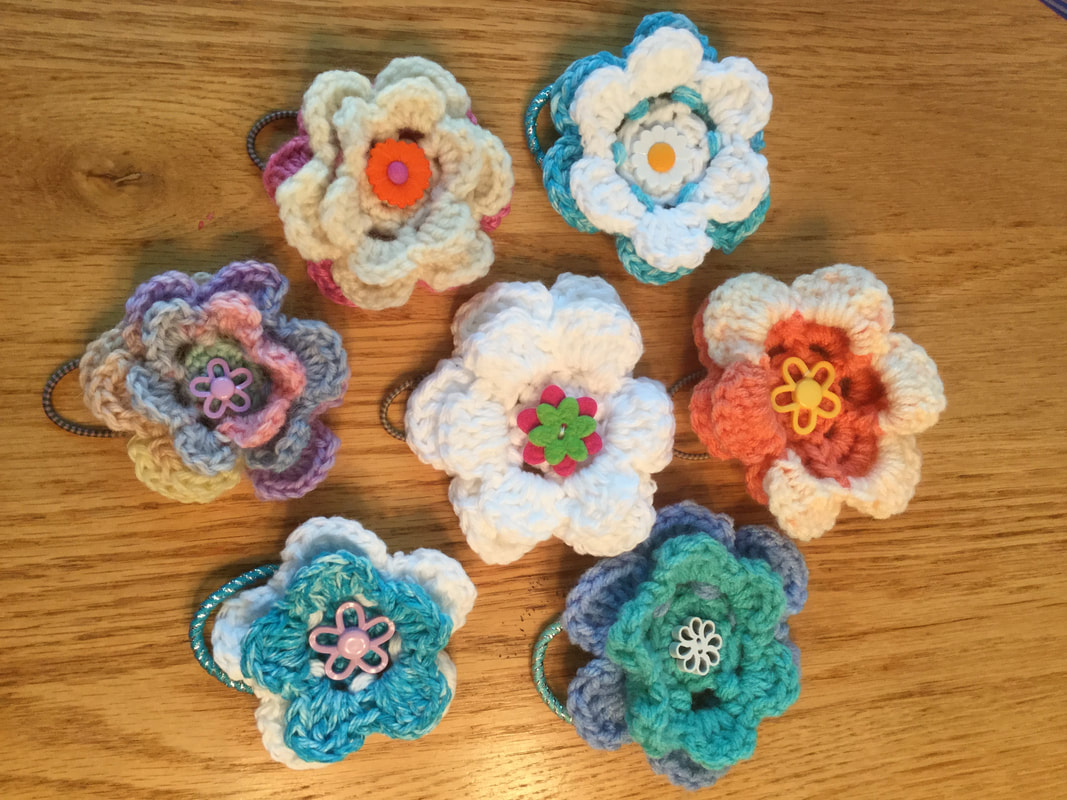 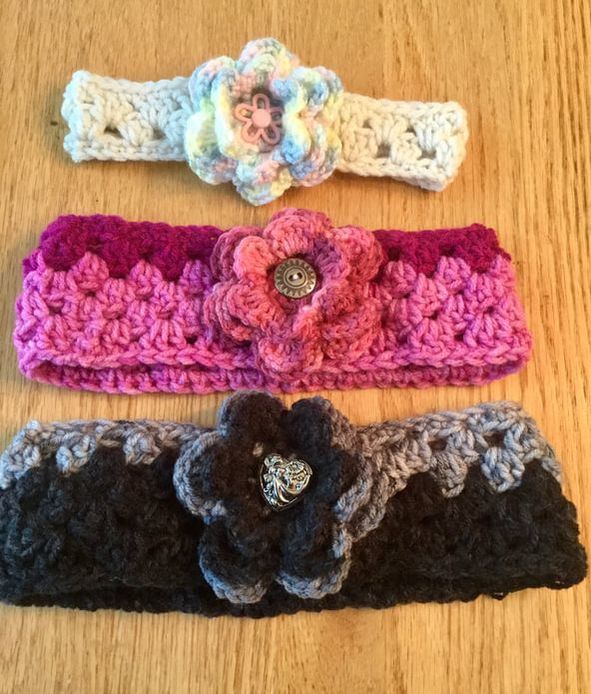 So now after a week of hard work, I have made a small dent in my scrap yarn pile. I really like the pieces that I have crocheted, but much work still remains. There is a lot of yarn left. One problem in writing a blog post about many small pieces is that it seems to take every available minute until writing, photographing, and posting time. For the next week, I plan to switch back to a single project before I complete my scrap pile challenge.
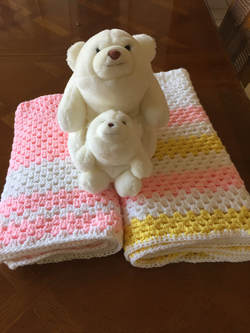
Please share your scrap pile experiences or confessions. What do you do with your leftover yarn? In previous posts I shared my knitted pattern for using scraps for the wrist and finger cuffs of a pair of fingerless gloves.(http://www.lilcreates.com/lillians-blog/knitting-with-scrap-yar-free-pattern) I also crocheted an extended granny square blanket, working around a corner square. (http://www.lilcreates.com/lilliansblog/yarn'chicken-a-high-risk-game-for-crocheters-and-knitters) Do you save or discard your scraps? What are your favorite scrap yarn projects? 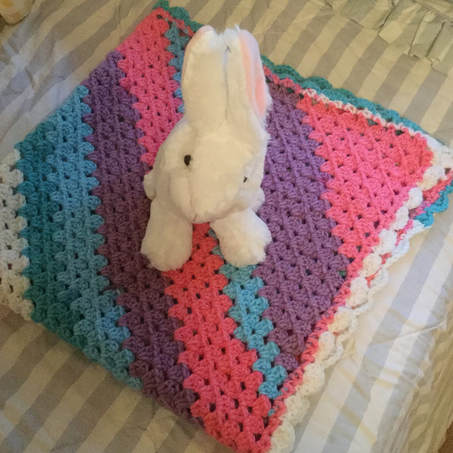 I love to make extended Granny Square Baby blankets. These pieces are by go-to gifts for baby and shower presents and well as for donations to my Threads of Love Group. These "Blankets With Holes" are ideal to keep an infant warm while maintaining breathability though the holes created in the stitching. (http://www.lilcreates.com/lillians-blog/blankets-with-holes) To construct these creative beauties, the crocheter works around a central motif, adding rings of color as the design progresses to a final edge and border. So why do you want to mess with a good thing? Variation and creativity bring excitement to the process after I have made a few projects on the same theme. In a later post, I attempted to make a significant dent in my scrap pile by crocheting around a corner granny square. I made cluster stitches along 2 sides of the original piece as I worked up the sides. I had fun playing with the many colors, gradually adding smaller batches mixed with larger remnants of more basic colors. As it was a scrap blanket, I was only able to crochet 2 rows of clusters as the blanket got larger. Since there were so many ends, I found it simpler to weave them in as I went along. The completed blanket was colorful, funky and interesting. At this point, I have not gifted or sold the piece. Still when I look at it, I smile because I feel as if I broke some kind of rules in creating it. (http://www.lilcreates.com/lillians-blog/yarn-chicken-a-high-risk-game-for-chrocheters-and-knitters )
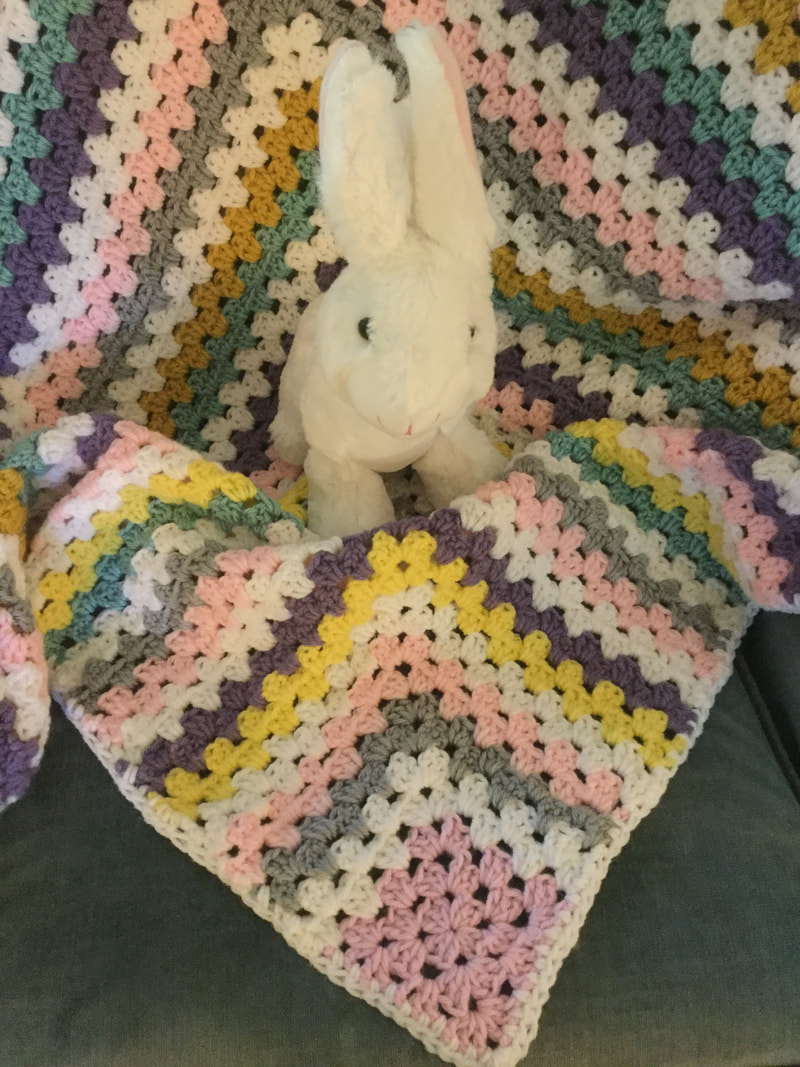
This leads me to my third Granny Square Blanket, the Diagonal Stripe. When I started this blog, I promised myself that each posting would contain either a new yarn or tool or a new technique. In executing this blanket, I accomplished both goals. I enjoy working with self-striping yarns, but up until now I had been unable to buy Bernat Pop manufactured by Yarnspirations. My local Walmart did not carry an extensive variety of yarns, and so when I visited a mega-Walmart in a town about 45 minutes from home, I just had to inquire. My choice was Snow Queen that included that included the colors of my granddaughter's bedroom. Before leaving home for my camping trip in Maine I also researched directions for the Diagonal Stripe Granny Stitch Baby Blanket and carried the printed sheets in my yarn bag. With two other projects in tow, I had 3 WIP's. The first two could easily be carried with me as I hiked to picturesque sites. It was delightful to take out my pieces and stitch as I waited for family members who were taking longer and more rigorous paths to the same spot. However, back in the campground I could relax with my striped Granny. Once I had mastered the simple increase for shells, my pattern was set. I had just begun the decrease side when we started on our car trip home.
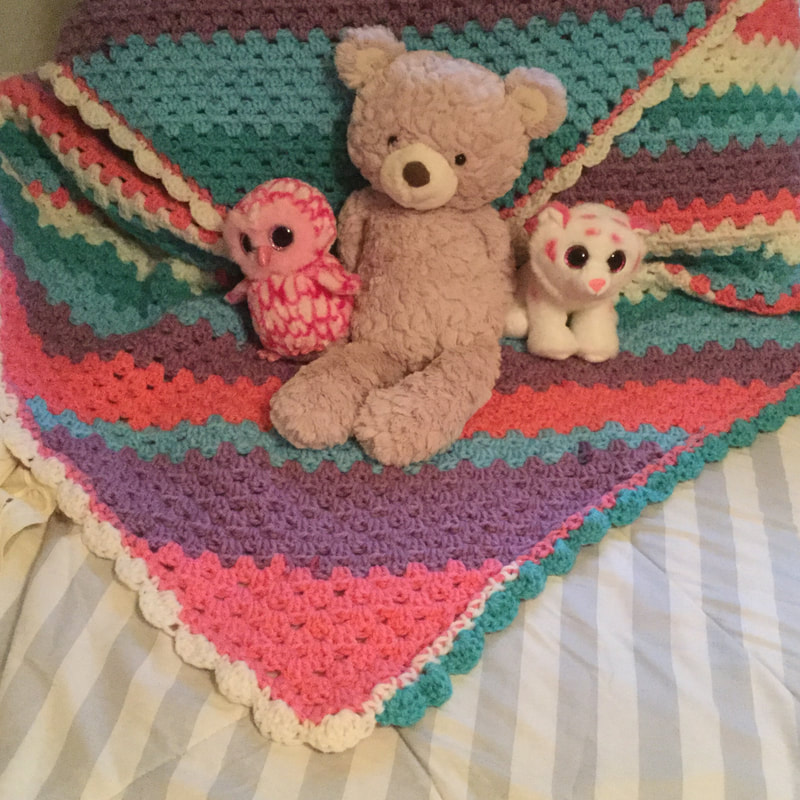
As I had rotated projects, I was able to complete all three within a few days of one another. On Thursday, I crocheted my last stitches, made a shell border, and wove in the ends of my Diagonal Striped Granny Square Blanket. On Friday, my favorite model, my granddaughter smiled and giggled into the IPad as I snapped her picture. The completed blanket contained yardage of soft white, light aqua, tourquoise, lavender, and coral. The scalloped edge was the finishing touch. I had considered teaching myself the reversed scallop technique, but I did not want to spend the needed time examining tutorials and videos to master the border for this particular project. I would leave that for a later date. Not only was this Diagonal Stripe Granny Baby Blanket attractive, it was perfectly square. Even without blocking, it did not skew in any direction. Was the source of this perfection, the pattern of the yarn? Go to Zooty Owl for directions on crocheting a diagonal stripe. (zootyowlcards.blogspot.com/2013/11/rainbow-candy-diagonal-granny-stripe.html) If you have crocheted with Bernat Pop or have executed the Diagonal Striped Granny Stitch on a blanket or other project. Please post your experiences or your pictures.  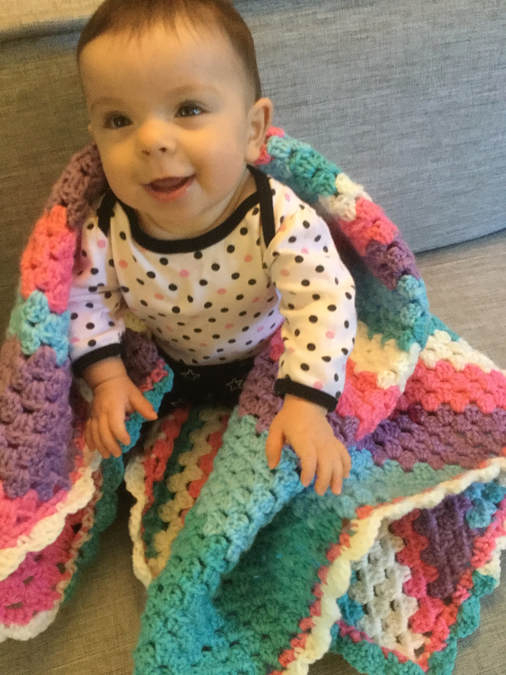 |
Archives
November 2022
Categories
|


 RSS Feed