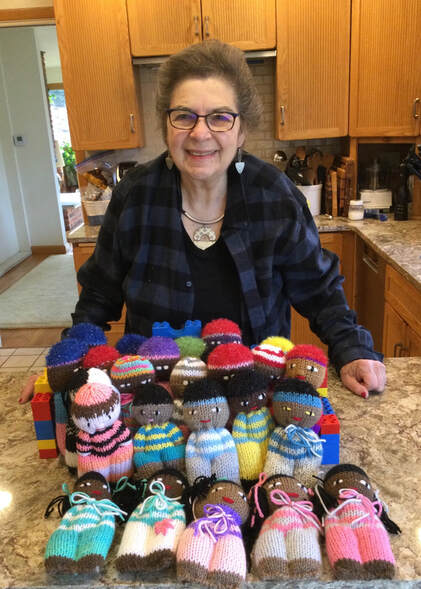
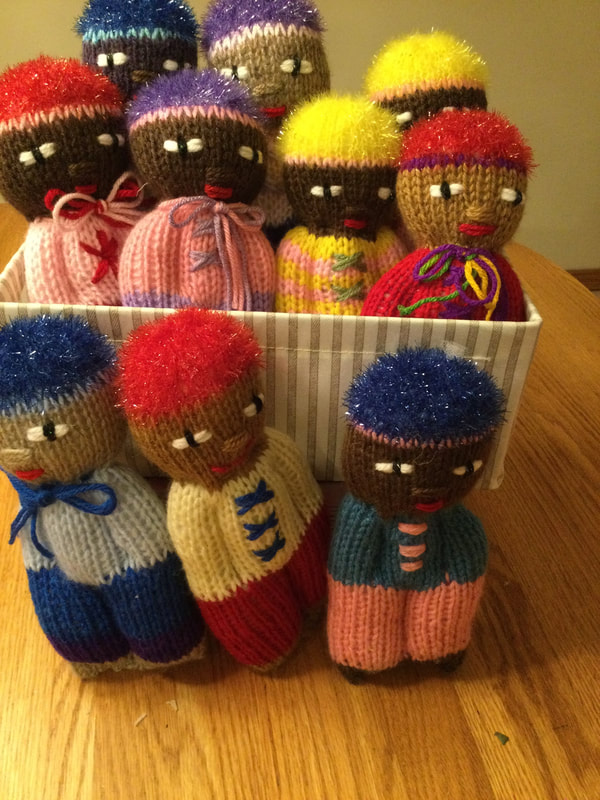
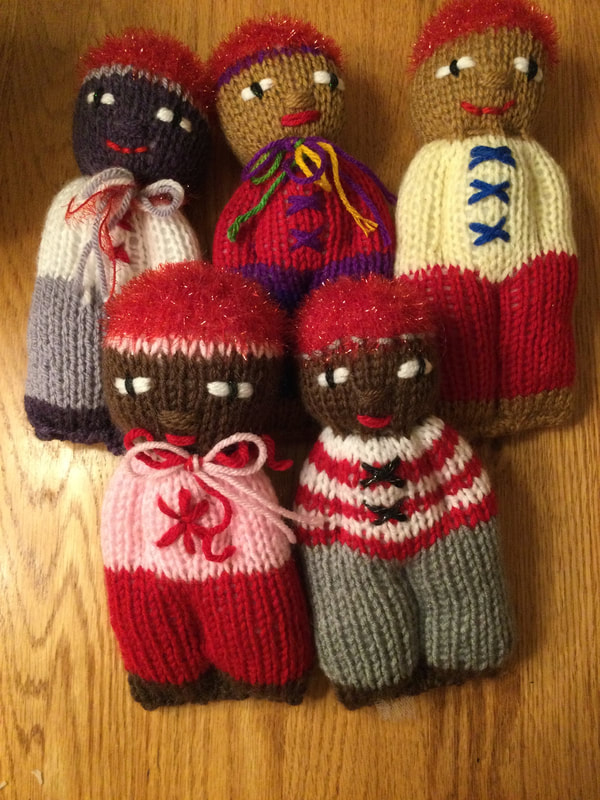
 Creating Comfort Dolls has kept me absorbed in the spirit of the "Giving Season" While so many of us have so much it is easy to get concentrated on the details of preparing holiday celebrations or shopping for gifts for family and friends. Yet there are so many people who have been hit hard by the economy and the pandemic. While monetary donations for just causes are always welcome, I find that giving the work of my hands makes a special connection for me. While I knit and crochet hats, scarves, shawls, and mittens, The Comfort Doll, also known as the Peace Pal or the Izzy Doll, has a special meaning for me. For several years I have donated my dolls to Knitting4Peace, It is a wonderful organization that distributes dolls and other needed pieces to children and families hit by disaster or need in the U.S. and world wide. I use their patterns for the dolls and knitted mittens. Although. I usually ship my works directly to the organization for distribution, I am using their suggestion to take a photo of my pieces and to send the tally to the group. In this way, my local organizations receive the productions, but both Knitting4Peace and I avoid the hefty postage costs. During the last month I have added to my collection to produce over 50 dolls. 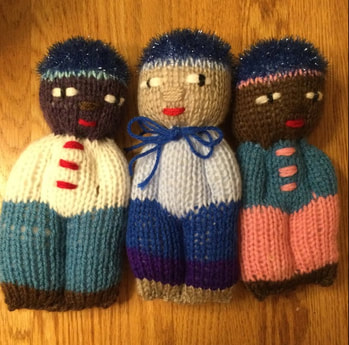 Knitting Comfort Dolls is such a win-win for me on so many levels. I get to involve myself in the creative process to explore color combinations, techniques, new hair and costume sales. It is a terrific way for me to work with my small scrap collection. For more information of creations and construction of these comfort dolls, see: http://www.lilcreates.com/lillians-blog/knitted-comfort-dolls-made-with-love. Additional creative suggestions can be found in: http://www.lilcreates.com/lillians-blog/knitted-comfort-dolls-a-new-look. As you can see from the pants and striped shirts, it does not take many yards to dress up your dolls. I also get to experiment with new yarns. I bought Lion Brand Scubby Sparkel to knit crazy hair for gender neutral dolls in colors red, blue, purple, yellow, and green.
A rough black scrubby yarn makes for realistic locks for boys of color. I added a jaunty headband to coordinate with the outfit to offset the hair with a few rows of color. 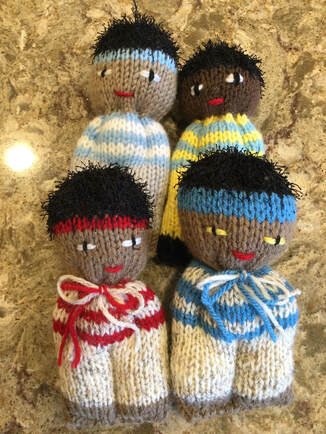 A new favorite is my set of dark haired girls with hair tied in colorful yarn. When I have more time I could add matching skirts or dresses, but I was pushed by my own self imposed goals to produced 30 dolls so that my newest group would have dolls for all fo their clients for the holiday season. 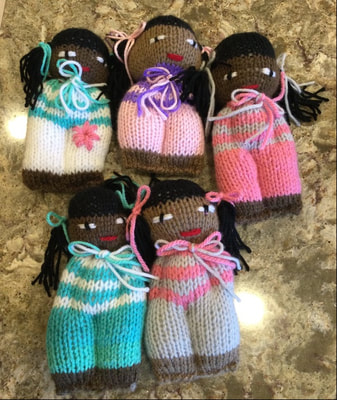 'The mission of RKids, located In New Haven, Connecticut, is to reconnect families and children who had been in the foster child system with support and guidance. For children who cannot go home, they also work on adoption. I really enjoyed my meeting with Randi Rubin Rodriguez, an administrator for the organization. She was able to share her vision, and we discussed the opening of the new facility in June, 2022. Since I want to share my skills, we began to explore the idea of starting an intergenerational knitting and/ or crocheting group that would be open to the children and their parents or grandparents. Boys/ Men as well as women would bur welcome. This is just in the wish talking stage, but, we can always plan and dream. Along with the 34 dolls, Also donated 20 pairs of knitted and crocheted mittens to keep hands warm during the winter. This year I taught myself how to knit and crochet mittens with a thumb gusset. The two needle method made my transition from fingerless gloves easier. 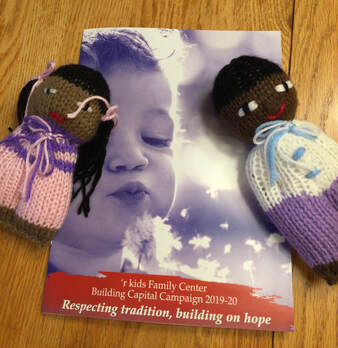 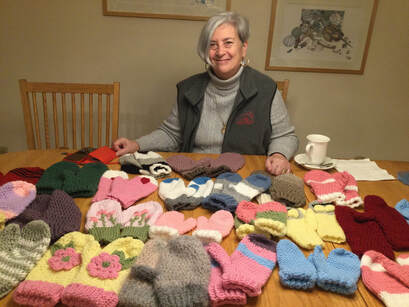 A member of my local knitting and crocheting group at the Woodbridge, Connecticut senior center was collecting for Hartford Bags of Love. A policeman in that city outfitted a van with shelves to store packaged hats, scarves, and mittens to help the needy residents of Hartford warm during the cold winter months. I did not have an opportunity to add dolls this initial donation, but I am working on a new supply. 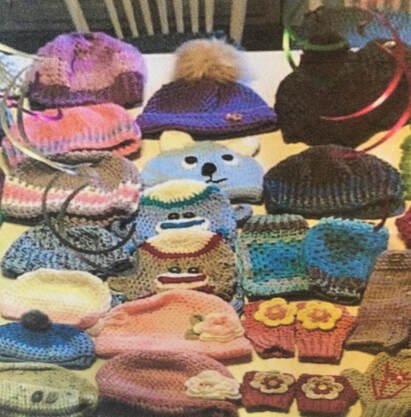 My last group is the Woodbridge Human Services Department. These dedicated professionals seek out the elderly and families in need to provide services, food, vaccinations, warm clothing, and transportation to doctor appointments. We are a relatively small town with fewer than 9,000 residents, but this group shows that our community has a big heart. Currently, they are putting together holiday baskets with personal items, but they plan to offer an open "shopping" session in which the donated hats, scarves, shawls, mittens, and my dolls will be on display for individuals and families to select items that are most appealing to them. The Human Services Apartment is headed by Jeanette Glicksman and Ellen MacDonald. Kristy Moriarty and Jessica Espito work with the Senior Center. Judi Young is the social worker. Our consistent, hard working, and caring staff may seem to be in the background, but they make an important difference. So here is my shoutout!!! The tragic pandemic and its effects on the elderly and people of all ages has heightened our awareness of what we as individuals can do in our communities. I have been most fortunate to be able to make the transition from sales of my knitted and crocheted goods to donations. While I still create for family and friends, I no longer have the burden of trying to sell my wares, and, I have the absolute joy of sharing the work of my hands. 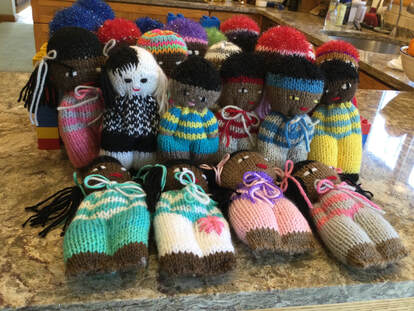 As always I welcome your reflections and feedback. I welcome you to join my on my stitching journey.
2 Comments
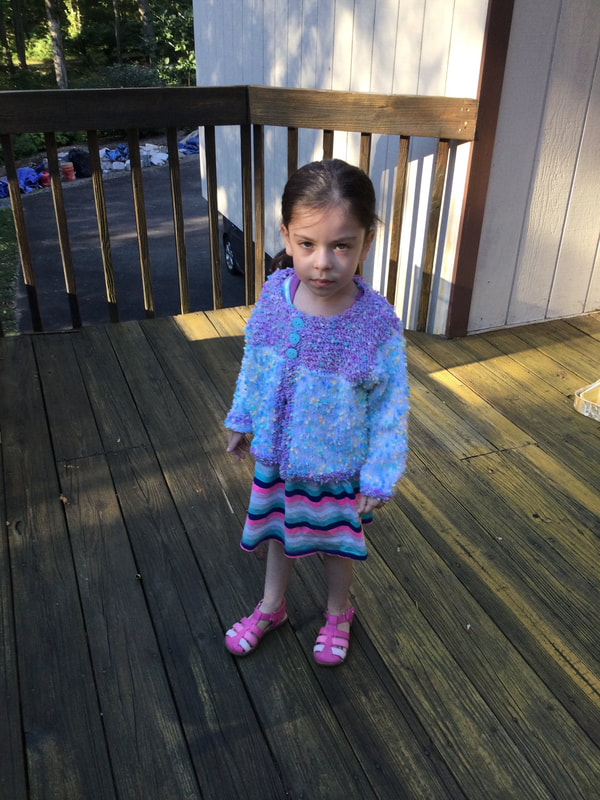
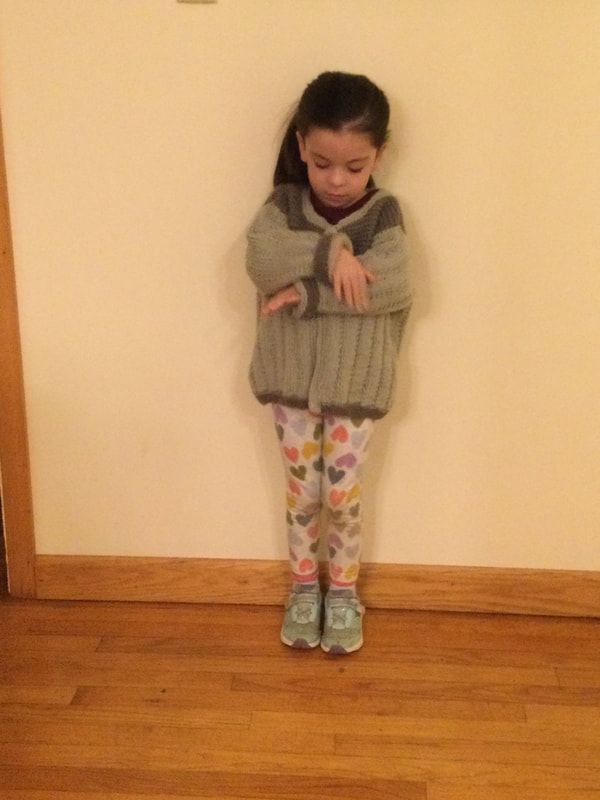
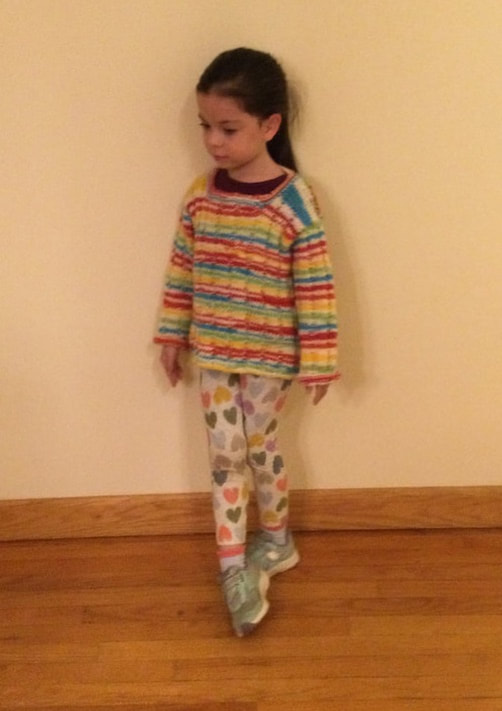
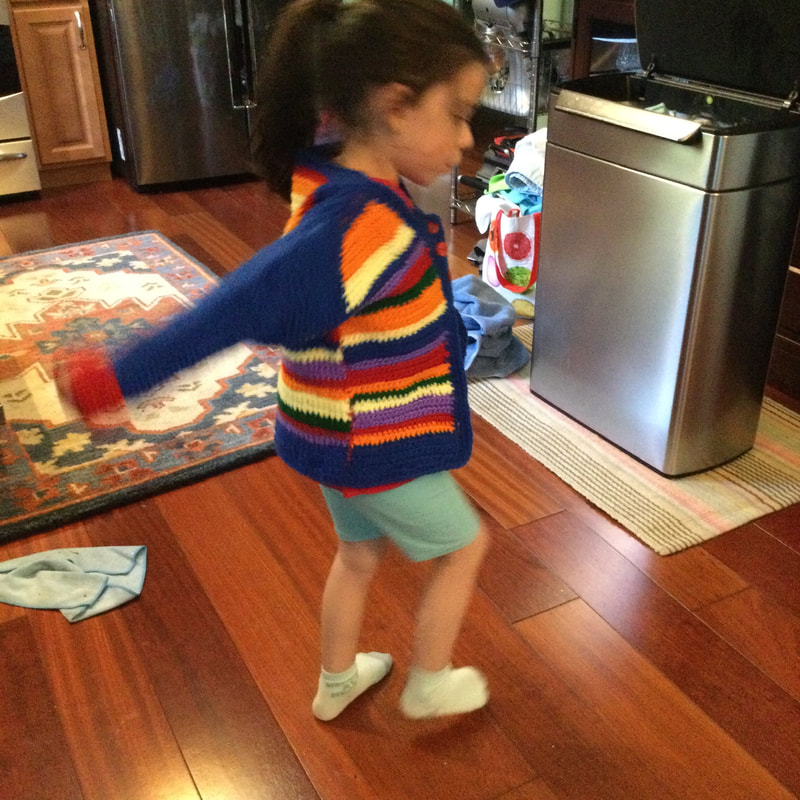
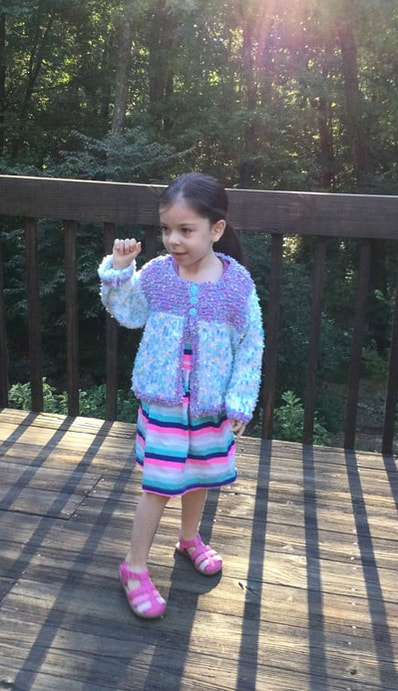 While many crafters insist on working from free patterns, I find a great deal of stimulation when I visit my local independent yarn shop. The proprietors display many knitted and crocheted designs as well as an enormous and varied inventory of books and binders of patterns. They stimulate my imagination and call for me to try my hand at many new creative projects. When I can pair the pattern with the yarn, I am ready to go. While the yarns are typically more expensive than those found in large craft stores or from on-line sources, they are frequently high quality fibers that are colorful, soft, luxurious, and interesting. I usually reserve these purchases for family members or close friends when I give myself that special treat. Plus, I really want to support these dedicated vendors so that they are there for me when I want to make something special. Sometimes, I start with a pattern that I find on their shelves of binders. At other times, the yarn (especially if it is on sale) is the source for my inspiration. My favorite independent yarn store is The Yarn Barn in Woodbridge, Connecticut. 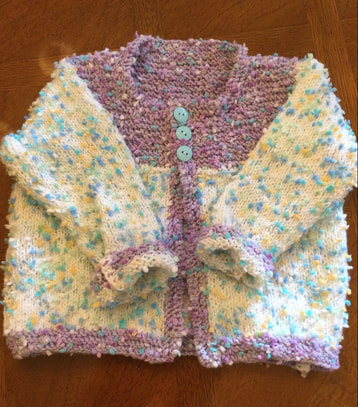 When I purchase a pattern, I typically like to find one with multiple looks from the same set of directions. The Child's Pullover and Cardigan, #P601, written by Jelli Beenz, published by Plymouth Design Studio was able to deliver. Although the pattern originally called for a Jelly Bean Yarn that is no longer produced, I was able to find two coordinating Paintbox yarns. The first worsted weight yarn was light purple with aqua and yellow speckles. The coordinating yarn was white with aqua and yellow speckles. The border and bottom, and neckline were knitted in garter stitch with a #6 knitting needle. The body and sleeves were knit with a #8 knitting needle. I made this first piece in size 4 for my petite 4 year old and daughter. I love the contrast between the yoke, borders and main part of the sweater. While the pattern called for a ribbed texture on the body of the sweater and a garter stitch on the yoke, the uneven texture of the yarn made it difficult to showcase the ribbing. Therefore, I knitted garter stitch on the borders and the yoke, but I used a simpler stock and net stitch for the body. I was thrilled that I had the perfect 3 aqua buttons for the closing in my stash. This sweet young lady loves wearing this cardigan to Pre-K and frequently is complimented by her teachers. 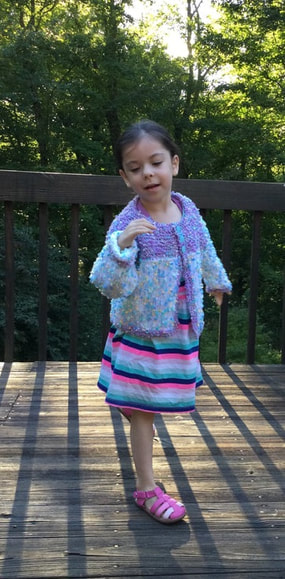 Then I tried the same pattern with two shades of grey in size 6 for her six year old cousin. However, while she is slim, she is big for her age, and the sophisticated interpretation of the sweater did not fit her. As you can see from the picture, the four year old can wear it now, but there is plenty of rom to grow. The sophisticated coloring yielded a completely differently different look. While the yarn for the first sweater was purchased from yarn shop, the yarn for the second sweater was in my stash, originally purchased from a large craft store. Again, the garter stitch was used for the neck, borders, and yoke. The two row repeat four-two broken rib is just right for the main body and sleeves. The three grey buttons for the closing came from my collection.  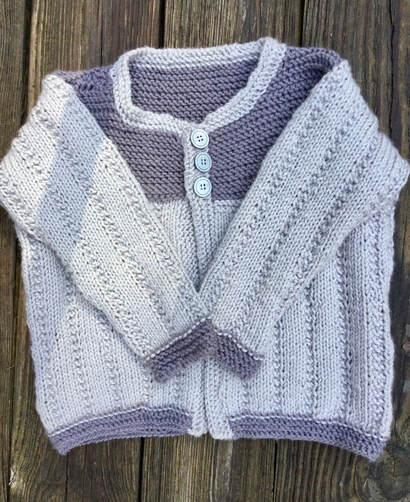 Although I usually knit cardigans, the third sweater was a pullover with a wider neckline that makes it easiler to pull off and on. I bought the multicolor rainbow yarn on the same day that I got the speckled yarn. My granddaughter saw the rainbow yarn peaking out of my bag and inquired whether the yarn was for her. How could I deny her? The Paintbox yarn was a lighter worsted weight. While I used the same #8 needles, I think I would have been better off with a #7. The cardigan was knitted entirely with the broken ribbed pattern, and there is no change for the yoke. This sweater was also knitted in a size 6. While it is roomy. the sweater works well as an oversized pullover. 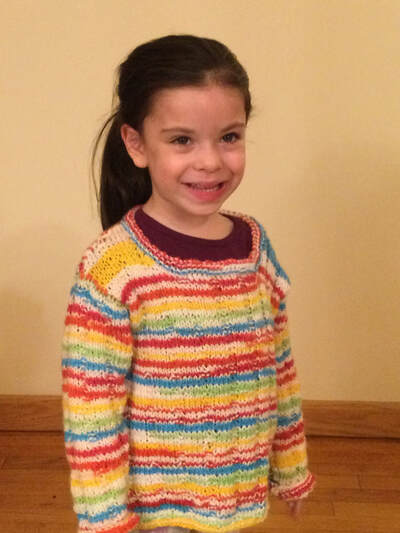 I knitted the three sweaters over the course of a few months with other projects in between. Once I figured out the quirks in each of the designs the sweaters were relaxing to create. I appreciated your feedback and comebacks. I welcome you to join me on my stitching journey.
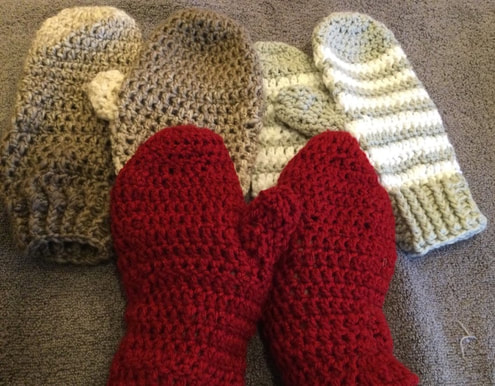
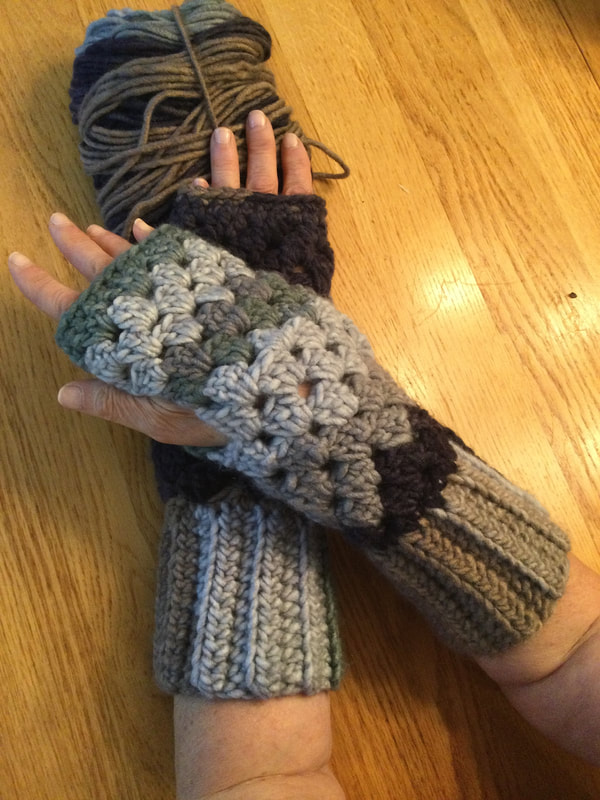
 Creating mittens has really stirred up my creative spirit. i started with knitted mittens and transitioned to crocheted mittens. If you read my last post, you would have noted that my designs started with the cuff and went up to the fingers. However, as I did my research, i was excited to explore the exciting patterns that started with the fingertips and work down to the cuff. Then the thumb was added, and voila, a lovely mitten. 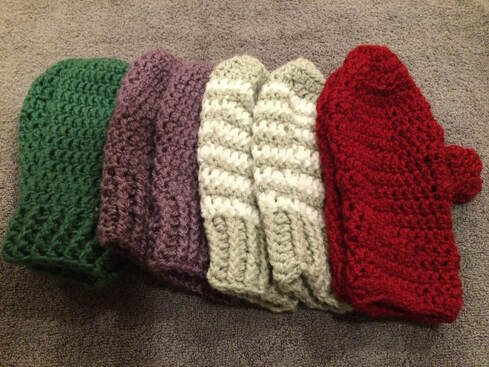 My first pattern for top down mittens was published by Ticklish Fingers.(http://ticklishfingers.blogspot.com/2013/2014/crochet-mittens-innstructions-oncluded.htm).The pattern starts with a magic circle and incorporates the double crochet stitch. I started with mittens with alternating colored rows. The mittens were easy to make, and the resulting product was attractive and comfortable. Since I was working in double crochet, using worsted weight yarn, and an H (5.0mm) hook, I was able to complete the pair in a matter of hours. The solid burgundy and the self striping acrylic/wool Lion Brand Scarfie blend went even faster. These mittens guard against the chill,, but for a warmer mitten I would try a denser stitch.
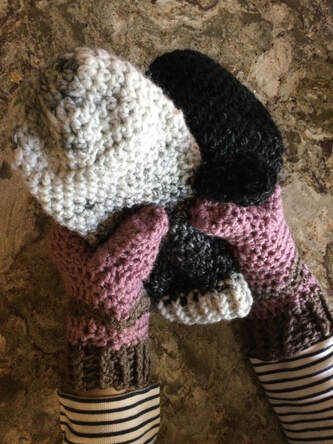
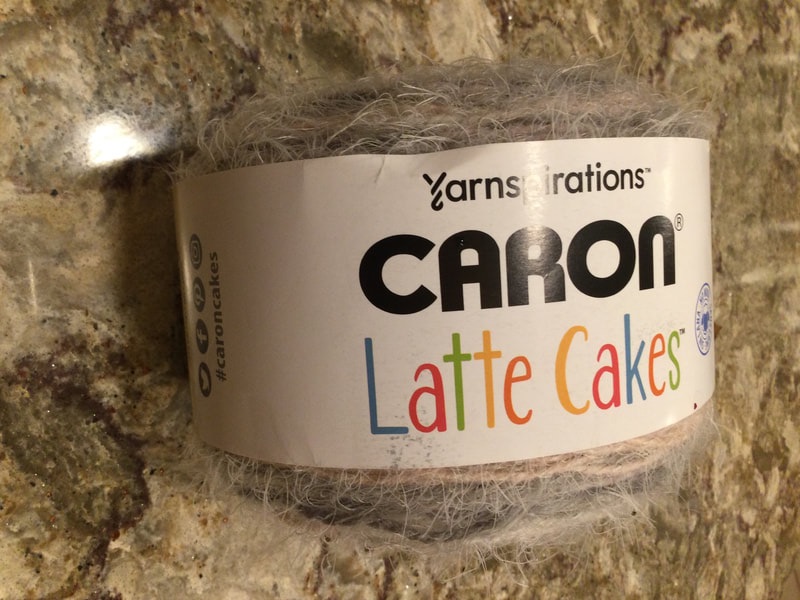
Quick Crocheted Charity Mittens by Random Randi's Ramblings (https://www.rave;y.com/patterns/libary/quick-chairty-mittens) also started with a magic circle and worked well with double crochet stitches. The pattern calls for an H (5.0mm) hook for the body of the mitten with a G (4.0) hook for the cuff. I did not make the switch and used the H hook throughout the project. The purple and green worsted remnants from my stash were put to good use. Another remnant from Caron Latte Cakes made for warm, fuzzy, and cozy mittens. These mittens were a bit more form fitting and seemed a bit warmer. The pattern called for the thumb to be crocheted separately and then joined to the body of the mitten at the thumb hold. I reversed the directions and crocheted the thumb directly out from the thumb hole.The cuff was produced by alternating front and back double crochet post stitches.The length of the cuff actually depended on the amount of yarn I had left in the remnant. The pattern is available as a free Ravelry download and can be used for charity or personal use. 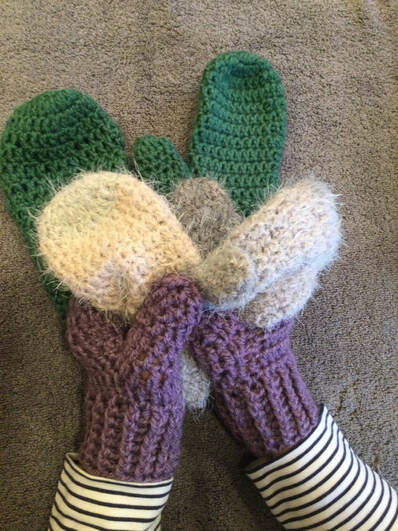 The Perfect Fit Mittens from Left in Knots (https://leftinknots.com/home/crochet-perfect-fit-mitten) differs from the first two sets of mittens, as directions call for a half double crochet stitch in the body of the mitten. The directions do not require a separate cuff, but I chose to add the alternating front and back post stitches. Since this stitch is a bit tighter, the mitten feels warmer. I plan to keep the black/gray Lion Brand Scarfie yarn mittens for myself. Since there is about 20% wool in the yarn, I really like the feel of these mittens. The heather rose and brown striped mittens were made from small discount skeins which are perfect for donating. 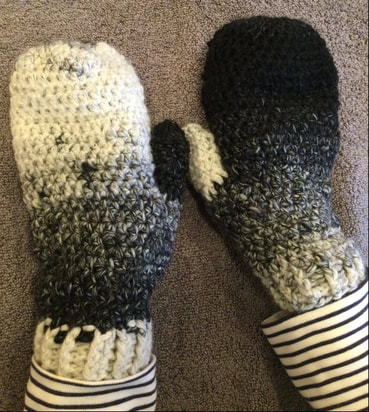 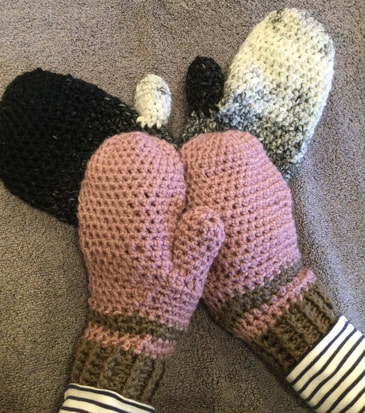 The Mixed Stripe Mittens Crochet Pattern (https://stitch11/com/mixed-strip-mittens-crpchet-pattern) was densest of all as it used the single crochet stitch. When I followed the directions with the plum, pink, and blue mittens, I felt that the mittens were a bit tight. Then I moved up to an I (5.5mm) hook. However, the gloves were still snug for an adult hand, and were best used for a youth or young teen. I would even consider going up to a J (6.0mm) hook to get a looser feel. 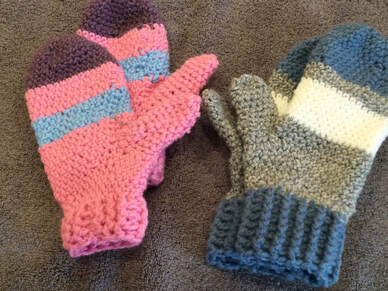 While most of these mittens will be donated to local charity groups, I will probably keep the black and white Scarfie Yarn mittens for my winter accessory wardrobe.. If I make a crocheted hat, the set will work well with my black trench coat . Of the three textures, I like the half double crochet from Left in Knots the best. At this point, having knitted and crocheted countless mittens,I am all mittened-out for a while. I have a couple of requests to make up before the winter holidays, but I am ready to start some other projects.
I hope that you have enjoyed the results of my research and will undertake some mittens of your own. I appreciate your remarks. feedback, and photos. I welcome you to join me on my stitching journey. 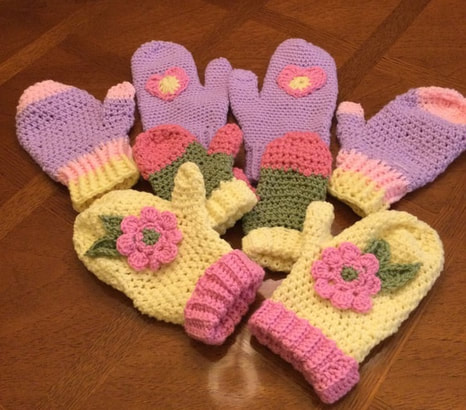 My mittens journey continues with a several crocheted versions starting with the hand or cuff and moving up to the fingers. My previous article showcased knitted mittens, but I was eager to try my hand at crocheting. For me the knitted mittens have a smoother texture and are easier to show detail. However, I can still include blocks or stripes when I crochet. Appliques break up the expanse of plain stitching and even hide uneven surfaces. Plus, the crocheted mittens feel warmer. My mainstay mittens are the fingerless versions that I have interpreted with many designs and various yarns. Now I am adding the thumb and completing the top as my non-profit clients have requested mittens that present warmth as well as style. After considerable research, I found 3 patterns that were easy to follow, included a range of sizes, and fit well. In order to share the patterns with my readers, I have crocheted one or more pairs of mittens for each set of directions to make sure that I shared information as a fellow crocheter. All of the patterns in this article are crocheted with worsted weight yarn. My first pattern is Caron Hands Full Crochet Mittens by Yarnspirations. Sizes include 2/4 years, 8/10 years, and adult. (Caron Hands Full Crochet Mittens,Blue. Item #CAC0315-004045V) The authors recommend Caron 1 pound yarn as the mittens are recommended for charitable donations. you can get 8 pairs of toddler, 6 pair of child, and 4 pairs of adult mittens from a single skein. A US 7 crochet hook is recommended, but I find it hard to crochet with small hook and went up to the 8(H hook, 5.0 mm). I use the 7 for flowers and appliqués. The ridged cuff is made to look like a knitted version. By crocheting with a single crochet stitch from the back loop only (BLO), you will make strip that achieves this effect. The strip is crocheted together from the short ends. Then you crochet around 1 row with single crochet before starting the Half Double Crochet that forms the basis for the rest of the mitten. Instructions are given to form the gusset. The thumbholes are left open as you crochet the rest of the hand and the closing portion of the fingers. Then the thumbs are added to the mitten. Both mittens are identical, and you do not have to differentiate for right and left mitten. My photos show the child and adult sizes. The color blocked child size is a great way to use up large ends from your stash. The adult version features a floral appliqué that adds playful touch. 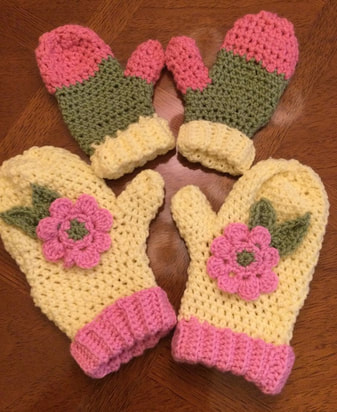 The Free Crochet Pattern: Mrs>Murdock's Mittens offers pre-school, child, and women's sizes. (https://www.ravelry.com/patterns/library/mrs-murdocks-mittens) The instructions call for a G 4.0mm hook, but again I used an H 5.0mmhook. As the pattern was done entirely in single crochet, I found that the sizing was comfortable, and the mittens were attractive. I crocheted the women's mitten for this pattern. I have a medium to large hand, and I was quite happy with the fit. The appliquéd two toned heart broke up the plain surface. Be sure to attach appliqués or floral designs to the tops of both gloves. Place your thumbs together as if you are playing the piano so that the attached pieces match. 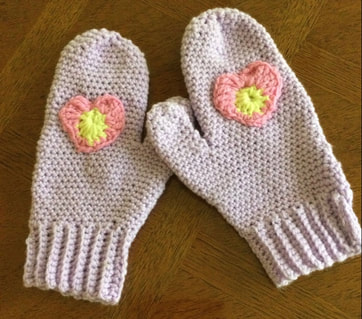 The third pattern that I chose to share with you is Crochet Basic Mittens Pattern for Adults https://www.crochetforyoublog.com/2021/03/crochet-basic-mittens-pattern-for-adults Patterns come in small, medium,. and large sizes. I think that the smallest would fit a child or teen. Although there are specific directions for each size, the authors show you how to personalize the mitten that fits you exactly. The hand and thumb are crocheted in Half Double Crochet stitch. (HDC The mitten directions start at the bottom of the hand just at the thumb gusset. You crochet the thumb hole, and finish the hand and mitten top. Then you add the thumb. Finally you add the cuff. The directions for the cuff are given before the directions for the specific sizes. These directions were different than most mitten cuffs, and I substituted, the procedure that uses the alternating Front Post DoubleCrochet (FPDC) and the Back Post Double Crochet (BPDC). I have used this technique in many of my hats and fingerless gloves to achieve an attractive ribbing. My ribbing was only a few inches long, but you can make it twice as long so that you can fold up the ribbing. I found that these mittens were wider than most.  rMost of my mittens will be donated to non-profit organizations for keeping their clients warm duringthe winter months.I have been looking for local sites as I want to help my local Connecticut communities. An added benefit is that I avoid the exorbitant mailing costs that I encounter when I send my work across the country.
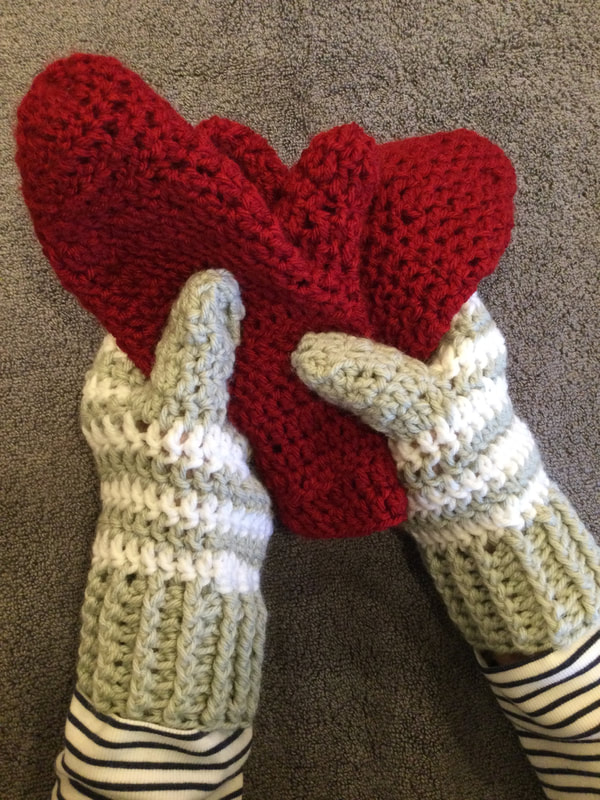
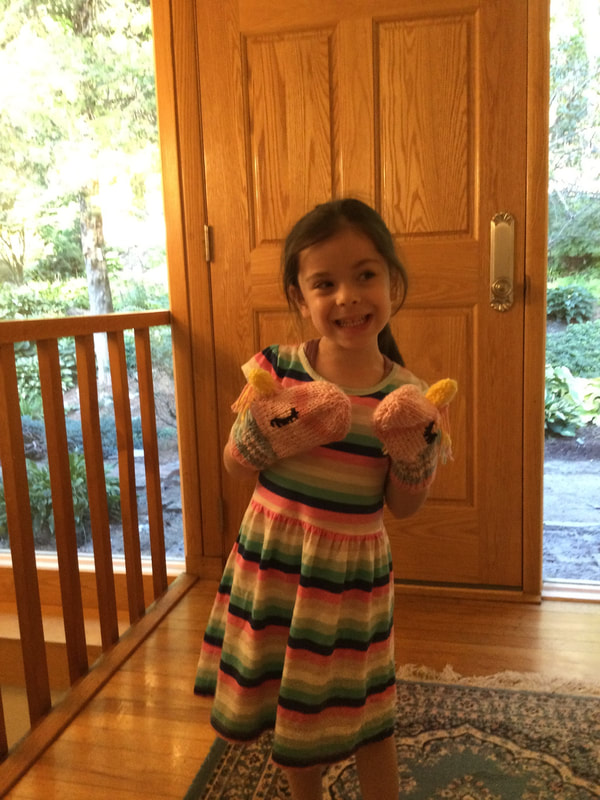
You may have noticed that I stipulated in the title that these mittens were crocheted from the cuff up to the fingers. Much to my surprise, I found a different construction as I was doing my research on crocheting mittens. That design is crocheting from the fingers down to the cuff. I have made several mittens featuring this type of construction and will feature them in a future article. Then you can take your pick. As always, I welcome you to join me on my stitching journey. Please provide you questions and feedback. I hope you enjoy these patterns and projects. Whether you crochet for yourself or others, I hope that you take joy in the creations. Please include photos of finished mittens if possible. 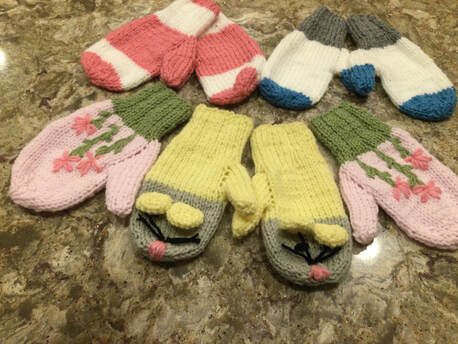 This year I promised myself that I would tackle the thumb gusset and knit a mitten with a covered top. Fingerless mittens have been a favorite project of mine that I have knitted and crocheted for several years. I have gifted them to family and friends, sold them at fairs, and have worn them as an atractive accessory. However, with my fair activity dramatically paused with CoVid, I wanted increase my donation of my products to charitable groups. However, these organizations preferred the closed mitten as their clients really needed to keep their hands warm in the cold winter months. Although I know how to knit on double pointed needles that most mitten patterns require, I do not enjoy that activity. I usually use them to close off knitted beanies, but I rather not knit on the dp needles for an entire project. When a friend in my knitting and crocheting group introduced me to the two needle method I was hooked. Her pattern was a bit complicated, and so I searched for a pattern that I could execute in any environment.  My favorite pattern was designed by Arna Caplan for Knitting4Peace. I have knitted hundreds of Peace Pal dolls and countless hats and scarves for this wonderful organization that sends pieces filled with love to at risk communities throughout the USA and Internationally. I also have several other organizations on my giving list. Now I wanted to try my hand at mittens. In contrast to other patterns, the right and left mitten are identical. They are knitted with worsted weight yarn with number 5 and 8 needles. Pattern sizes are youth's, women's, and men's sizes. The mittens are knitted flat, starting with the cuff. After a few rows, you start the thumb gusset. When the desired number stitches is reached, place the stitches on a holder. The knit across top of the row to fort the the hand. Follow directions for decreases to finish off the top of the fingers. Leave a long tail to sew the mitten together. Join yarn at the thumb stitches and knit the correct number of rows before completing thumb. Sew hand and thumb seams. I prefer blanket stitch, although others may prefer to crochet the edges or use a mattress stitch. 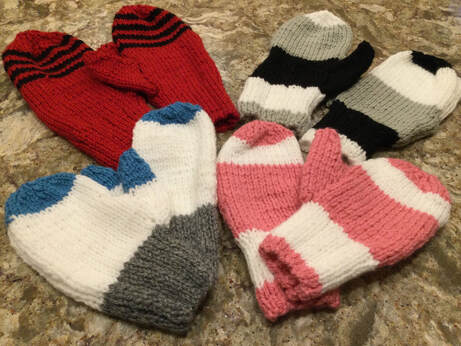 Their are countless ways to decorate your mittens. Two of my favorites are stripes and color blocking. You can knit both mittens the same or you cn change the arrangement of the colors for an intriguing mismatched look. 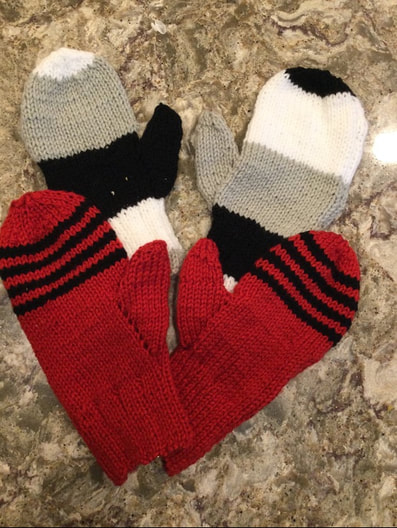 These embroidered flower mittens are just the first of many. 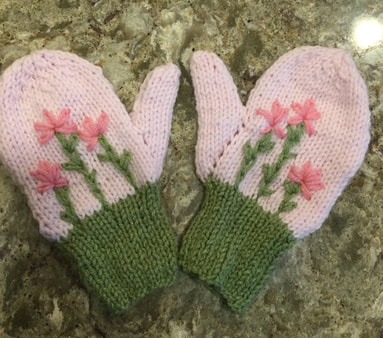 A friend asked me to knit a pair of unicorn gloves for her granddaughter and a pair of dinosaur gloves for her grandson. My granddaughter is modeling the unicorn mittens, but I will have to make her a warmer pair for her to wear.
There are all kinds of animals that one can knit. Even if the design is for the four dp needles, you can adapt the picture to the two needle method. For the mittens below, I embroided a mouse face and crocheted the ears. 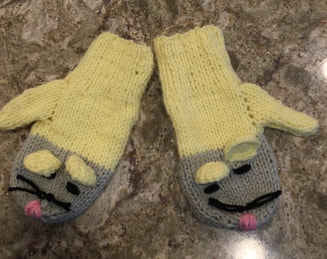 Rita's Family Knit Mittens from Yarnspirations is an intermediate skill mitten that features Red Heart Super Saver Yarns in sizes from 2/4 years to men. Knitting needles are size 6 and 7. The directions for the right and left mitten are different so that the thumb placement is more accurate. I found the pattern harder to follow and went back to my first set of directions. As always I appreciate your feedback and reflections. I welcome you to accompany me only stitching journey. As I craft I am always learning. Now that I knit a mitten with a thumb. My next goal is to learn how to crochet a mitten with a thumb.
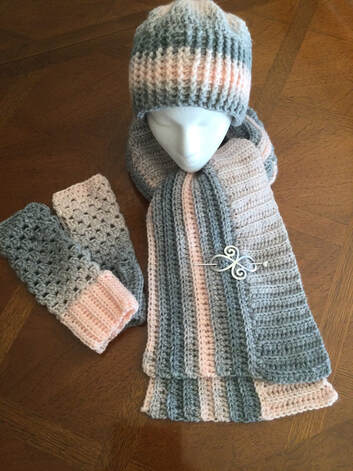 With the colder weather in autumn and winter, I decided to create pieces to coordinate with the my inventory of fingerless gloves. (http://www.lilcreates.com/lillians-blog/crocheting-the-last-skein. My first instinct was to crochet a hat with the stock left- over skeins I had used to make the chunky weight gloves However, I knew that a scarf would finish off some of the sets. The taupe remaining yardage crocheted from my Lion Brand Scarfie evolved into my favorite beanie from Lakeshore. With an additional skein, I would have a regular length scarf about 45 inches long. When I applied a shawl pin, the scarf worked well at the neckline of my beige trench coat. After my first creation, wanted a longer model and bought an additional skein to crochet a 60 inch scarf. 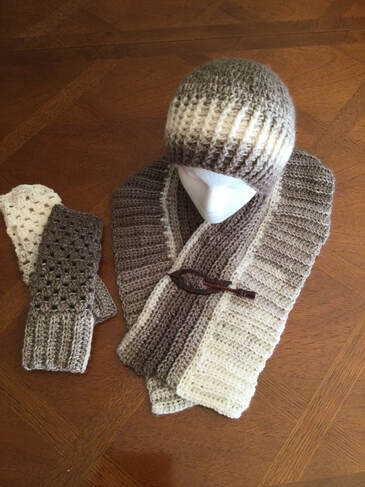 The second scarf was created with with light grey and pale pink tones. I was able to make a simple looped tie closed the scarf with a silver pewter scarf pin to that the layers would lie flat. What makes this scarf different from others that I have crocheted is that I have crocheted in two different directions. 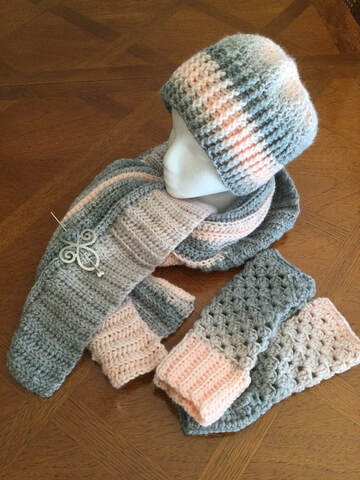 Pattern: Two Directional Crocheted Scarf Materials: Approximately 1 skein of Lion Brand Scarffie (#5) for a scarf 45inches long x 7 1/2 inches wide (312 yards) 1 2/3 skeins of Lion Brand Scarfie (#5) for a scarf 60 inches long. x 8 1/2 inches wide (approximately 500 + yards) An equivalent heavier weight Worsted or Aran of 225 grams or approximately 500 yards would also work for the longer scarf. An Ombre Yarn, such as Red Heart Super Saver would also produce the desired effect. Crochet Hook: I or 5.5mm Directions: Part 1: Chain 15 stitches. You will be making short rows in this section. Row 1: Half Double Crochet in the second stitch from the hook. (14 stitches) Row 2: Chain 1. Half Double Crochet (HDC) in the backlog only (BLO) across the row. (14) Repeat Row 2 until you reach the desired length. Your panel will be about ___ inches wide and about 3 1/2 inches long. A single turning chain is used so that there will not be a gap at the beginning or ends of the rows. By crocheting in the BLO you will be forming ridges across the short rows. DO NOT FASTEN OFF. Part 2: Turn Row 1: HDC [picking up stitches as you work your way along the length of the scarf. Row 2: HDC on the BLO as you crochet along the length of the scarf. Ch 1. Turn to begin the new row. Repeat these long rows until you have crocheted about 5 inches. My width of the long row section of my taupe scarf run 4 inches as I ran out of yarn, but it worked well for the shorter piece. A wooden or pewter scarf pin is the perfect accent to anchor the layers. 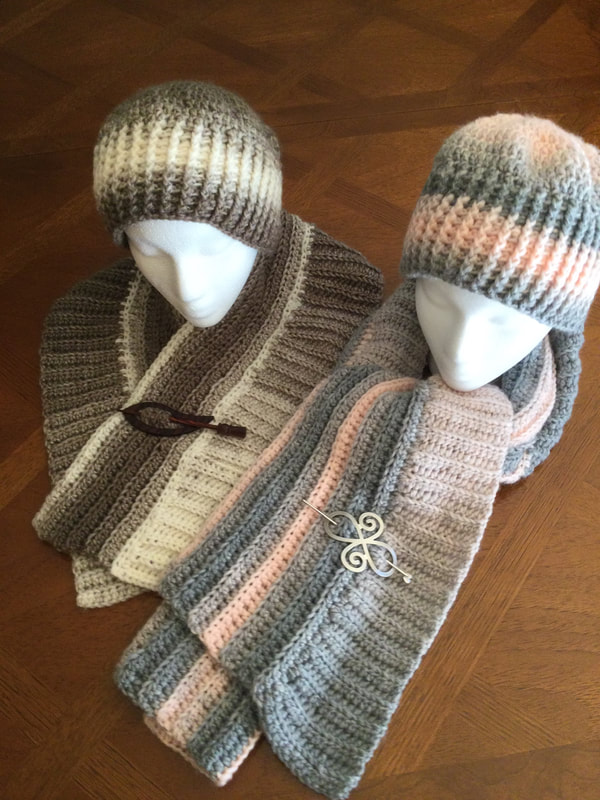 As always I appreciate, your reflections and feedback. Please share your interpretations and phots of your work. I welcome you to join me on my stitching journey.
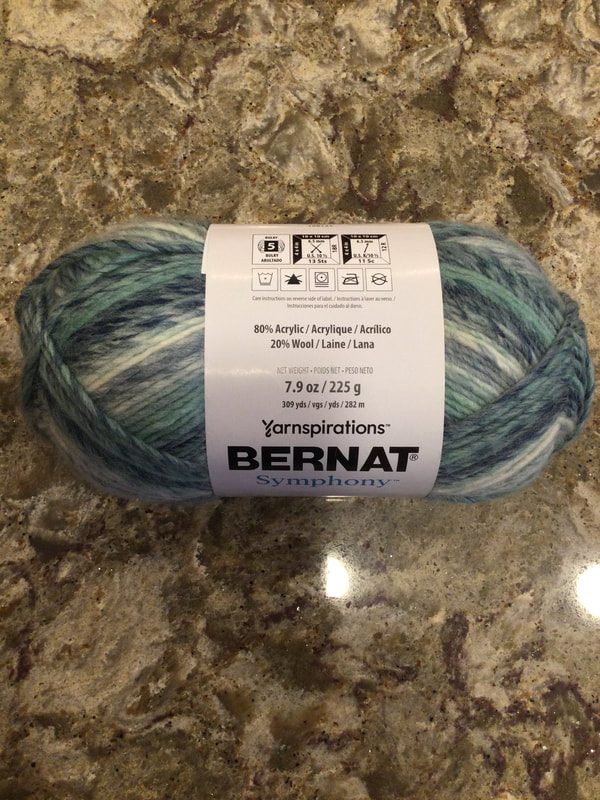
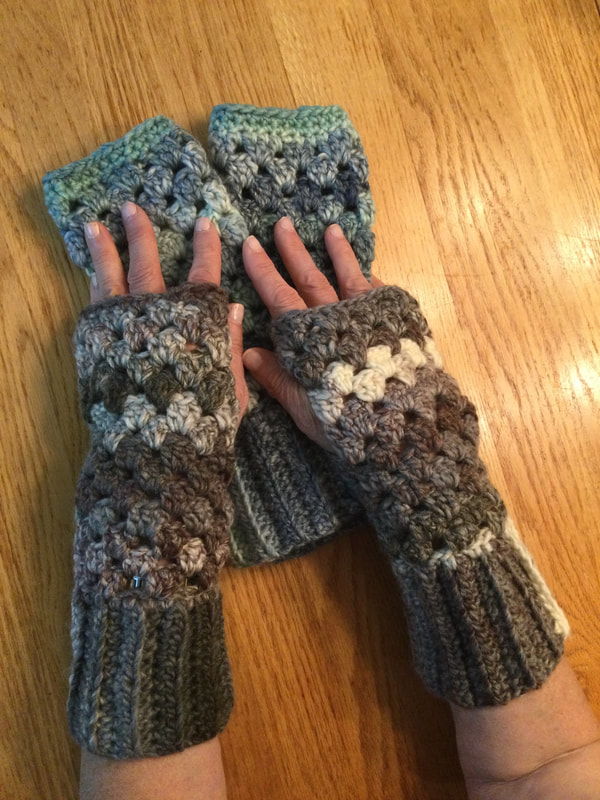
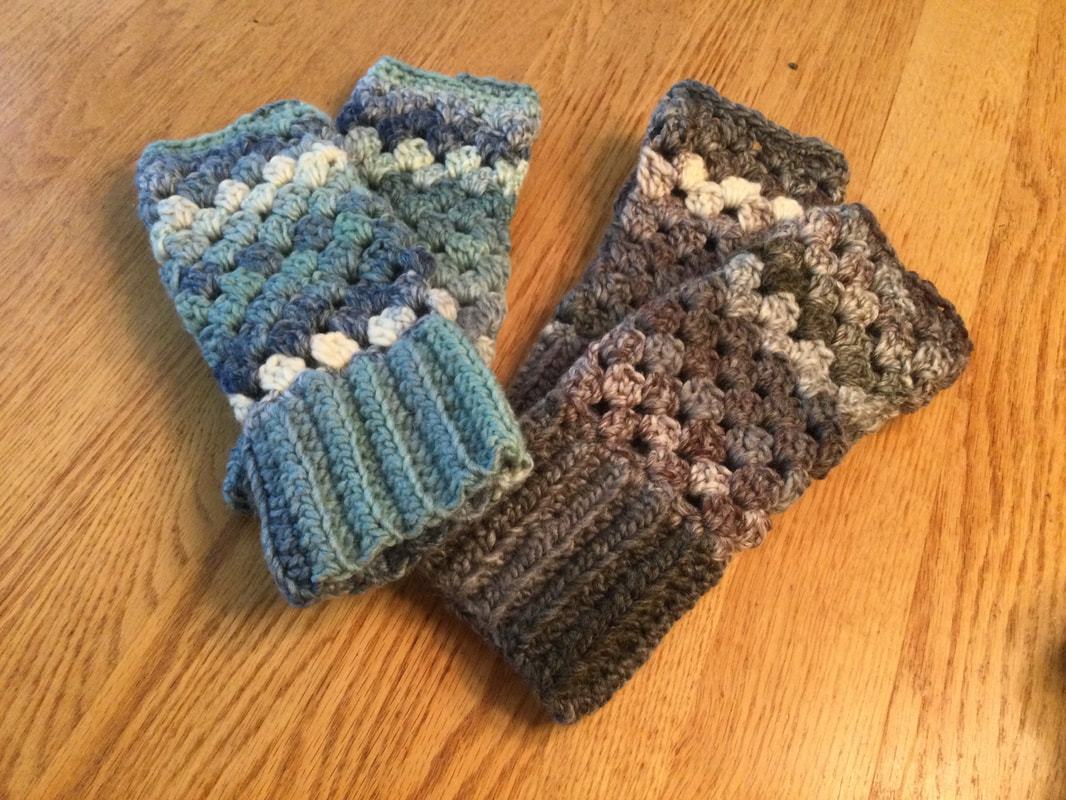
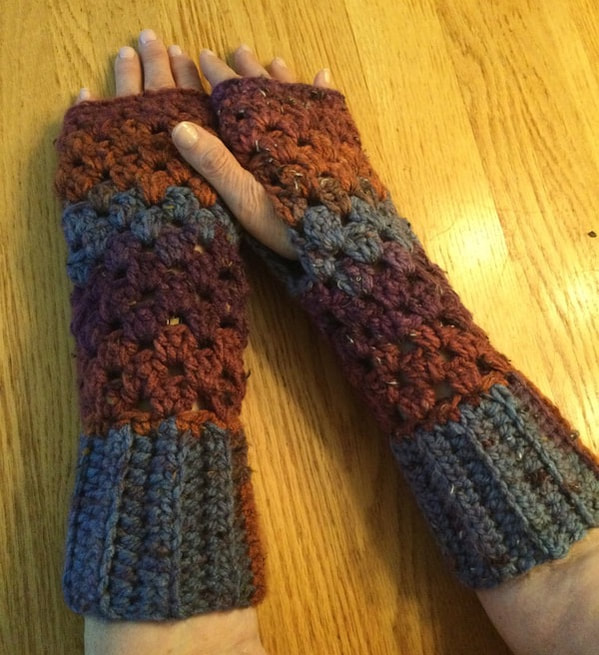
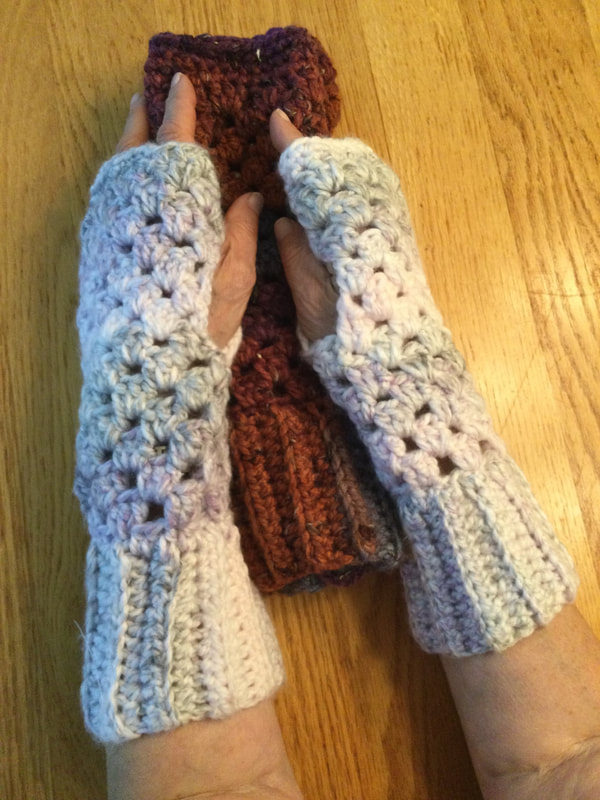
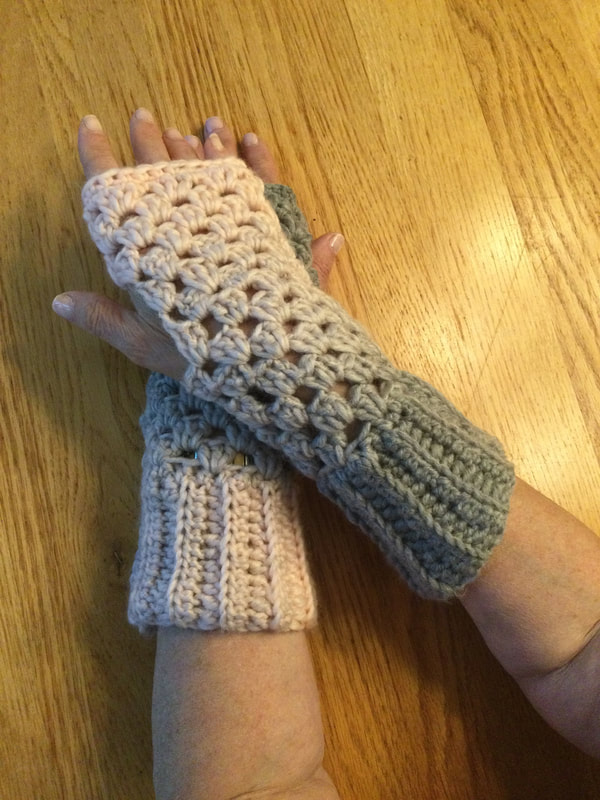
 - As I prepared for my main outdoor craft fair of the 2021 season, I sorted through my fingerless gloves to determine my displays. A favorite sale item has been the exquisite, cushy, long gloves crocheted from Premier Appalachia Yarn. The yarn is a single ply, bulky weight, sel-striping fiber that is 90% acrylic and 10% alpaca. The yarn is luxurious, and the colors are gradual and sophisticated. Several years ago I found a 50% off display at my large craft store, and I bought about 12 skeins. Although there were only 140 yards in a 200 gram unit, I set aside 1 skein to use to combine to finish off the individual pairs. Many of my customers sought out these gloves for holiday presents, and I presented a pair to a few selected friends. I knew that I had come to the end of my stash of this fiber as I held the last piece that included off white, light grey, gold, and pale apricot tones. I stroked the yarn. and divided it in half as I began to crochet my last pair. I realized that I would not have enough to finish off the last few yards of the top, but luckily I had a remnant of gold LionHeart Scarfie that would blend well with the other shades. A couple of weeks before the fair, I set out in search of yarns that would replace my beloved chunky #5 Appalachia. I was after a yarn that yielded the softness, beautiful colors, and stitch definition of my beloved fiber. One of my best matches was Symphony by Bernat. The yarn is a single ply, bulky weight, self-striping fiber that is 80% acrylic and 20% wool. The yarn comes in 225 grams for 309 yard balls. The yardage allowed me to crochet a luxurious pair of long fingerless gloves and a matching beanie hat. At sale price of about $7.99, I could rationalize a purchase price of $40 for the set. I had not finished the beanies in time for this first fair, but Iwill be ready for another outdoor fair or possible online sale.In the future, Could also use one skein for 2 sets of fingerless gloves. However, I might have add a coordinating bulky yarn for the last couple of rows.
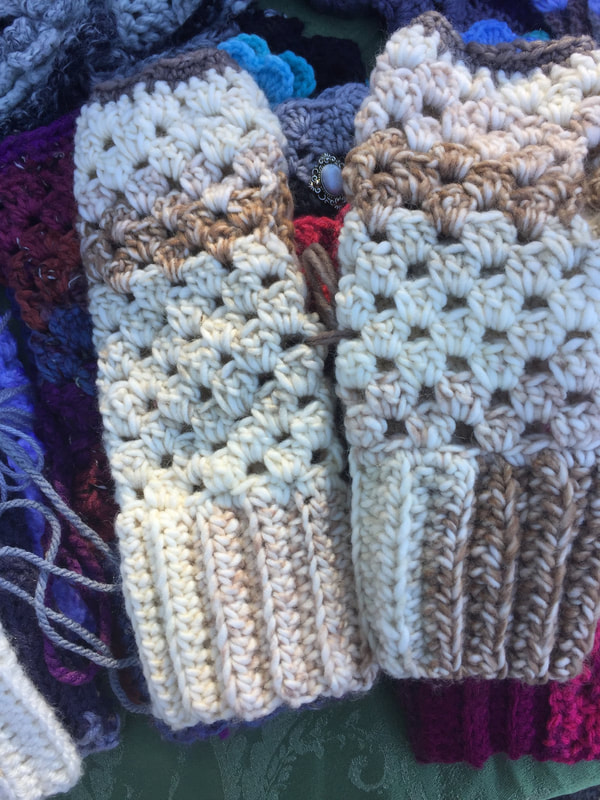
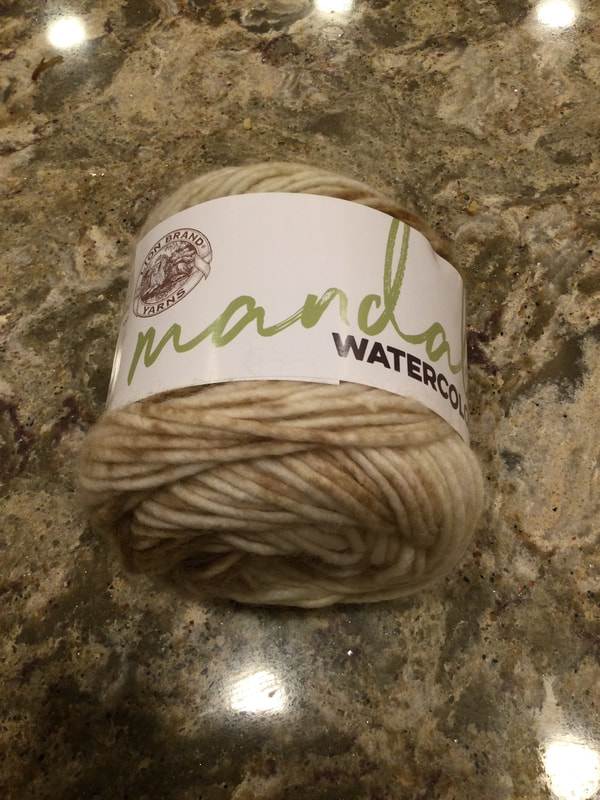
Mandalla Watercolor Yarn by Lionbrand gives a hand dyed look. This bulky yarn is also single ply in a blend that is 75% acrylic, 15% wool, and 10%, nylon. The Almond colorways that includes cream, tan, and medium brown included 164 yards that was just enough to complete the long fingerless glove with a few rows of border. A customer at the fair bought it up quickly, and it was one of my first sales of the day.
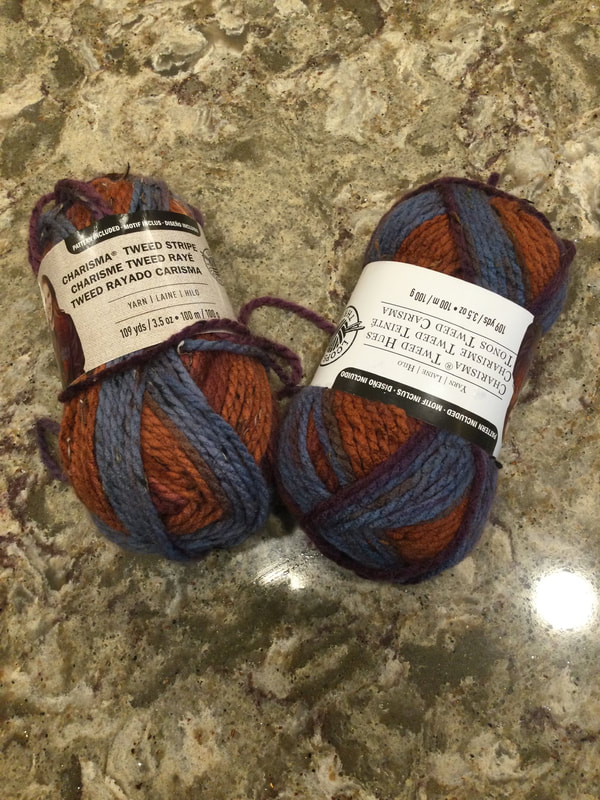
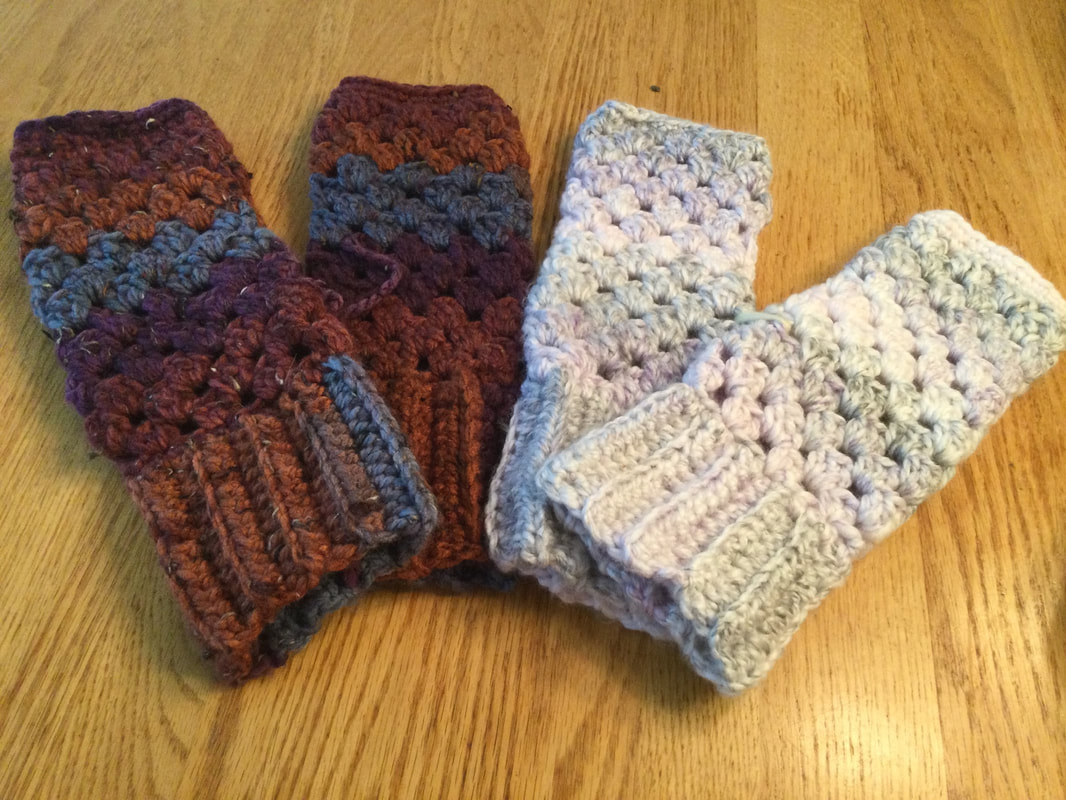
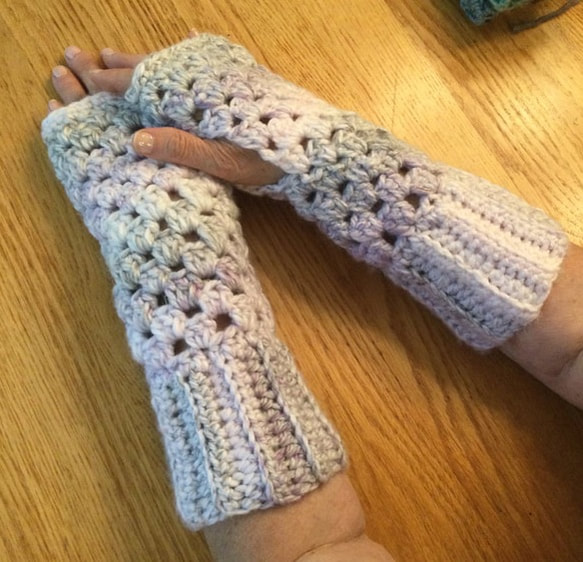
The Charisma Yarn by Loops and Threads From Michaels was at the bulkier end of the #5 range. Each 200 gram skein included 109 yards, and I had to use 2 skeins for each pair of gloves. The pale strawberry-multi was one of my favorites. The rust, blue, and black yarn was dynamic. The self-striping yarn is 100 % acrylic and quite plushy to touch. With a price point of approximately $4.49 per skein, my cost per pair of gloves was $9.50. I will probably have to change my prices for the plushy bulky yarns to $25 or $30 while I keep my worsted styles at $20.
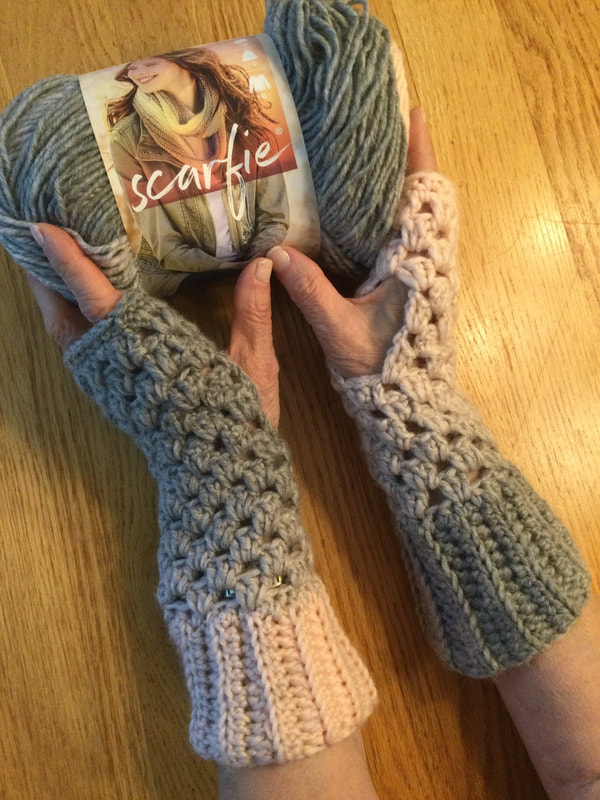
LionBrand Scafie has long been a favorite of mine, but is on the thinner side of the #5 range. This self-striping yarn yarn is 78% acrylic and 22% wool. I selected a Cream Taupe and later bought a Pink Silver. The 312 yards enabled me to crochet a pair of gloves as well as a beanie. In fact I went back to JOANNs to buy some other yarn and bought another skein to crochet a matching scarf. I am planning to show case these sets with others in a forthcoming article. I will also include a pattern for the crocheted scarf at that time.
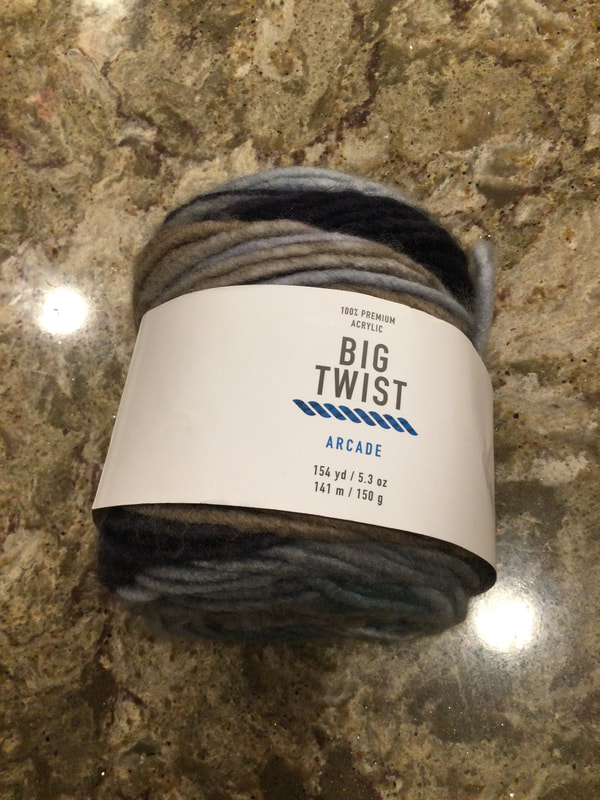
The bulkiest of the #5 self-striping yarns was The Joann Big Twist Arcarde Yarn. It is a single fiber 100% acrylic yarn with smooth color movements. The skein weighs in at 150 grams and includes 154 yards. However, I was in for an unpleasant surprise. I expected to need a few yards of a compatible bulky yarn to finish off the top of my fingerless mittens. However, I completely ran out of yarn when I was at the midway point of the second glove and had to return to the store to secure enough yarn to finish the set. Even at a sale price of $5.99, the cost for a pair was almost $12. The gloves are thick and luxurious, but this meant that I would have to increase my purchase price on these bulky gloves as well.
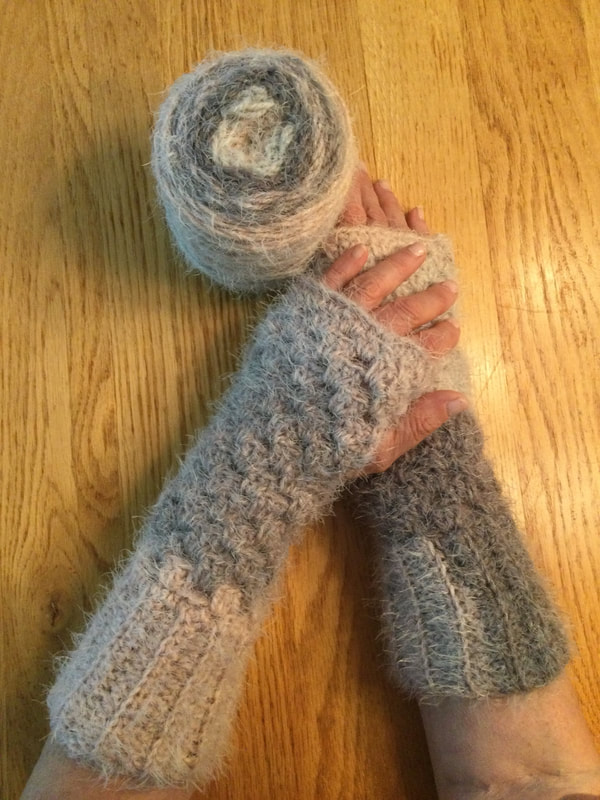
My last selection was Latte Cakes by Caron (Yarnspirations) . This subtle self-striping yarn comes in delicate shades with a fuzzy surface. The skein weighs 250 grams and includes 530 yards. Although the yarn is labelled a bulky #5, it seems thin for that category. The gloves and hat are soft to the touch. The fiber content is 58% acrylic and 42% nylon. Although the yarn cost $9.99 I was able to crochet both a pair of gloves and a hat from a single skein. If I sold the pieces as a set for $40, I could recoup my costs. If I use this yarn again, I could also fashion 2 sets of gloves out of the single skein.
I have finished the gloves and am almost done with the Latte Cakes Hat. Of all of the yarns,I think that the Symphony by Bernat was my favorite. The gloves were plushy, and there was just enough yarn for the beanie hat. The Chunky Yarn Fingerless Gloves Pattern is a modification of my mismatched worsted pattern. It works best with the middle to heavy chunkier yarns. For the lighter skeins, you may wish to refer back to the original worsted pattern. Chunky Yarn Fingerless Glove Pattern
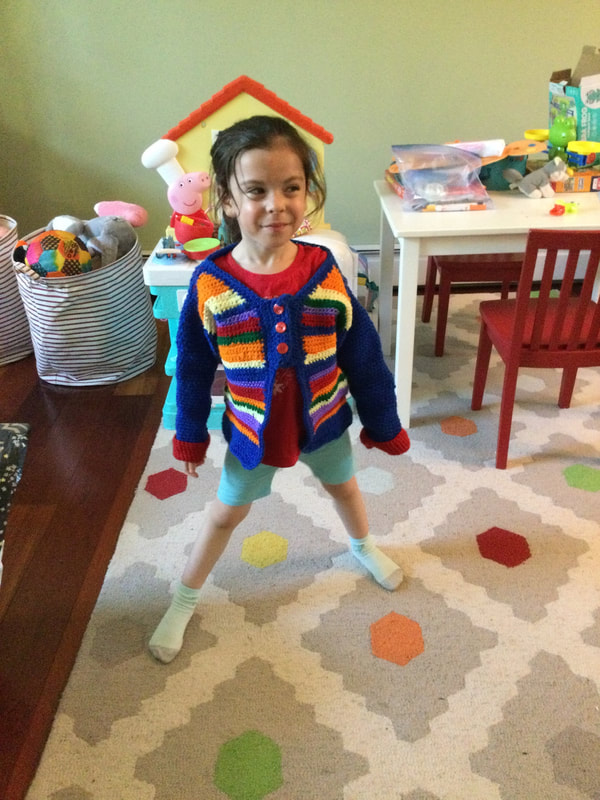
This pattern is a modified version of my Mismatched Fingerless Gloves that are crocheted with worsted weight yarn. The main differences occur in the hand below the thumbhole and at the top of the thumbhole Instead of 8 rows of Granny stitch groups below the thumbhole, I call for 6 rows. At the top of the glove, I simply crochet 2 rows of single crochet instead of the more elaborate shell border. Since the bulky yarn is heavier, I have left off the flower that I have added to many of my worsted weight gloves. I have added a decorative button many of my fingerless gloves. However, this decoration may not be needed for the plushy chunky gloves. some customers feel that it catches or gets in the way. Materials: Approximately 165 yards of bulky #5 yarn; 5.0 H hook ()to ket that thicker texture for the glove); large eye needle for weaving in ends. Please note that most manufacturers call for a 6.5mm or K hook to be used with the bulky weight yarn. However, I prefer the density and stitch definition that is achieved with a 5.0mm or H hook. Directions: Cuff: Chain 13 stitches. HDC in second stitch from hook and continue across (12 stitches) Row 2-20 Ch 1, HDC in back loop Single crochet short ends together Body of glove: Row 1: ch 1, HDC in same stitch and around for 24 stitches, sl stitch to join Row2: After join seam,Ch 3. S DC in same space. Skip 2 stitches. 3 DC group in next space, Continue around for total of 8 clusters. Slip stitch to join. Row 3: Continue in tops of group to space between clusters. Crochet 3 DC for form cluster. Continue around and slip stitch to join. Row 4-6 Repeat Row 3. Thumbhole: Row 7: Continue in top of cluster to form first group of thumb hole row. Continue around to form 7 clusters. In the next row you will reverse direction of stitches. Row 8: Chain 2. Form a Double Crochet cluster in next spaced continue around. You will end with a double crochet. Row 9: Form a Double Crochet Cluster in first space. Continue around with Double Crochet clusters inch space, ending with a Double Crochet Group. Row 10: Chain 2. Form a Double Crochet Group in next spaced continue around. You will end with a double crochet. Row 11: Form a Double Crochet Cluster in first space. Continue around with Double Crochet group in each space, ending with a Double Crochet Group. Slip stitch to close. This is the close of the thumb hole opening. Top of Glove above Thumbhole: Row 12: Slip stitch on top of DC group until you reach the first space. Chain 2 and crochet 2 DC in same space. Continue with 3 DC in each space around. Close with slip stitch. You will have 8 groups again at the top of the thumbhole. Row 13: Slip stitch across the top of the stitches in the first group. In next space, Chain 2 and make 2 more DC in the same space. Continue around until you have 8 groups and close n top of next stitch with slip stitch. Row 14: Slip stitch across the top of the stitches in the first group. In next space, Chain 2 and make 2 more DC in the same space. Continue around until you have 8 groups and close n top of next stitch with slip stitch. Row 15-16: Chain 1. Make a single crochet inch stitch around and close with slip stitch. Finish off and weave in ends. 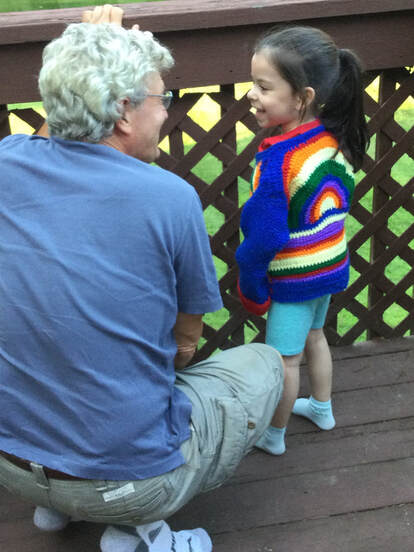 This Double Rainbow Crocheted Cardigan brings a smile to all of those who see it. My inspiration for the sweater was The Over the Rainbow Toddler Sweater by Yarnspirations.com/bernat. This multicolored treat ranges in sizes from 2T to 6 and uses 7 shades of worsted weight yarn with a J (6.0mm) hook. When I saw the photo of the sweater, I knew I wanted to make it, but I needed to make several changes to express my vision for the piece. The Double Rainbow Crocheted Cardigan starts with half-double-crocheting the double rainbows on the back section. Then the bottom layer is added. The original pattern instructions include detailed information for creating the rainbow and for crocheting the color sequences. However, instead of the 7 shades of worsted weight yarn, I substituted 6 colors that were truer to the rainbow hues. Another significant change that I made was to eliminate the aqua in the basic design. With this transition, first I had to make changes in the color sequences and number of rows for each color in the rainbow itself. Then, I changed the number or rows and color sequence for the bottom section. I noted that the authors of the pattern included different numbers of rows for the various colors. The random arrangement was attractive and easy to improvise. Since I was working with my own vision, I had to be guided by my granddaughter's measurements as I executed instructions for size 4T. 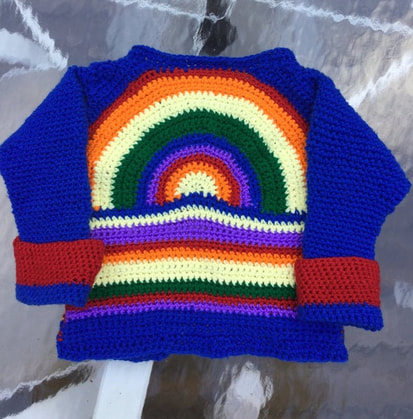 After the back is completed, directions are given to square off the rainbow for the back part of the shoulders. The front of the sweater is worked from the shoulders down through the v-shaped neckline and straight down to make each front of the sweater. Since I was substituting my own color sequence, I just had to make sure that I varied the number of rows in a pleasing matter. Once I completed the first front, I wanted to doublecheck that the opposite side matched exactly. I also had to confirm that the front pieces matched the back in length. 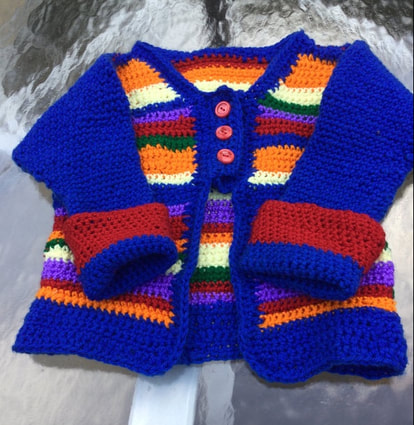 The pattern called for the sleeves to be crocheted top down and then sewn into the sweater. I selected a different strategy. Once I sewed the shoulders and the side pieces, I took the stitch count for the top of the sleeve and crocheted the same number in single crochet into the rounded armhole. I followed the directions for decreasing the number of stitches as I moved from the shoulder to the wrist. I eliminated the extra colored stripe and stayed with blue and red for the sleeve. The sleeves are longer than the child's arm and are designed to be folded up to form a contrasting cuff.
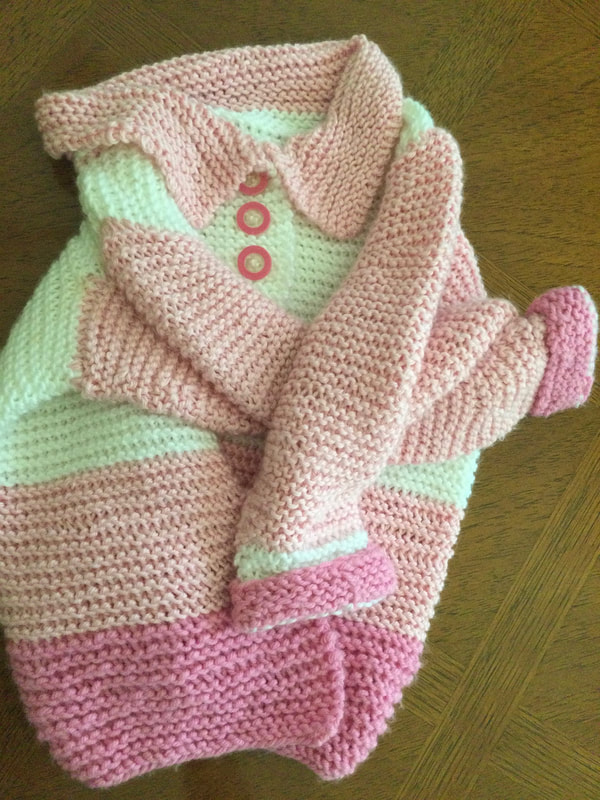
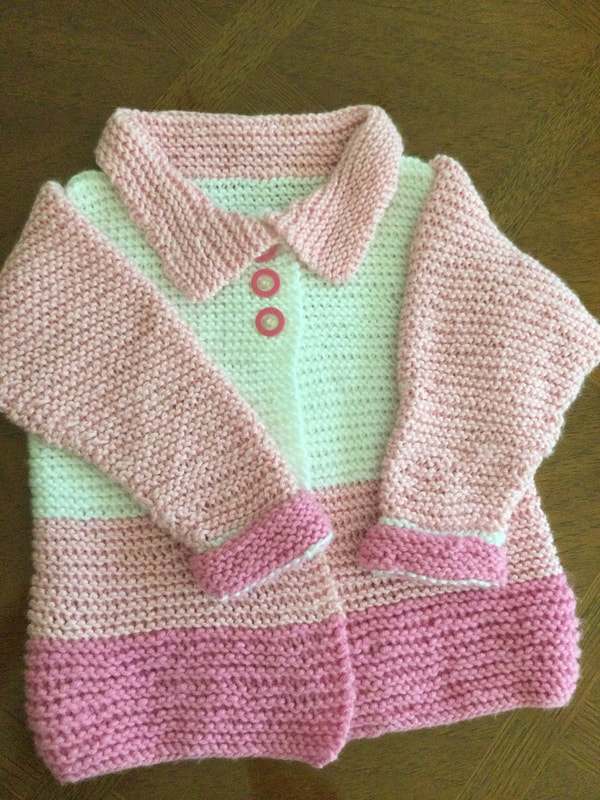
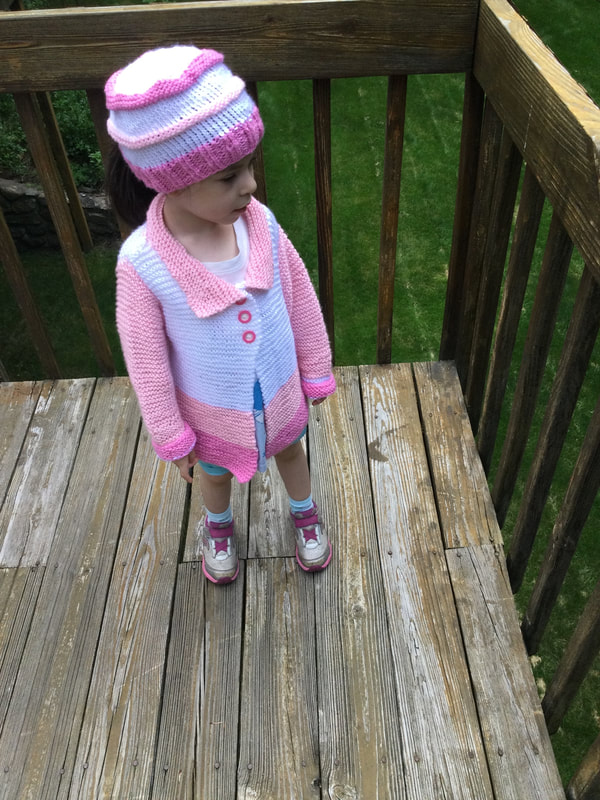
To finish off the sweater., I stitched two rows in half-double crochet along the bottom, fronts, and neck of the garment. Now, instead of the three sets of ties, I chose a sleeker version, by adding a 4 row single crochet placket of 18 stitches for 3 buttons and buttonholes. My granddaughter tried valiently to follow my directions to make poses that would show off the best features of the front and back of the cardigan. She looked adorable, but it wasn't until she was called onto the deck to observe the bunnies in her backyard, that we really got a wonderful natural smile. Many thanks to my sweet granddaughter who puts up with her Nana's requests even when she doesn't quite understand why I am putting her through these paces. The completed Double Rainbow Cardigan was an exciting piece to execute and photograph. The original sweater was attractive, but I am very pleased with the color and design changes that I made. Many thanks to the designers at Yarnspiration who wrote the pattern for this sweater so that I could put my own stamp on it. Readers, have you ever found a pattern that was interesting, but you were still inspired to work with it to develop your vision? As I continue on my stitching journey, I find that with increased confidence, I am able to combine elements from different designs that express me as an individual. In future blog posts, I will be gleaning from the many free patterns and as well as purchased pattern books to create pieces that use the best features of two or more patterns. This new venture promises to be exciting! As always, I appreciate your feedback and reflections. I welcome you to join me on my stitching journey. 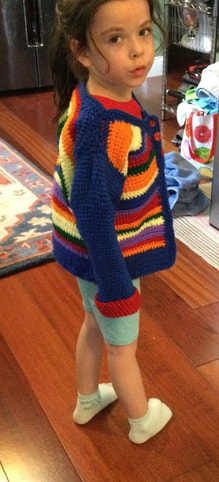 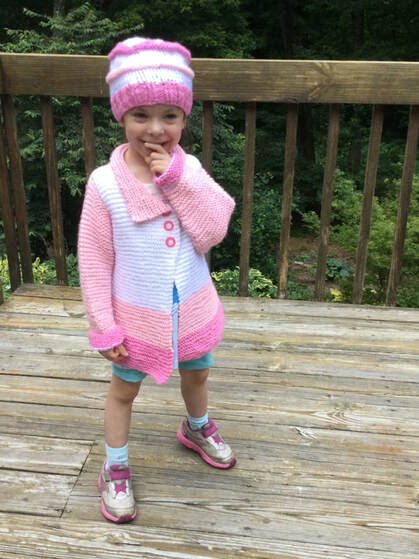 For those knitters who enjoy the simplicity of the garter stitch, this delightful sweater jacket pattern is just right for you. While the original pattern calls for a broad color block at the bottom, I have made the piece in both a solid blue tweed and in a three way color block with two shades of pink and a band of white. Both sweaters were knitted in worsted weight yarn with a #8 needle. Pattern sizes run from 4 to 12. The Sawtelle Cardigan pattern was designed by Amanda Keep Williams. To get free pattern register at annies catalog.com. I had retrieved the pattern from an earlier source, and so I just went through the procedure and it works. The original piece was made in a size 4T and ran true to size. As my granddaughter has several sweaters in 4T, I wanted to make the next size to plan growth during the winter season.The pink and white sweater is roomy as she is only wearing a t-shirt and shorts under the outer garment. When she puts on a couple of pounds and is wearing warmer winter garments, she will fill out the sweater. My sweetheart put up with all of our modeling directions. The pose I like best has her giggling as she gazed up at her daddy making silly faces. 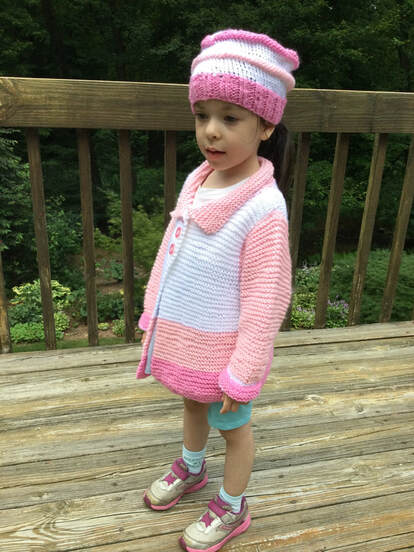 The sweater is almost seamless since you cast on enough stitches to cover the back and both fronts. A garter stitch is used thorough the sweater. After you knit the body up to the armholes on circular needles, you divide for the the back and armholes. There is no extra trim for this sweater. The garter stitch comes right to the edge. The buttonholes are made right into the garter fabric. After the sections are completed, you seam the shoulders together. The armholes are knit in the round. In order to achieve this look when knitting in the round, you have to alternate knit and purl rows. When you knit flat, you knit all the rows. This part was the only tricky part to the sweater, but after I got the hang of the procedure, my knitting went smoothly. 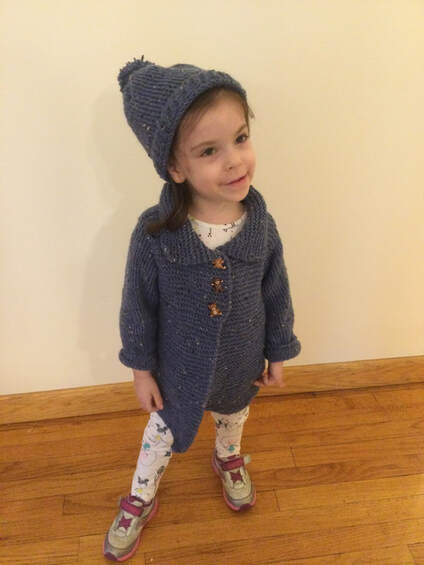 When I knit the sweater in a solid color, I followed the directions and began picking up the collar stitches with the right side facing. This step left the join on the inside of the sweater where you could not see it. However, when I chose to use a contrasting color for the collar, I had to start with the wrong side facing so that the join would be concealed as the collar lay over it.
This sweater jacket provides a basic canvas for trying out different combinations of yarn colors. Just remember to end your last row of a color section with a knitted row so that you get a smooth transition. Otherwise, you will have a line dashes when you turn your piece to knit on the reverse side. If you choose to use a self striping yarn you can avoid this situation. I am sure that I will knit this sweater again for other children in different colors and sizes. It has become part of my basic knitting repertoire.
As always I appreciate your reflections and feedback. I welcome you to join meonmny stitching journey.
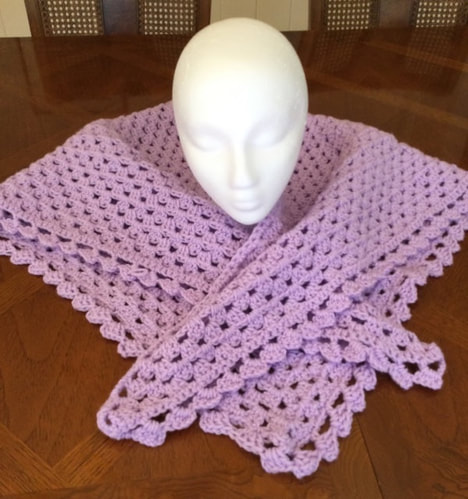
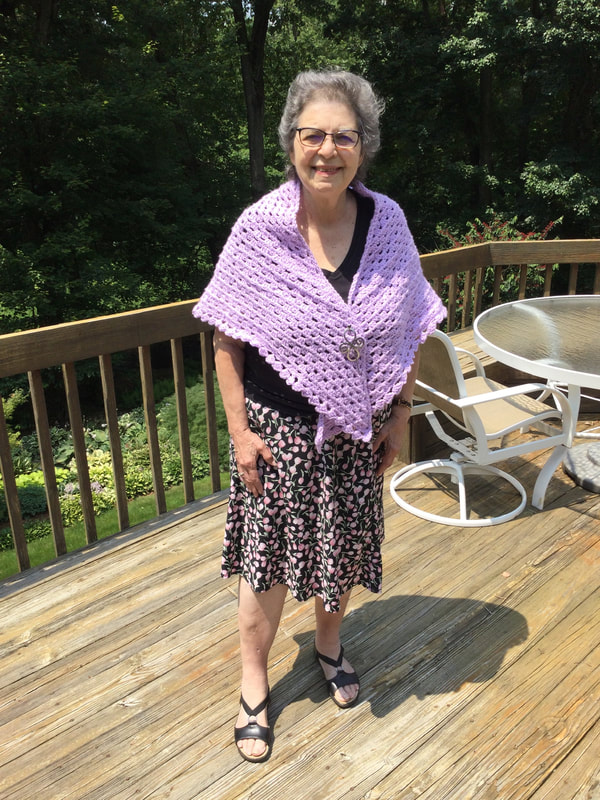
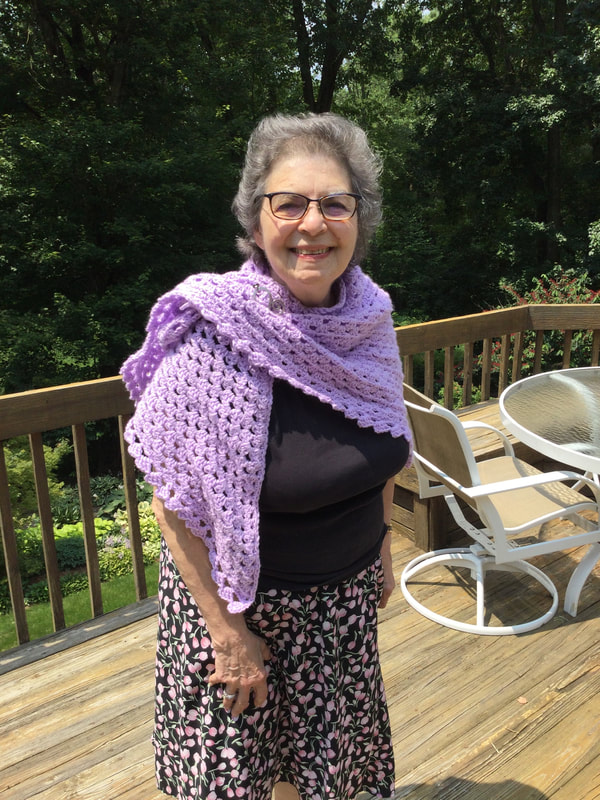
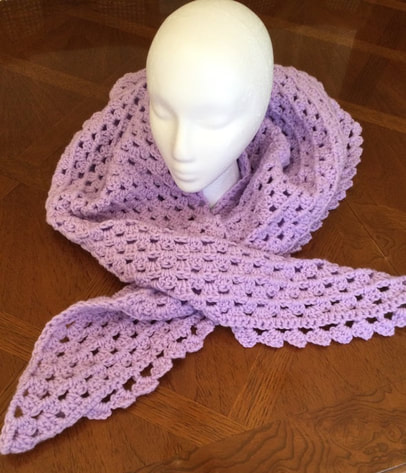 My Triangle Shawl with Clean Straight Lines was the result of a long, but productive road trip to Chautauqua, New York. My husbanding I had not been on a vacation for over a year and a half and were excited about our adventure. Despite the pouring rain, we kept up our spirits, and I completed more than half of my piece before arriving at our destination. The basic project fit in with my own rules for crocheting on the road. Bring enough yarn. Make sure you have all essential hooks, measuring tapes, needles, instructions, and any other needed equipment. Trying to find a knitting or craft store in isolated locations can sabotage any project. However, most of all, do not try a new, unfamiliar, or detailed piece. I find it impossible to count and keep up my end of the conversation with my husband (who is driving) if my crocheting is too complicated. The triangle shawl I picked was familiar, but I also wanted to tackle the problem of the side pieces reaching up like wings. I also wanted to work on the contours so that the shawl was much wider than it was deep. The wider configuration is more flattering for me and many other women. 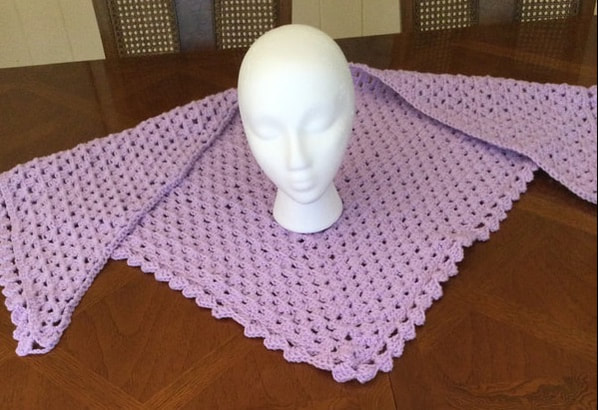 When I use the Granny Stitch Method to make a blanket, I usually leave out the chain 1 between the clusters because I like a denser blanket. However, when I make a shawl the piece does not drape when I do this. Also, in order to get the proper width. the shawl becomes much too deep and cumbersome. My first step in changing the shape of my shawls to add the ch1 between clusters. The second change was to chain 3 stiches instead of two in the central section of two Granny Stitch clusters. The third step I took was to chain 4 loosely instead of 3 at the end of each row. The chain 4 becomes a double crochet and a ch 1 in the next row. The extra stitch makes for more ease at the line that rests on the neck and down the front. As I lay out the steps for the triangle shaw, the directions become clearer. The shawl is worked from the bottom up and becomes larger as you add rows. Once the pattern is established, you repeat the same row until you have reached your desired size or until you run out of yarn. My completed shawl, before adding the edging, measured 60 inches wide and 31 deep. With the edging , the shawl measured 62 inches wide and 32 inches deep. I am 5 foot 6 1/2 inches tall and the shawl reached just below my hips.
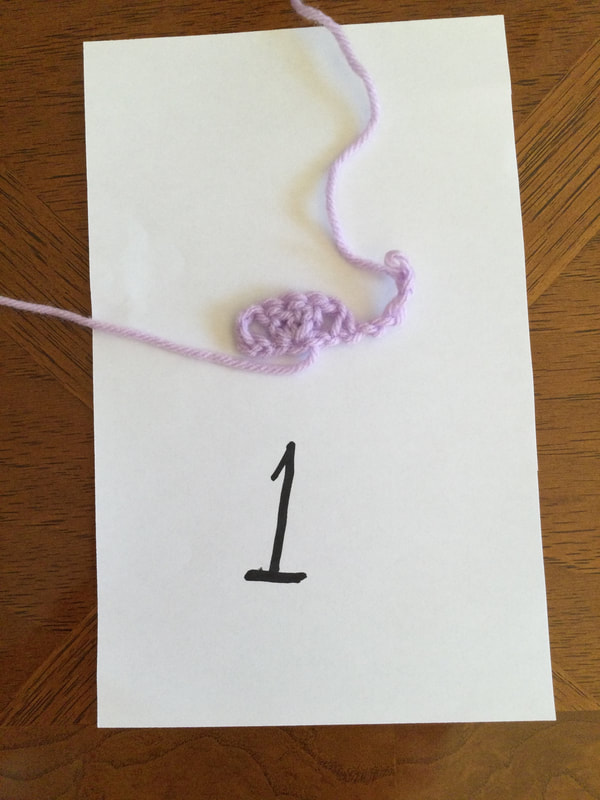
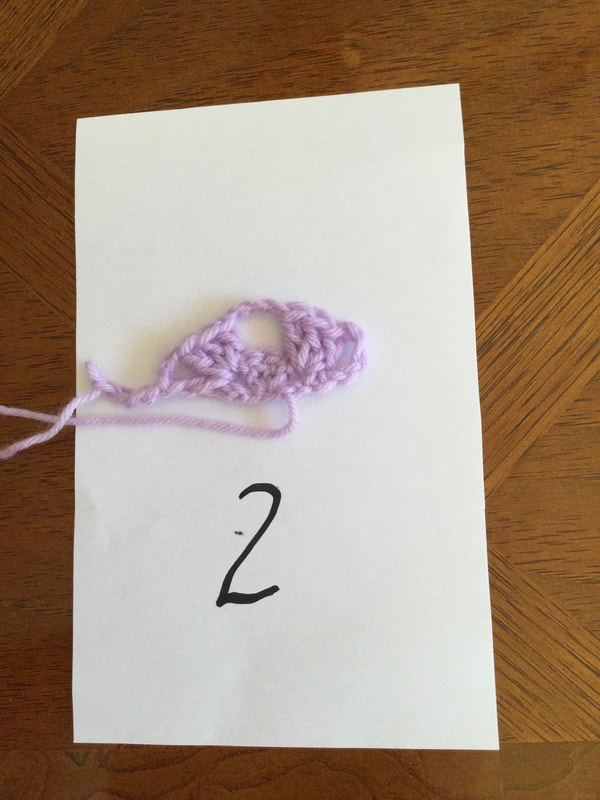
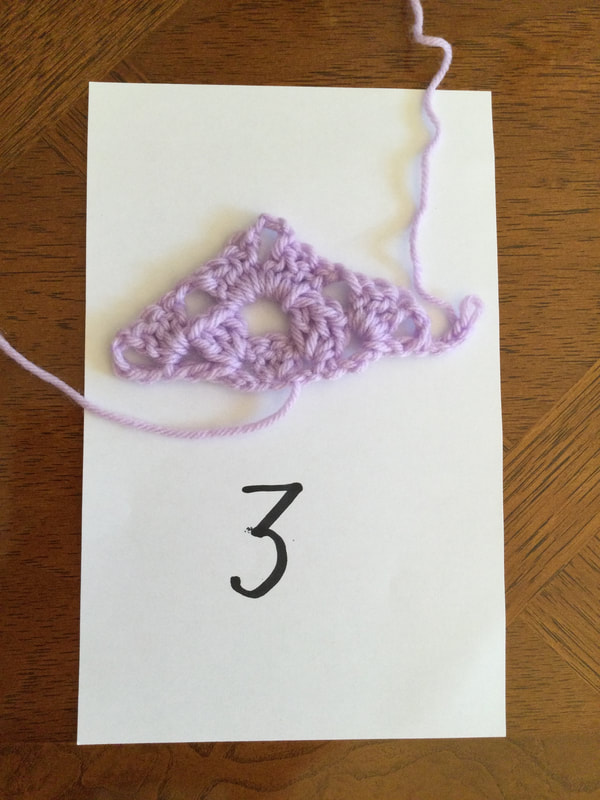
 Row 1: Make a magic circle and chain 4. . Crochet 3 DC into the magic circle ring. Ch 1 and make an additional DC into the ring. Pull the magic circle tight. Chain 4 loosely. Turn Row 2: Crochet 3 DC into to the ch1 space. Ch 3. Crochet 3 DC into the last ch1 space. Ch1 and make 1 DC in the same space. Chain 4 loosely.
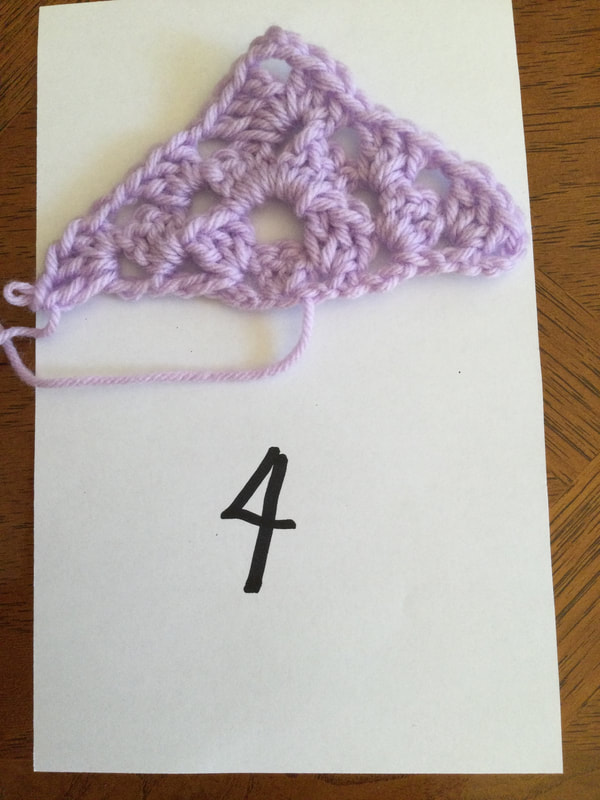
Row 3: Crochet 3 DC in the ch1 space. Ch1. Crochet 3 DC in ch3 space. Ch3. Crochet 3 DC in same space Ch1. Crochet 3 DC in last ch 1 space. Ch1 and make 1 DC in some space. Chain 4 loosely. Turn Row 4: Crochet 3 DC in first ch 1 space. Ch1. Crochet 3 DC in next ch 1 space. Ch 1. Crochet 3 DC in the 3 ch space. Ch 3. Crochet 3 DC in the same Ch 3 space. Ch1. Crochet 3 DC in next ch 1 space. Ch1. Crochet 3 DC in the last ch 1 space. Ch1 and make 1 DC in same space. Chain 4 loosely. Turn At this point the pattern for the shawl is established. You will be adding extra clusters in the chain 1 space at the beginning and end of each row. You will be crocheting 3 DC ch in each ch 1 space until you get to the center. Then you will make 3 DC, Ch 3, 3 DC in the central 3 chains. Ch1 and continue down the opposite site. When you get to the last ch 1 space, you will make 3 DC, Ch 1, 1 DC in the same space. Chain 4 loosely and turn your work. Repeat and continue until you have the size you desire.
The completed triangle lay flat, and I had reached my goal. Still I wanted to add an edging to make my shawl more exciting. Before starting any edging, I had to SC around all sides of the shawl to provide a solid base for the crocheted edging. The long flat side would remain plain, but even on this side, the SC finished off the stitches and made for a finer look. The Block Edging would add interest without being too fussy.The Block Edging consists of groups of leaning DC stitches. You work over a multiple of 4 stitches + 3. When I finished my row of sc I did not cut my yarn. I just started with Ch3, skipping the first 3 stitches. Continue with the following sequence. *Make 1 DC in the next stitch. Ch3. Crochet 3 DC around the DC and skip the next 3 stitches.* Repeat from* around. At the end, slip stitch into the third stitch of the beginning chain. Cut off the yarn and we've in the ends. 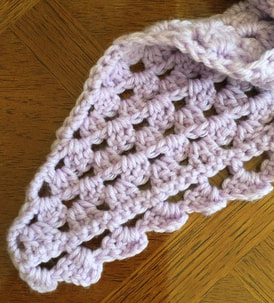 Each time I crochet or knit a project I like to learn something new. This was the first time tried the Block Edging, and I was quite pleased with the results. It added enough accent without weighing down the shawl.
I am glad that I chose lavender for this shawl. Since I rarely wear this color, I will not be tempted to add it to my growing stack of shawls and scarves. I will probably donate it to my local chapter of Threads of Love. This piece should provide a warm hug for a hospital patient. I hope my process inspires you to look at a familiar project in a new way . Even small experiments like my edging can breathe life and spirit into your crocheted garment. As always, I appreciate your feedback and reflection. I welcome you to join mean my stitching journey. |
Archives
November 2022
Categories
|


 RSS Feed