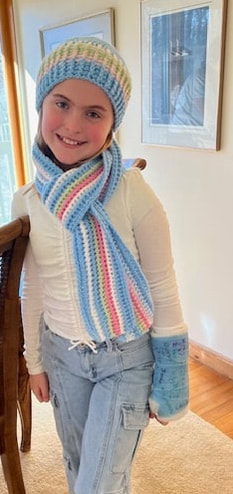
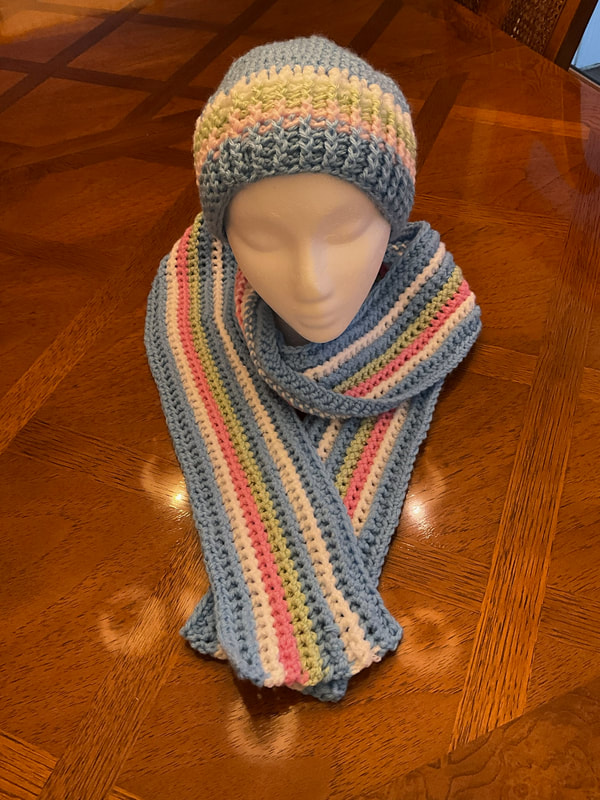
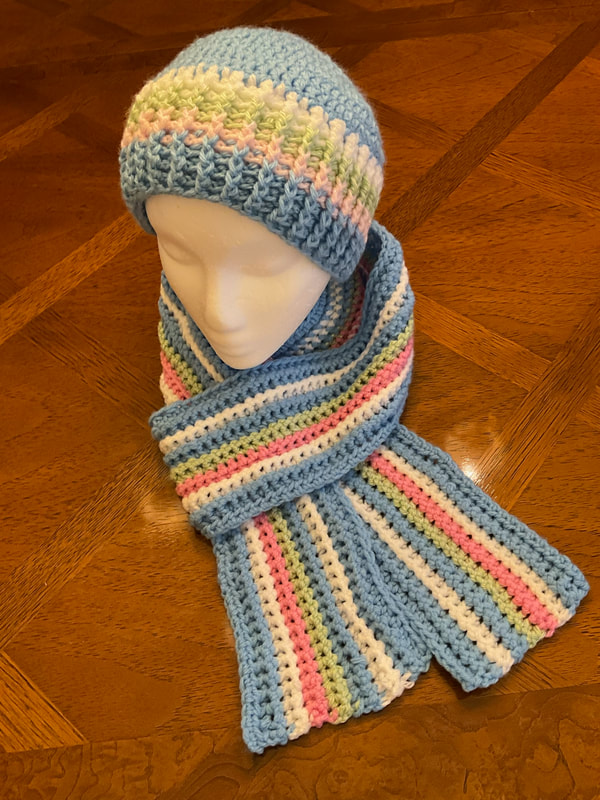
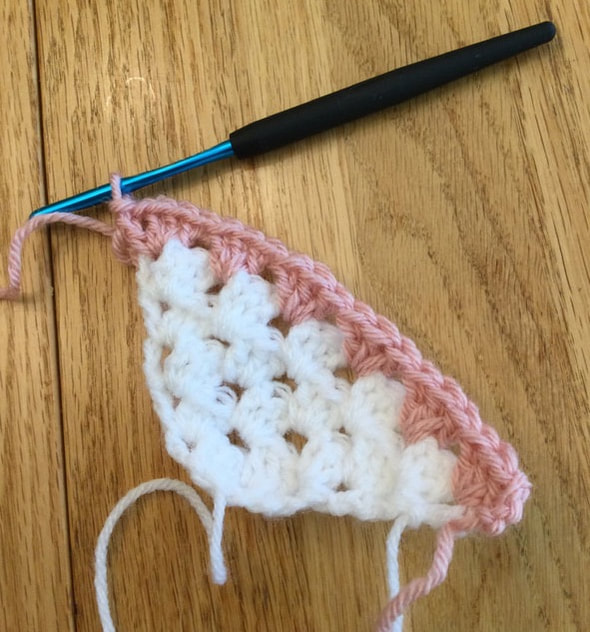
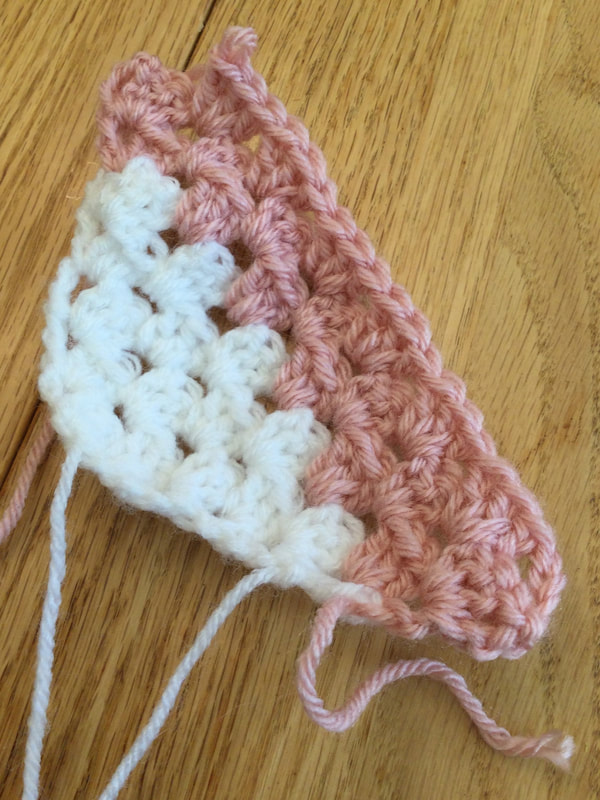
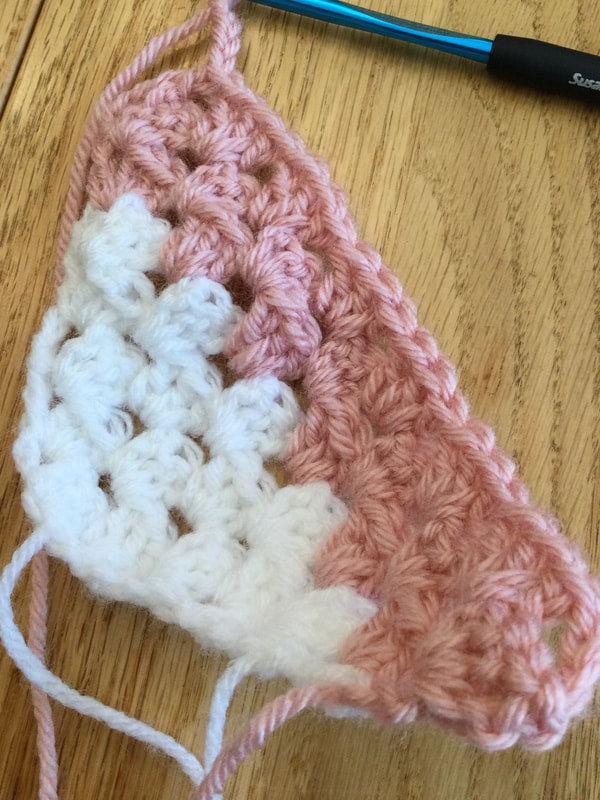
 The final pieces of my granddaughter's winter present are complete. I began the accessory project with coordinated hats and mittens late December after we sat next to each other at my husband's birthday dinner. I was happpy to crochet pieces in her favorite colors, Although I completed the scarves a couple of weeks ago, I waited to publish this post when I learned that my granddaughters would visit this weekend. I initially planned to design and crochet one scarf (horizontal) that included the colors blue, white, pink and green that would coordinate with the hat I presented in my previous post. However, as I began to look at the styling options I knew that I had to try out a vertical option as well. The horizontal scarf was best matched with the predominantly white hat. The vertical scarf matched best with the blue Which would my granddaughter choose? Several of my friends in my knitting and crocheting group suggested a 48 inch scarf that would tie up easily and not interfere with the activities of an active 8 year old. However, I decided to check with my granddaughter, as I believed that she would want a longer style that could be wrapped around or looped in a more teen-like fashion. Since my subject is 4'8" tall (56 inches), I added another 4 " for a total of 60 " The resulting scarf is my own creation in a color-block design. 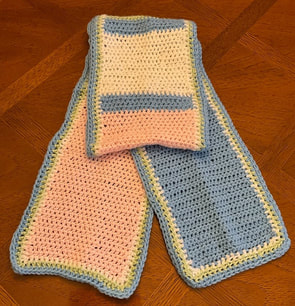 The Horizontal Colorblock Scarf begins with a chain of 27 stitches using worsted weight yarn and an I hook (5.5 mm). Once I made a Half Double Crochet Stitch (HDC) in the second chain from the hook, I had 26 stitches. I maintained that count throughout the length of the scarf. I planned to have a longer block of blue in the beginning and a contrasting section of pink at the end of the scarf so that the different contrasting colors would present when the scarf was tied or wrapped around. 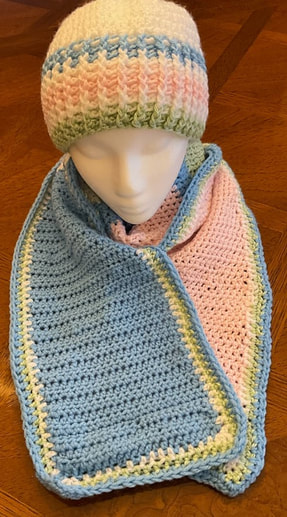 The sequence for my original scarf pattern runs as follows: 15" blue 15" white 1 1/4 "blue 5" green 1 1/4 blue 5" pink 1 1/4" blue 5"pink 1 1/4"blue 5"green 15" green The blue strips between the colors were about 4 rows of HDC. When the scarf was completed, I added a border of 3 rows: white, green, and blue HDC. The border finished the piece and evened out the edges.The completed scarf measured 7 1/2" in width and 60+" in length. For the simple wrap around scarf I left the scarf open. However, for the looped style, I folded the scarf in half lengthwise.  As I wanted better control over the width of the scarf for a variety of styling options, I searched for a pattern that could be crocheted lengthwise. Then additional rows could be added until I reached the desired width. The Candy Stitch Scarf explained in a YouTube video by Nati Crochet fit the bill. Al;though the scarf crocheted in the video was crocheted in a single off-white hue, I wanted to incorporate all of the colors from the blue hat. Using a medium worsted yarn, Twist from Joanne's Fabric, I chained about 240 stitches in blue to reach a length of about 60 inches.The next row and the final row were crocheted in HDC. To achieve the bumpy texture of the Candy Stitch, each color had to be done in two rows, creating a definite right and wrong side.The Candy Stitch is a variation of the HDC that calls for slipping the hook into 2 stitches in the row below before pulling though 3 loops onto the hook.
The demonstration on the video is clear and easy to follow I definitely recommend taking the time to view the presentation before starting the project. I was totally pleased with the end result. My granddaughter felt likewise and immediately chose the blue hat and vertical scarf. The Candy Stitch will definitely remain in my stitch repertoire as I consider future projects. Tassels can be attached to decorate a shorter version of the scarf. Her younger sister was also pleased with the white hat and the Horizontal Colorblock scarf.
Both girls are delightful models, They smiled broadly in their new pieces as they continued to indulge their Gram Gram who places their photos in her LilCreates blog. Thank you for your reflections and feedback. I welcome you to join me on my stitching journey.
0 Comments
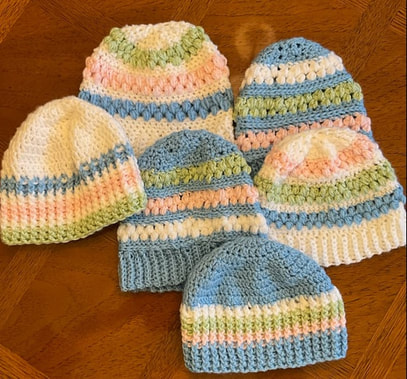 After missing several months due to illness and family issues, it is wonderful to be back with my readers again. Although I have crocheted and knitted several items, my crocheted hat and mitten project is the perfect for launching into 2024. At a recent birthday celebration for my husband, my 8 year old granddaughter announced that she wanted to sit next to me (her gram-gram) at the dinner table. Naturally, we got to talking about the type of winter gear that she preferred for season. My beautiful blond, blue-eyed darling requested a hat and mittens in blue, pink, green, and white. I immediately began research to produce the pieces in a timely manner. If time permitted, I also planned to include a scarf to complete the ensemble. 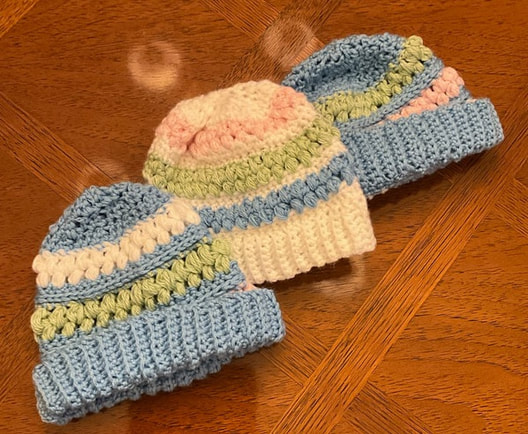 At first I was intrigued by the Jelly Beanie - Free Pattern from loopsandlovecrochet.com with sizes ranging from infant to adult. In the original pattern, the designer, contrasts a main color with the same bright variegated yarn for all three sets of puff stitches. This is a bottom up hat that begins with a crocheted border strip done in single crochet (SC) in the back loop only (BLO). Once you reach the desired length for the brim, join he ends are joined together. Then you single crochet (SC) around and follow with rounds of Front Post Single Crochet (FPSC) and another row of single crochet. Two rounds off puff stitch (PS) in a contrasting color are very attractive. My first hat was done white as the main color and contrasting puff rows of blue, pink, and mint green. I started with a child size as I was working a hat for an 8 year old. However, the finished piece appeared to be much too small. Then I moved up to the teen size. I knew I was doing something wrong, but I could not figure out how to solve the problem, The issue probably stems from the way the SC or the FPSC do not allow the crocheted fabric to stretch. The hat was still too tight. When I added stitches to the base cuff and beginning rows, I switched to a main color of blue with puff stitches in white, pink, and green. The last hat seemed larger, but I will have to try them on my granddaughter when I see her during the next month. I really the Jelly Beanie, and I am hopeful that I can figure out how to make it true to size. I tried one more adaptation to get a more relaxed fit. I moved up to an I hook (5.5 mm) and made 3 rounds of Single Crochet (SC) between sets of the Bean Stitches and left out the Front Post Single Crochet (FPSC). The fit was improved, but I am not happy with the stitch definition. 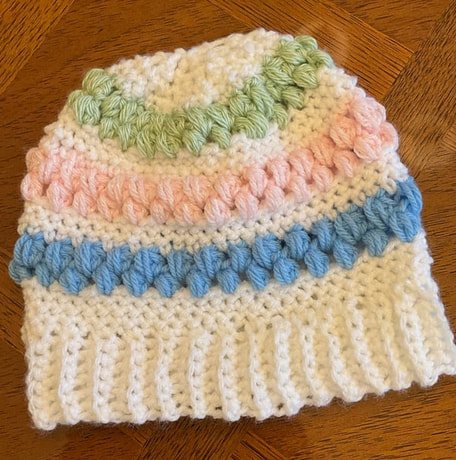 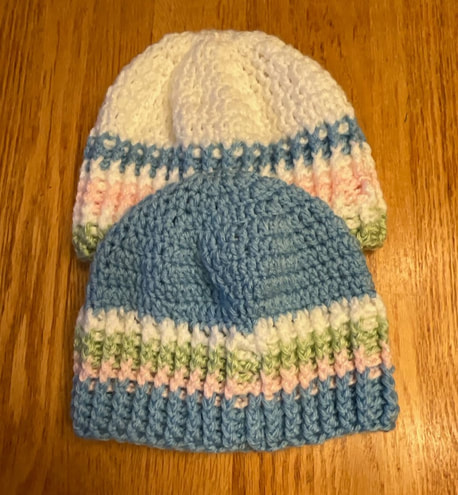 I was still determined to create a crocheted hat that would please my granddaughter and which would fit comfortably. I had bought plenty of yarn, and decided to work on a tried and true pattern, the Lakeside Beanie. Although pattern directions are for a man's size, I have experimented through the years to crochet this hat in smaller sizes for children or women. I generally use worsted weight yarn (#4) with an H hook (5.0) This beanie begins with a magic circle with 10 double crochet stitches in the beginning ring. The object is to crochet a disc for the crown. Therefore, you crochet 2 double crochet stitches (DC) into each stitch for round 1 (20).Then in round 2, you make a repeat of 2 DC in the same stitch, followed by 1 DC in the next stitch (30) For each round you increase the number of Dc between the increases until you reach the size needed. The directions call for a final row in the disc of 70 stitches with an I hook (5.5mm) for a man. When I make a woman's hat, I crochet 6 rounds. For a child 5 rounds are usually enough. Once you are finished making the crown you stop increasing and just crochet 2-3 rounds of DC. At this point the hat starts to curve downward. What I like best about this hat is the use of alternating Front and Back Post Double Crochet (FPDC and BPDC) stitches that create a lovely stitch definition with a wam cozy covering of several inches for the ears. Although the original hat calls for one or two colors, I wanted to include my granddaughter's chosen colors in the hat. For the original pattern, see "Lakeside Beanie," a pattern from Chellie Plummer of 5 Knots North. Detailed directions are given for the men's size, but you can easily adapt for a child or woman by decreasing the size of the crown circle and adjusting the number of rows you crochet with the FPDC/BPDC. This is one of my favorite patterns. Many thanks to Chellie for sharing her design. 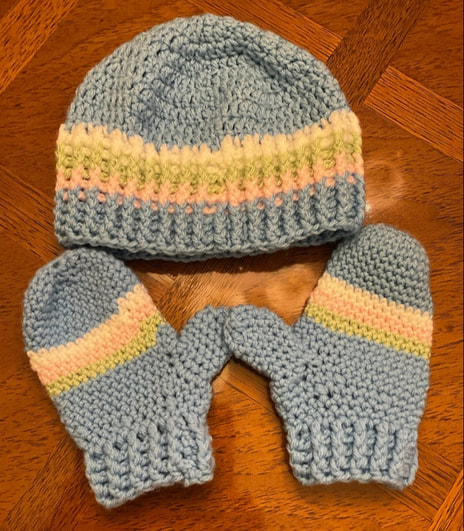  The technique I chose for the coordinating mitten was a a top-down version that started with a magic circle with increases in subsequent rows to eventually form a 30 stitch disc. After I stopped increasing, in about 11 rounds, I added to the main color with 2 rows each of contrasting stripes to match the hats. I crocheted to about round 24 before making the opening for the thumb. I chained 10 stitches and skipped 5 stitches in the body of the mitten before joining. Then I continued around in single crochet to the end of that row and in the second round (Including the thumb hole). Directions are given on how to form the bottom of the hand. I like to finish my cuff with a few rows of alternating Front and Back Post Double Crochet (FPDC/BPDC) to form the cuff. Where all was done, I went back and attached the yarn to make the thumb. See stitch11.com for Mixed Stripe Mittens Crochet Pattern. Directions are found in 3 sizes.  I am almost finished with the various hats and mittens that I have been playing with. As you can see, I learn from mistakes as well as from my successes. Although I will include the crocheted scarf in my granddaughter's gift package, I decided that I will write about that piece in my next post. I am also looking at several bottom-up mitten patterns that will need adaptations and changes for both the woman's and the child's size. I have had a lot of fun exploring and creating with my hat and mitten project, However, I am learning to simplify and prioritize for those blog posts. If I am to meet my personal goal of posting this article before the end of January, I will need to include my bottom-up mittens for women and children in a future article. I also need to do some additional research before I start the coordinating scarf. Some friends have suggested a cowl that will not get in the way of a child playing outdoors. Still, my granddaughter may want a longer scarf that can be folded in half with the ends pushed through the loop.
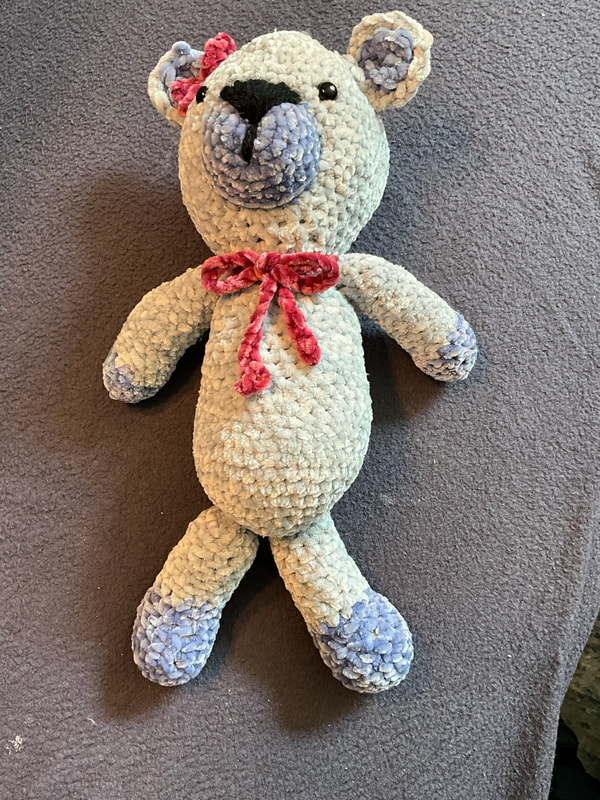
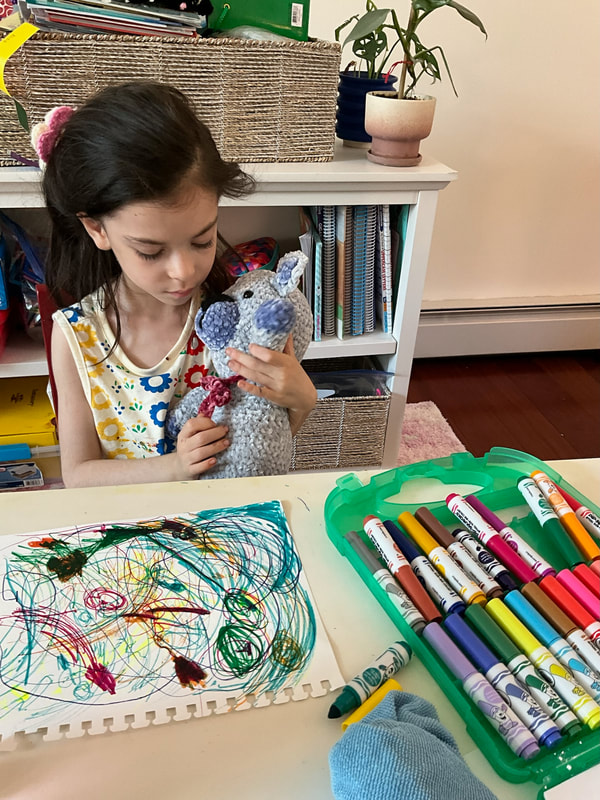
As always, I welcome your reflections and feedback. Which hat did you like best? I invite you to join me on my stitching journey. 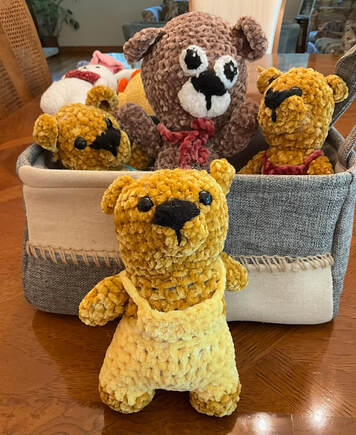 I just adore crocheted bears. I have made them in all types of shapes, colors, and sizes. While I had previously crocheted bears from about 10 to 14 inches tall, I knew that I needed a smaller amigurumi for my donation project. If you search Pinterest you will find Crochet Teddy Bear With Heart Free Pattern that yields a bear with overalls that is about 7 inches tall when I use Bernat Velvet yarn with a 5.0mm H hook. Initially, I decided to made the bears without the hearts, but I will probably try one or two. The step-step pattern starts you out with making the separate pieces first: 2 arms, 2 ears, one, muzzle, and one tail. You begin the main body construction starting with the legs and joining to make the body. Then you sew on the arms before crocheting the head. Directions with photos are given for each step as you stuff the amigurumi, created the face and sewn the ears. Finally you complete the overalls and sew on the tail. . 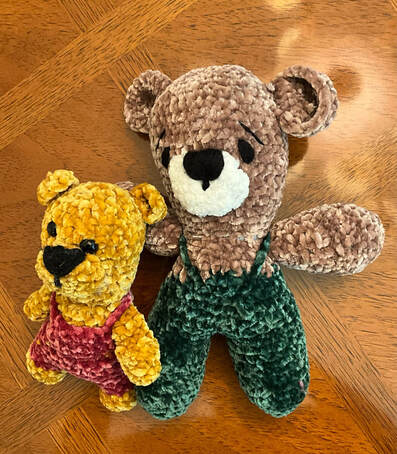 One of my favorite bear patterns is part of composite group that uses a base construction that can be adapted to crochet a monkey, a baby, a giraffe, and an owl. While I previously made the bear with regular worsted #4 yarn, with a 4.0,mm, G hook, i decided to follow the same steps with the Bernat Velvet yarn with a 5.0mm, H hook which yielded a somewhat larger, 11 inch tall bear. While I was able to secure the pattern free online several years ago, it can now be found as a paid pattern on Etsy, Ravelry, and Amazon. If you do a Google search for Amigurumi Crochet Patterns:Baby and Animal Friends by Veronica Kay, you will find many alternatives. The directions are written clearly, step-by-step. However, there are no picture tutorials. 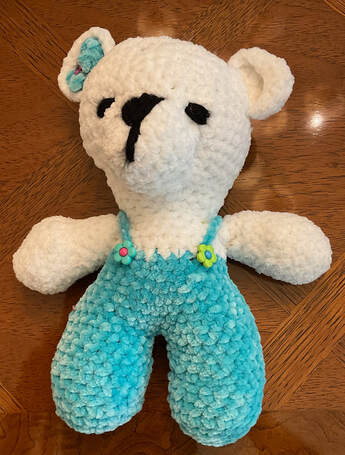 Crocheted Bears and Other Animals:25 Toys to Crochet by Emma Brown for Cico books provides an excellent selection of crocheted bears. The bears are more of a British style, but the details and faces are intriguing. The book calls for worsted weight yarn, but I wanted to try the softer textures of the Bernat Velvet. The Missy Bear was a great success that you can see in the picture of my granddaughter cuddling her newest amigurumi.
Although a koala is not actually biologically bear, I am including this cutie in the collection based on appearance. Kiko, The Koala Free Amigurumi Pattern can be found at https://amigurumi.space/kiko-the-free-amiogurumi-pattern. I chose to make my amigurumi in dark grey with pink accents.The legs and body of the koala are crocheted in one piece with the head attached separatelty. Using Bernat Velvet, the finished piece measured about 11 inches. 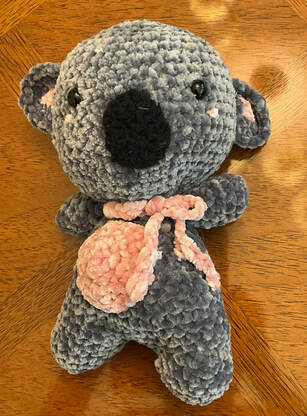 My panda is my last in this collection. Unfortunately, I was unable to find the exact pattern that I used to make the expect bear. However, if you search on Pinterest there are many pandas to chose from. 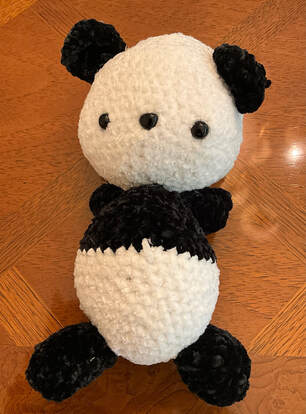 Any of the bears featured in this article would joy to a child or anyone who is young at heart. I welcome you to join me in my amigurumi explorations. Thank you for your feedback and reflections.
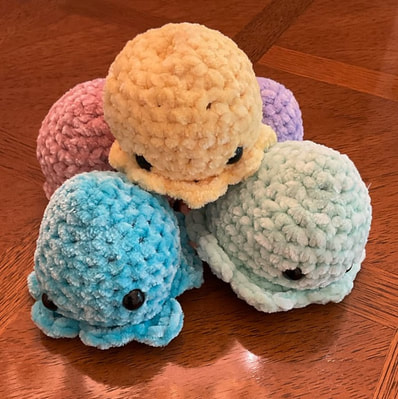 Plushies are my new obsession. While I have not written a blog article since June, I have been incredibly busy crocheting stuffed animals with chenille yarn and have plunged into the world of amigurumi. I started with the small skeins of Just Chenille from the Dollar Store, but soon progressed to Bernat Velvet for a more lush texture. While many crochet artists use the blanket weight #6 yarn for larger figures, I prefer the #5 weight with a 5.0mm, H hook to make smaller pieces. This is my third year making presents for the foster children program, 'R Kids, in New Haven, Connecticut. While I had made Peace Pals (Comfort Dolls) in the past, I needed a change. The dolls took from 4 to 6 hours each to execute. To create 45 dolls, that meant from 180 to 240 hours for the project. I wanted to make colorful and attractive huggables. At 45 minutes to 2 hours for most of the pieces, I had a good alternative. This article will be the first of many as I explore the world of plushies and share my experiences with my readers. 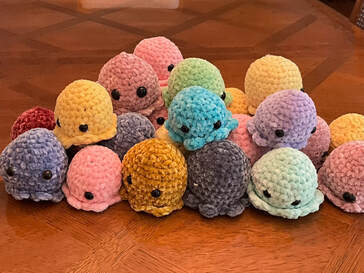 At this time I have completed about 42 of the smaller pieces that can be donated to this organization. I have also been drawn to some larger pieces that I will write about in future articles. There seems be no end to my plushie fascination. While some of the administrators were concerned that teens would not be drawn to velvet plushies, I have found that the online bloggers have steady crowds of customers who cannot resist the colors and soft texture of the plushies. At at- 3-6 inches, they make ideal desk or shelf buddies. If you include a claw, you can attach them to backpack. My adult daughter claimed a turtle for her own desk. 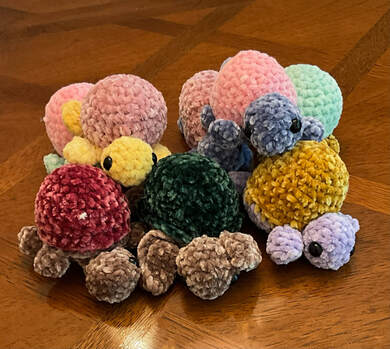 My first plushie came from a You Tube post: Mini Octopus Plushy by Crochet by Genna. The finished octopus was about the size of my fist. When I started with the Just Chenillle Yarn #5 chunky at 65 yards, I was able to make an entire octopus. Other materials include #12mm safety eyes, a 5.0 mm crochet hook, blunt tapestry needle, 2 stitch markers, polyfill for stuffing, and a scissor. Genna's directions are clear and easy to follow. When I needed more time I just paused the video. After the second time, I wrote down the instructions so that I did not have play the video each time I made an octopus. The safety eyes give this delightful creature personality. However, ifI crochet this piece for a child younger than three, I wi llcrohchet the eyes. Best yet, it is a no-sew pattern and takes less than an hour to crochet.. 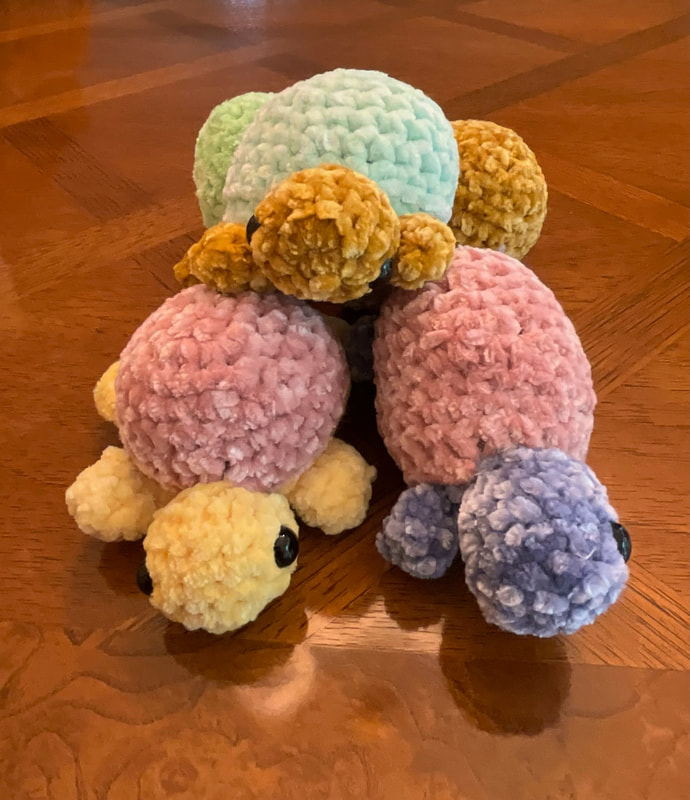 The second plushie that I attempted also came from You Tube: The Mary Jay presents Step-by-Step Tutorial on How to Crochet A Smiple Turtle for Beginners: Quick, Easy, Amigurumi Turtle, The pattern starts with the crocheting the shell, using a procedure that is similar to the creation of the octopus. The head, legs, and tail use a contrasting color and are crocheted separately and sewn to the body. Again, the instructions are clear and easy to follow. There is a bonus. When I replayed the video to write this article, I found that the author had included the url for the written directions, Thank you, Mary! https://www.themaryjay.com/free-patterns/crochet-turtle-pattern These turlles can be made with realistic colors of green and brown or fanciful tones to make creative, bright amigurumi. 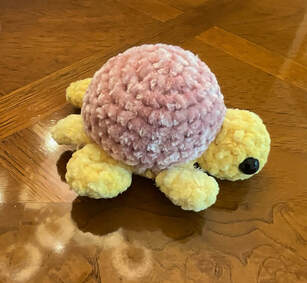 Please join main taking the amigurujmi plunge.The octopus and the turtle are the first two in my series of plushy creatures. I welcome your feedback and reflections.
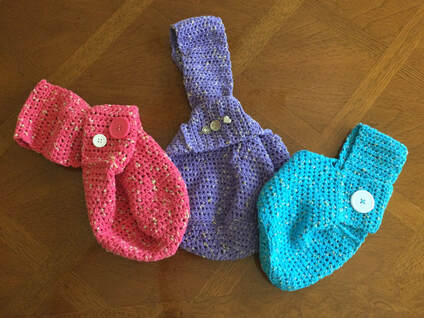
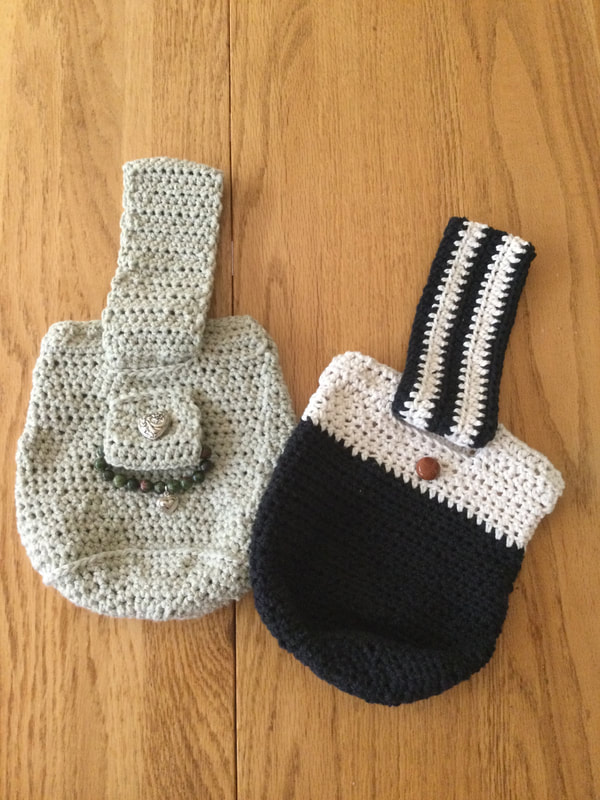
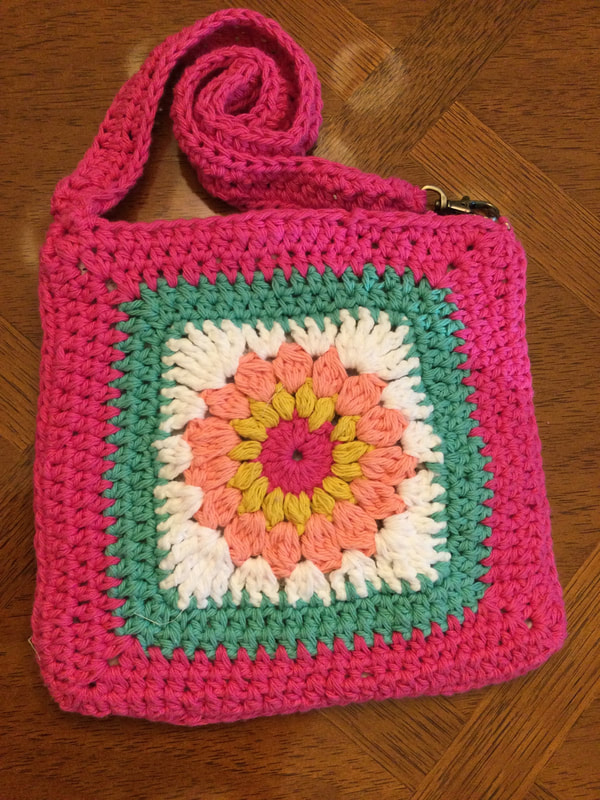
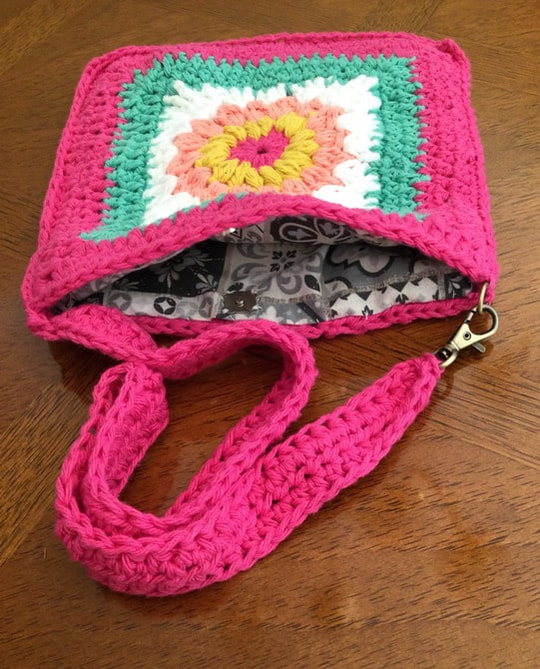
 I have had so much fun exploring some of the possibilities for creating these circle crocheted purses. This is my second article in my crocheted purse series, and I am delighted to share my creative discoveries with my readers. I have made 5 piece so far, but I keep coming up with new ideas for the colors, closings, straps, hardware, and patterns.. 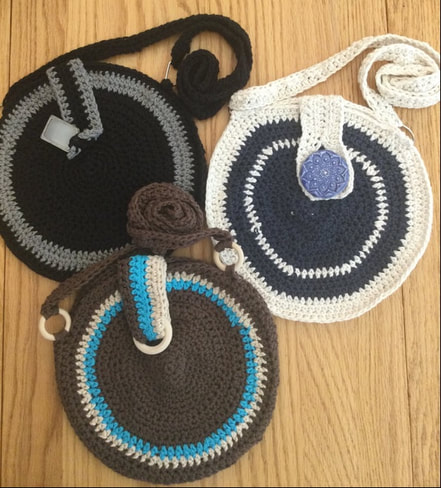 My yarn is a worsted #4 weight cotton yarn. Most of my crocheted pieces use Lily Sugar and Cream that come in a large variety of colors.The H (5.0 mm) hook provides a positive amount of structure. To execute my pieces, I have used, Double Crochet (DC), Half Double Crochet (HDC), Single Crochet (SC), and Slip Stitches stitches, 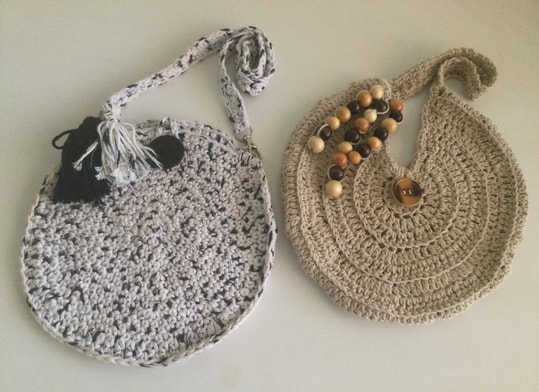 After scrolling through numerous pictures of circle bags on Pinterest and through Google searches, I decided to design my own. I had an interesting skein of white and black variegated cotton yarn from Lily Sugar and Cream that I thought would make a cool accent for my white summer ware. While many crocheters make small crocheted ring to start their circle bags, I like to start with a Magic Circle as I can draw the yarn tight so that there is no visible opening. Row 1: I created a magic circle and made a SC to secure it. Then I SC crocheted 6. Row 2: I increase in each stitch to end with 12 stitches. Place stitch marker in last stitch. Row 3: (SC, inc) * around for 18 stitches. Move marker to last stitch. For each row move the marker. I will not continue to repeat this direction. Row 4: (2SC, Inc)* around (24 stitches) Row 5: (3SC, inc)* around (30 stitches. Row 6: (4 SC, inc)* around (36 stitches) Continue to increase circle size by increasing the number of sitches between the increases in each round until I had a diameter of about 8 1/2 or 21 centimers. Close off and weave in ends, Crochet a second circle. 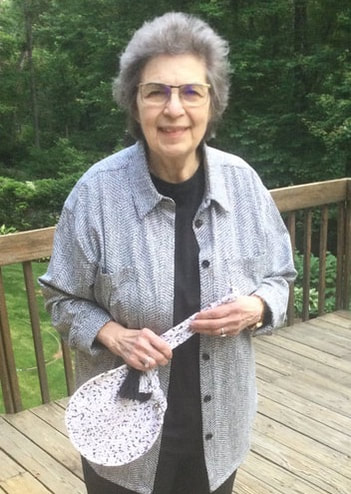 To assemble the purse I decided to leave the stitches on the outside instead of turning it inside out. This gave it a flat streamlined look. I placed the circles so that the right side of each faced out and SC around through the top stitch of both layers until lthere was a 6 inch opening left. This purse would be a hand purse, but the strap would be long enough to place over my shoulder. If it would be too long for a hand purse, simple tie the strap in a knot. When I fininsihed the outside stitching, I fastened off, but I did not cut the yarn. Instead I chained about 50-60 stitches until I crocheted onto the D-ring side of my clip hardware that would close the purse. Then I SC back to the start and anchored the strap onto the purse. On the other side of the purse opening I sewed the other D-ring into the fabric. To make the opening more secure, I attached a lovely flat black 1 1/2 inch )3 cm) two hole button to the front of the bag and crocheted loop that attached to the back. All that was left was to create a black and variegated tassel to the starting handle (opposite the clip opening). 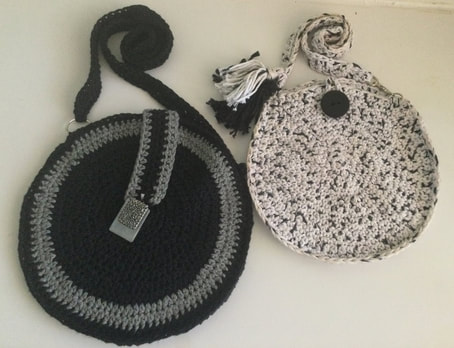 I crocheted a second hand purse with beige/toupe yarn. This time I used a double crochet stitch in the back loop only to create a distinctive raised edge. This purse did not make complete circle. Instead there was a V -opening. Rather than crochet all around, the crocheting has to stop at the middle and steps are reversed. At every other round decreases are made on both sides so that the V takes shape. Crochet a second circle following the same directions. To assemble, I placed the wrong sides together and single crocheted from one side of the opening to the other. Then I turned the purse right side out so that there was a more rounded edge. This strap was shorter. I made a slip knot and attached it to the left side of the purse before making a 32 stitch chain that I attached to the otherr side of the opening., I crocheted a single crochet (SC) into the purse mad a Half Double Crochet (HDC) into each stitch of the chain back to the first side and anchored it in with another SC. To complete the strap I HDC back and SC to the purse before fastening off. I left a tail iand cut the yarn. I weaved in all ends To decorate the purse I made a series brown and beige, and caramel lbeads that I fastened to the first side of the purse. To secure the opening, I sewed a tourtoise shell colored 1 inch button into the circle just below the V opening. A chained loop loop that was the same color as the purse was sewed to the other side. I have purchased some cotton cloth to line the purse and to give it structure. 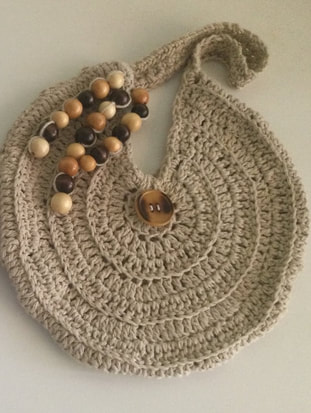 Now I was ready for the crossbody purses. As I wear a great deal of denim, I decided to couple denim yarn with off-white to create a graphic design. Also I had purchased an artisan crafted button at the Connecticut Sheep and Wool Festival, and I wanted to incorporate it in the design closure. For this purse, I would be working with HDC. I crocheted a denim circle untilI go to about 6 inches. Then I changed colors to the off-white for one round before transitioning back to the denim for three rounds. The last three rounds were done in off white. For the denim purse I would be stitching on the right side for assembly so that it would lie flat. The decorative piece would be the 2 inch blue tone flowered button that I sewed 3 inches (8 cm) below the opening.  For the closure, I chained 5 inches (about 20). In Row 1, I HDC in second chain from hook to the end. Row2 2: Ch 1 and turn work. HDC to the end. Row 3: C1 and turn work. Crochet 3 HDC. chain 8 and skip 8 stitches. HDC to end. Row 4: Ch 1 and turn work. HDC to beginning of button hole make 8 HDC around chain to enclose the buttonhole. HDC to the end. Ch1 and turn work.Row 5: HDC to beginning. Ch 1and turn work. Row 6: HDC length of strip. Sew button 2 11/2 inches from top of opening. Secure buttonhole strap of other side of purse so that it lays flat and makes for secure button closure. Weave in ends. For the strap I sewed in D-Rings of both sides of the purse. I used cross-body bag that I wore frequently as a model and made a chain that was similar in length. I started securing the chain to one ring, chained across and fastened the yarn the opposing D ring. Then I HDC across. Then I secured the yarn to the first D ring before HDC back. After finally securing the yarn again. I fastened off leaving a tail. Then I wove in all yarns. 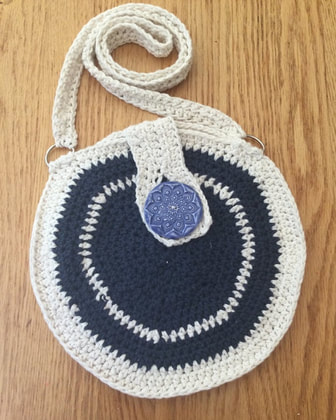 My favorite purse came next. This was to be a birthday resent for my son-in-law's mother. Black was her favorite color and matched most of her clothes. I had found some lovely pendants for sale at my local Joanne's. She chose an simple rectangular grey stone for her purse. Therefore, I inserted a few rows of grey about an inch in from the final rows before returning to black. In making this purse, I found that if I altered the routine pattern for a circle I could make my cotton circles lie flatter. Therefore, when I got to about row 4 I repeated the number of stitches between the increases for another row, There would be more fabric. I did this a few times as I enlarged the purse. 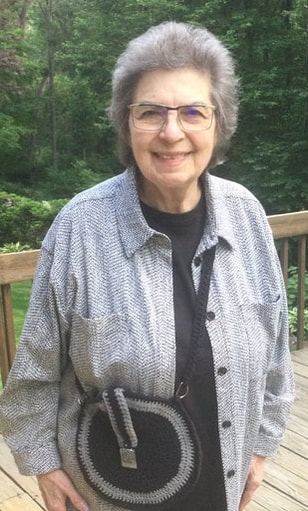 The closure for this purse was a bit different. I crocheted a 3 inch strip that was ahout 4 inches of 4 rows of HDC Then I attached the pendant about 1/2 from the bottom edge of the right side of the strip. I connected the strip to the back of the purse so the the strip lay across the opening. Then I fixed a magnetic snap to the bottom of the strip and to the place where it hit the purse. Alice was delighted with her gift and was pleased with the ease of the magnetic snap. 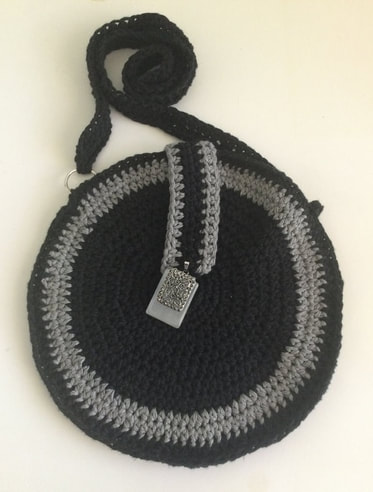 My final piece was rather Boho with a southwestern vibe. I chose rich brown for the main color with turquoise and sand for the contrasting colors of the circle. What made this design different was the use of wooden circles to attach the crossbody strap and the larger circle on the closure. I used the smaller wooden in the same way I had attached the D-rings in other purses. To make closure I crocheted a strip that was about 7 inches (18 cm) There were 2 rows each of brown turquoise and sand, I threaded the strip through the larger ring, folded the strip in half, and fastened both thicknesses to the back side of the opening. Then I sewed a magnetic snap to the purse and to the back of ringed strip. 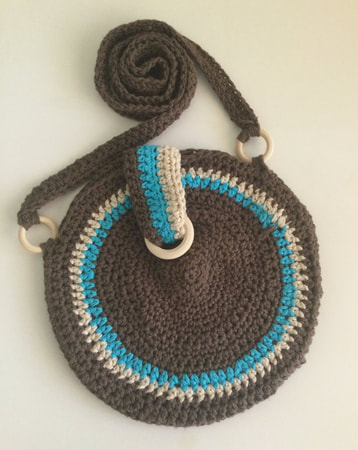 I have so many ideas bouncing around in my head, but I have to get to other kinds of projects. I also am going to line some of the purses with fabric so that nothing pokes through. The lining will also give more structure to some of the designs. A friend with a sewing machine is going to help me with some simple stitching to speed up my process. It is much faster and neater than my hand sewing. Thank you for joining me in my latest version of crocheted purses. As always I appreciate your reflections and feedback. I welcome you to jin me on my stitching journey.
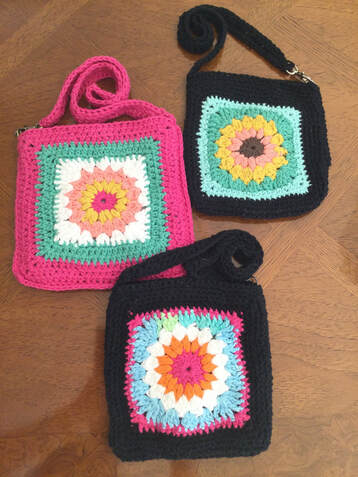 It is great to be back with my readers after taking time to create and crochet this new line of spring purses. With the warmer weather approaching, I like to get away from knitted and crocheted garments to indulge myself in working on interesting accessories. In the past years my focus had been on beach bags. I was able to gift one to my daughter, and enjoyed for myself in a blue and white for summer outings. I also made several variaations of the Japanese knitted purses. 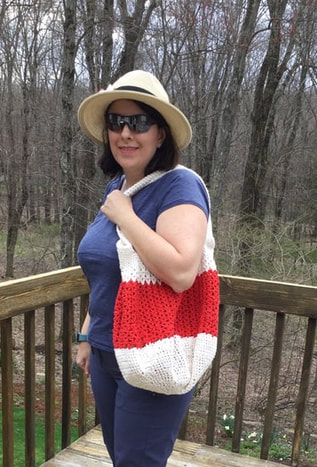
However, when I saw the Sassy Sunflower Crochet Crossbody Bag from Crochet 365 Knit Too, I knew I had to produce these pieces in a variety of colors. My new purses are crocheted with Lily Sugar n'Cream in worsted weight cotton. For these bags I used a G (4.0 mm) hook in order to produce a denser fabric. The motif begins with 16 DC into the center of a magic circle. I changed the color in the second round with puff stitches. The third round saw a new color with bobble stitches. At this point I had to square out the motif with a fourth color. Finally, I used the main color in single crochet to set the square for several rows. I repeated the process to make a second square before crocheting both squares together. I slipped the ball of yarn through the last stitch so that I could continue with the strap without having another end to weave in. For specific directions on how to create the squares and the bags see the Sassy Sunflower Crochet Crossbody Bag from www.crochet3655knittoo.com 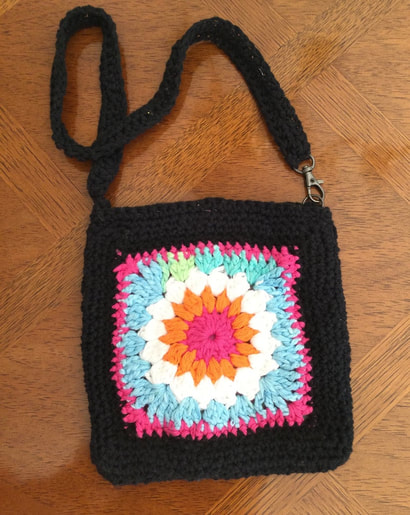 For the girl-size purse, I crocheted a chain of about 27 inches before attaching the chain to the D ring part of the clip hook. Then I Half Double Crocheted (HDC) in each stitch back to the body of the purse where I anchored the stitches. Next, I crocheted a second row of HDC back to the body of the purse to anchor the strap. To get the right amount of thickness I made a second row of HDC back to the D ring and anchored the strip again. I left a 6 inch tail so that I could weave in the yarn and cut off the end. Finally I had to sew in the last D ring on the other side of the purse so that the clip could slip into it. I really like the effect that this hardware gave to the bag. For the lady's purse I would make a chain of about 46 stitches for a crossover strap. 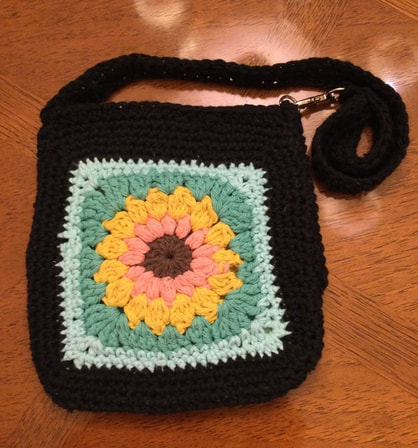 When my 6 year old granddaughter saw the purses with the black backgrounds, she liked the bold colors. However, when offered a choice, she thought that she would like her purse with pink in the background and strap. Since she wanted to put items into the bag, I asked her to wait until I could sew in a lining and a magnetic snap so that small items wouldn't fall through the openings between the stitches. As soon as I can finish with the photos for this article, I look forward to gifting her the bag.
sStill I was not finished. I still had great deal of white cotton yarn and a white leather purse handle from previous year's crocheted purses. I had a vision for purse that would work for me in the spring and summer months when I chose to wear white garments. I started with a black center, switched to white in rows 2 and tourquoise in row 3. I had a variegated white and black yarn left over from another purse that worked for row 4 and switched back to black for row 5. The remainder of the square was stitched in white for several rows. The purse was lined with a grey, white, and black print, and fitted with a magnetic snap. This piece would be more like a handbag in length. Since the clips of the handle easily just attached onto the purse, there was no need for additional sewing. 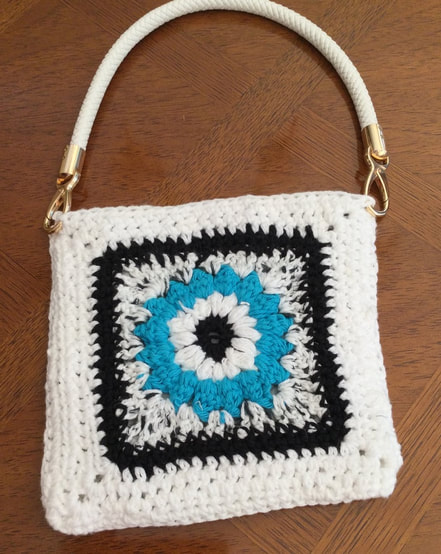  In the weeks since my last article, I have been busy fashioning an assortment of purses in variety of colors and shapes. I have at least two more articles that I will be posting in the series for your reading and creative pleasure. As always, I appreciate your reflections and feedback. I welcome you to join metonym stitching journey
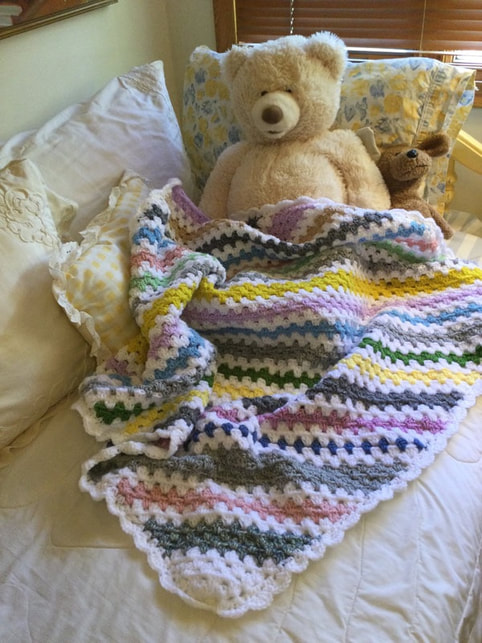 In the past 6 years, I have been donating crocheted blankets and shawls to my local chapter of Threads of Love. This organization provides pieces of comfort and love to adults and children who suffer from severe and terminal illnesses. The major portion of our recipients are patients of Yale New Haven Hospital at both the main and at the St. Raphael Campuses. However, we also send our shawls and blankets to men, women,and children in the community and to friends and relatives in other states. 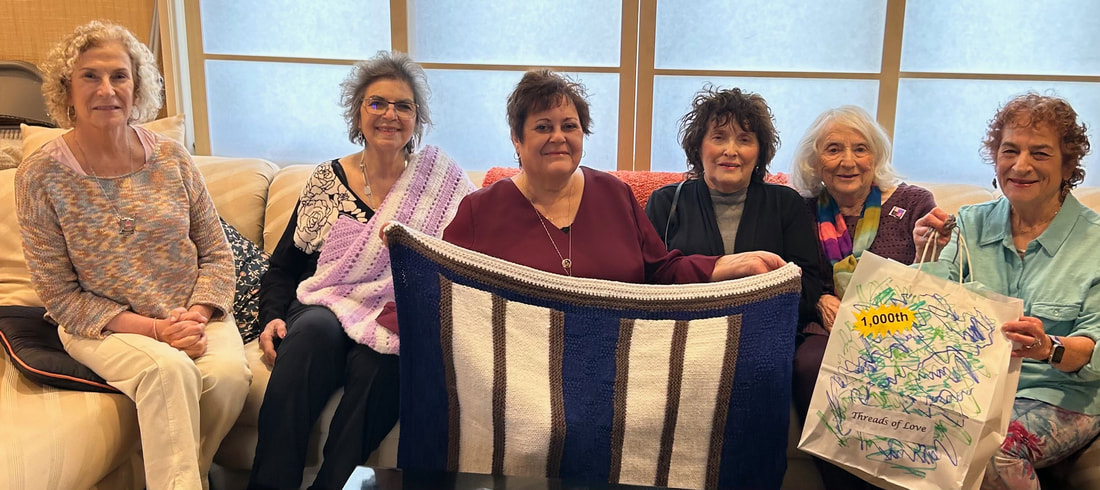 The blanket pictured above represents our 1002nd piece that we have created since our chapter's inception in 2009. To celebrate our milestone1000 pieces that we have donated, our members gathered together for a wonderful tea lunch at Open Table in Stratford, Connecticut. Pictures of our group were taken to be sent to local newspapers. I am proud to begin our new journey with my new second Crocheted Diagonal Scrap Yarn Blanket. My original was published in February 2017 (http://www.lilcreates.com/lillian's-blog/crocheted-diagonal-striped-baby-blanket) Both blankets start at th ecorner with granny cluster stitches and increase on both sides until the desired width is reached. At that point decreases are made to work down to the opposite corner, A simple scallop border finished off the blankets. Both blankets were made from scrap yarn from my stash. The first blanket featured bright pink, turquoise, and purple. To crochet my second blanket, I used a wide variety of muted colors in a random series of rows that alternated with 2 row sof white crocheted clusters. 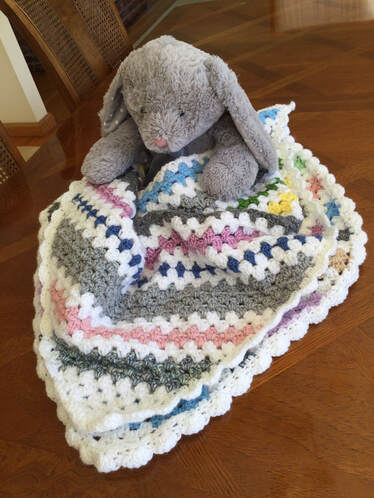 Pattern: Row 1: Start with magic circle and crchet 4 chains into the center. The chain equals 1 DC and 1 ch. Then make 3 DC into the center, followed by 1 ch and1 DC. (1 cluster) Row 2: Ch 4 and make 3 DC in the ch1 space. Skip the 3 DC cluster to make 3 DC in the ch 1 space.Ch1 and make 1 DC in same space. Ch4 and turn. (2 clusters)
Row3; Crochet 3 DC in the ch1 space. Skip cluster and crochet 3 DC in next space. Skip cluster and crochet 3DC in the final space. Ch1 and make 1 DC in the same space. (3 clusters) Ch3 and turn. Row 4; Ch4 and make 3 DC in the ch1 space. *Skip 3 DC clusters and make 3 DC in the next space.* Continue * to final ch1 space and make 3 DC, ch1, 1DC. Ch4 and turn This procedure continues until the blanket reaches desired size. If you want to change colors, leave 2 loops on hook when you make the last DC. Slip the new yarn through and chain 4.
When you have reached the desired length, begin decreases. Skip ch1 and first cluster to make 3 DC in next space. Continue making 3 DC in each space through next to last. Make 1 DC in last space. Ch 4 and turn. Continue procedure decrease on both sides until you have last cluster and finish off.
Please note that some times I use 2 or3 or 4 or 5 rows of color before alternating with 2 rows of white clusters throughout the blanket. To crochet scallop edge. make a foundation chain around the edge with single crochet (SC) or half double0crochet (HDC).Start near corner with a single crochet. Skip 2 stitches to make 5 DC in the next space. Skip 2 stitches and make a SC in the next stitch.When I reached the 2 stitches before the corner, I made sure to make5 DC in that space. I crocheted 1 SC at the corner and 5 DC after I skipped 2 stitches. I made sure to make each corner in the same way. Sometimes I had to skip an extra stitch or skip only 1 stitch to make this happen. The finished blanket is a delightful, cuddly, piece for a young girl. Since I only make Ch1 on the outer sides of the blanket for the increases, the center part of the blanket dense and squishy. I hope that you have fun making the Crocheted Diagonal Striped Scrap Blanket 2. I look forward to donating it to my group as we make our way toward our second 1000 pieces. 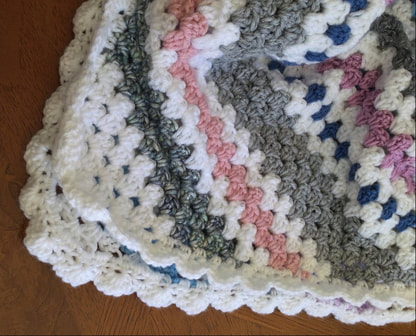 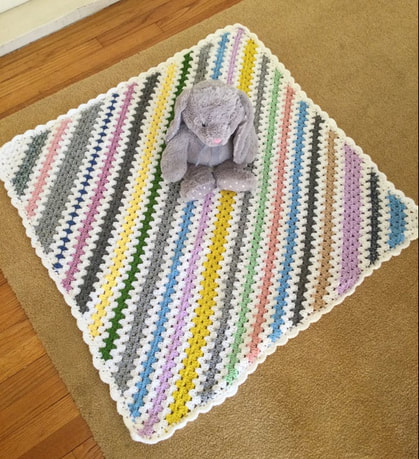 As always, I welcome your reflections and feedback. Please join my on my explorations and stitching journey.
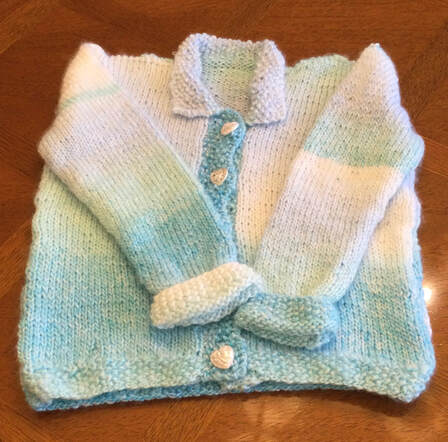
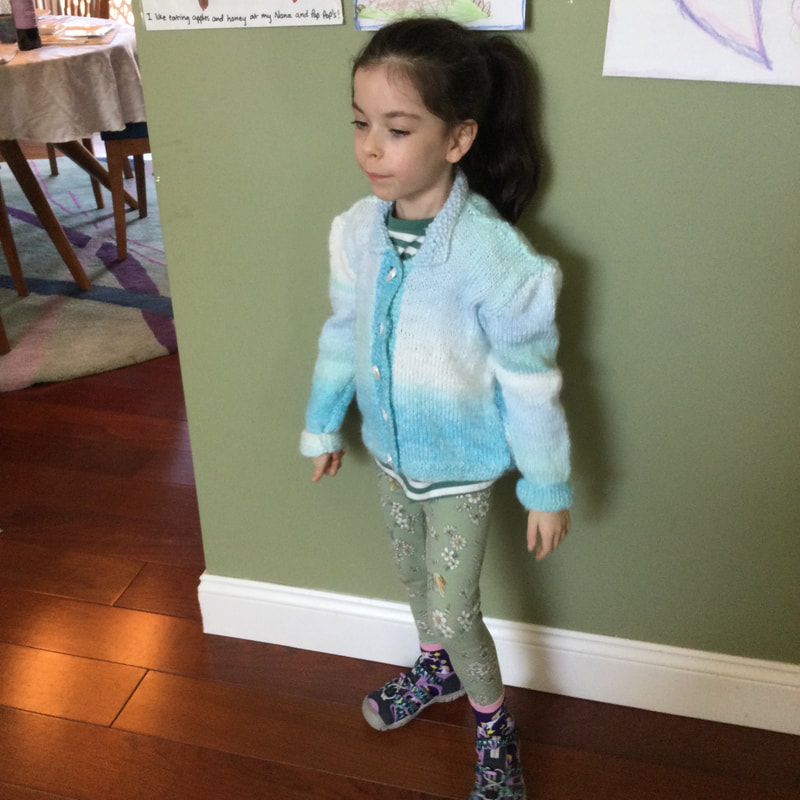
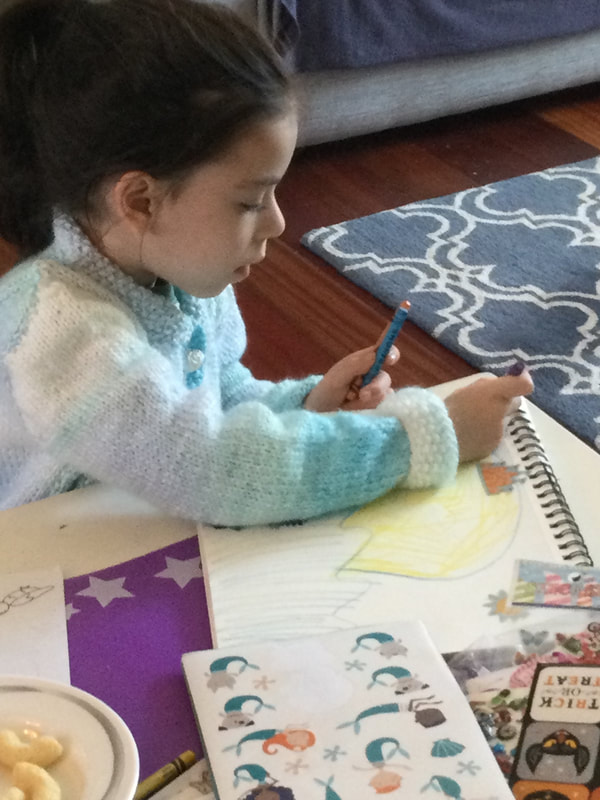
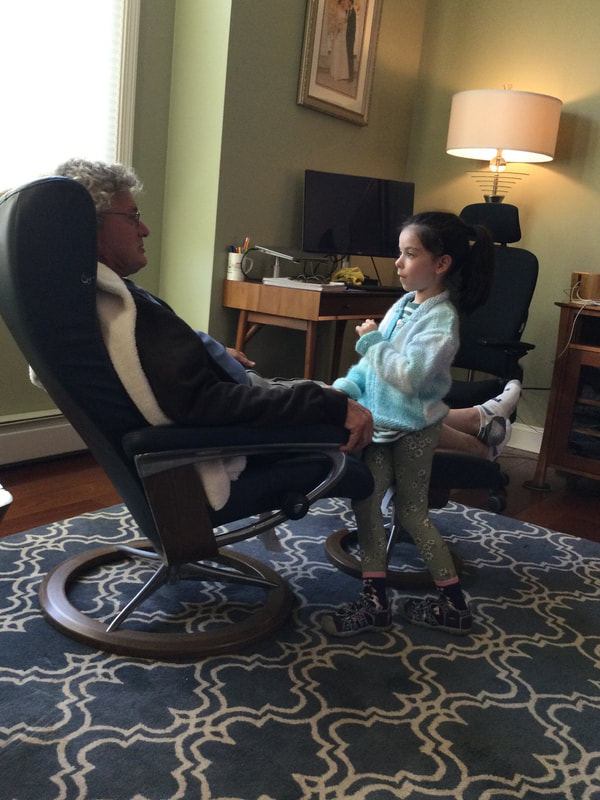
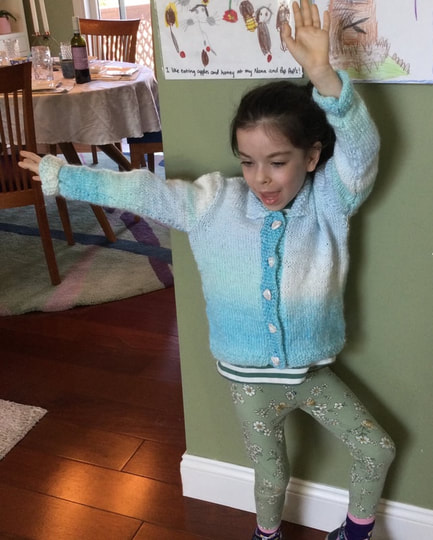 I have been successful in knitting colorful and stylish sweaters using a variety of storebrand, Red Heart, Lionbrand, and specialty yarns. The pieces were beautiul, and my granddaughters enjoyed wearing them. Still, I wanted to knit a sweater that was softer to the touch. A few weeks ago I found a selection of Ice Cream Roving Divagation Yarn manufactured by Lion Brand. The skeins were luscious to squeeze and the light pastel colors wee quite appealing. When my 6 year old granddaughter saw the sweater that I ws knitting for her 4 year old cousin she couldn't help touching and stroking. When I showed her the pattern and the piece I was working on, she gave her thumbs up sign of approval. Despite the fact that she has many knitted nd crocheted sweaters from her Nana, she requested if I could make her sweater from this soft yarn. Nanas just aim to please. 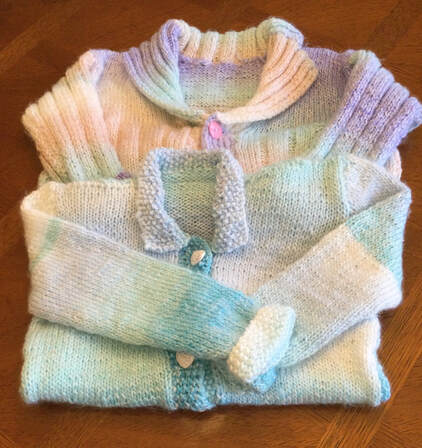 Previously, I had mainly worked with worsted or DK yarns with several plies that made up the strand. When I picked up this roving yarn, I did not know the features of the yarn, but I thought it would work for a child's sweater. The roving yarn is lightly spun and does not have individual plies.The solid strand is slightly twisted to keep its shape. It comes in all weights and sizes.The roving yarn goes from thin to thick, but it generally conforms to a weight class. The yarn I chose was a worsted weight #4. The yarn has a definite halo so that the fibers make the strands and finished pieces look somewhat fuzzy. This is both an advantage and a disadvantage. The plus is that this feature makes the yarn very soft and cuddly. The negative is that the fibers get intertwined with the knitting, making ir hard to frog or to correct mistakes. I found that there was little stitch definition in my finished piece. In addition the yarn could tear easily if stressed after a correction. Crystal from You Tube Blog Bag-O-Day provides an excellent explanation of roving yarn. She recommends roving yarn for most wearables. Common examples of roving yarn are Red Heart Unforgetable and Lion Brand's Scarify. I have knitted with these yarns to make hats and scarves with no problem. However, these sweater projects were my first with roving yarn. Until I picked up my Ice Cream Roving Divagation Yarn I did not realize that there were two main types of yarn: the roving style and the plied 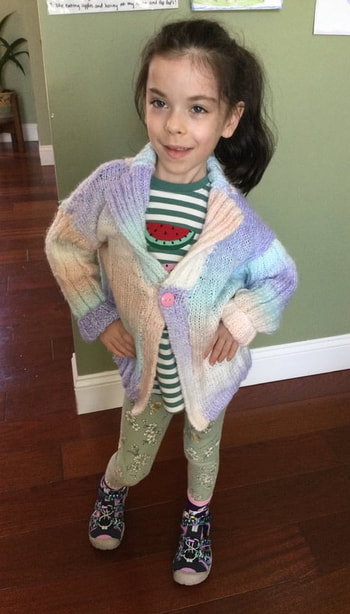 I had high hopes whenI started my knitting project. I have an extensive library of knitting books and have been looking forward to trying some of the sweaters from Ella Rae, Amity Prints, Knitwear for Children,Booklet #102. The "Carrie" pattern featured an interesting shawl collar and a K4 P2 ribbing for most of the sweater. As I had not knitted this type of sweater before I was intrigued. I should have read all of the directions first before I started. The shawl collar was interesting, but challenging. It consisted of three pieces, and I had to reverse my steps to get right and left lapels that would fit on the neckline of the sweater. I had to correct several times to get all the pieces correctly aligned and connected. Here is where the fuzzy character of the yarn made it difficult to frog. I was knitting a size 5-6 and needed about 1 1/2 skeins. The Ice Cream yarn weighs 200 grams and is about 380 yards. I used about 650 yards for the cardigan When I finally solved my construction problems, I was generally satisfied, though not thrilled with my handiwork.
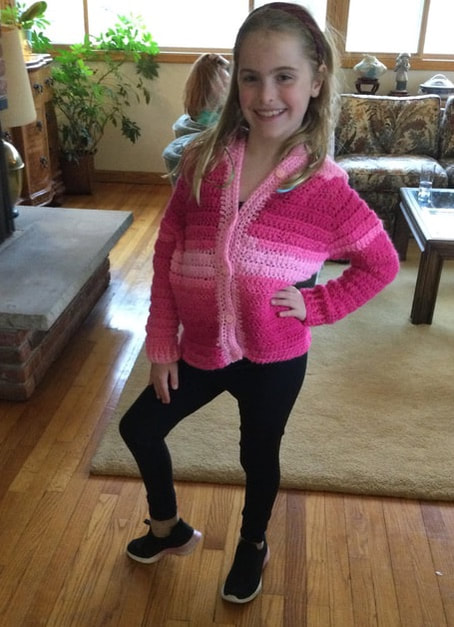
Since I had bought enough yarn to make 3 sweaters, I decided to take on another sweater from the same book. I hoped for better results and a cleaner construction job. The "Lila" cardigan featured a seed stitch, collar, cuffs, bottom band and button hole bands, The body of the sweater was knitted in Stock and Net. This time I chose the Capri color which has white shading to a light aqua.The instructions were simpler. The sweaters did hold their form better when placed flat on the table. Therefore, I was eager to see how they looked on a child, I told my granddaughter that I had a surprise for her, and that she could select the sweater she preferred. I would take photos of her wearing each one so that she could see how she looked in each piece. I think you can easily tell which sweater she preferred as she did not want to take off the second sweater. She especially liked the pearly heart buttons that were a finishing touch. When I purchased this roving yarn, I planned to make 3 sweaters, one each for the 4 year old, the 6 year old, and the 7 1/2 year old. However, after slogging through the first two pieces, I decided to return the remaining yarn and plan another sweater with different yarn for another day. This is an achievement in itself. I was proud that I actually went to the store instead of letting the yarn languish in my boxes. I will probably make another sweater for both the 4 year old and her sister. I not think the shawl sweater is up to my own standards. I get very excited when I see my granddaughters wearing the sweaters I made for them, The 6 year old gets to model more frequently as she lives aboout 25 minutes away whiile her cousins live in New York. I was thrilled when my daighter-in-law recently sent me photos of her girls wearing my sweaters at am outdoor event. The 4 year old was wearing her freeform multicolor piece, and her older sister ws wearing the jazzy pink hoodie that I posted in earlier articles. Although I faced some difficulties, I learned a great deal from these projects. Roving yarn may not be my favorite, but perhaps I will try it again at a later date. Also, I must read all of the direction for a pattern before I buy the yarn or begin a project from yarn in my stash. Thank you for your reflections and feedback. I welcome come you to join me on my stitching journey.
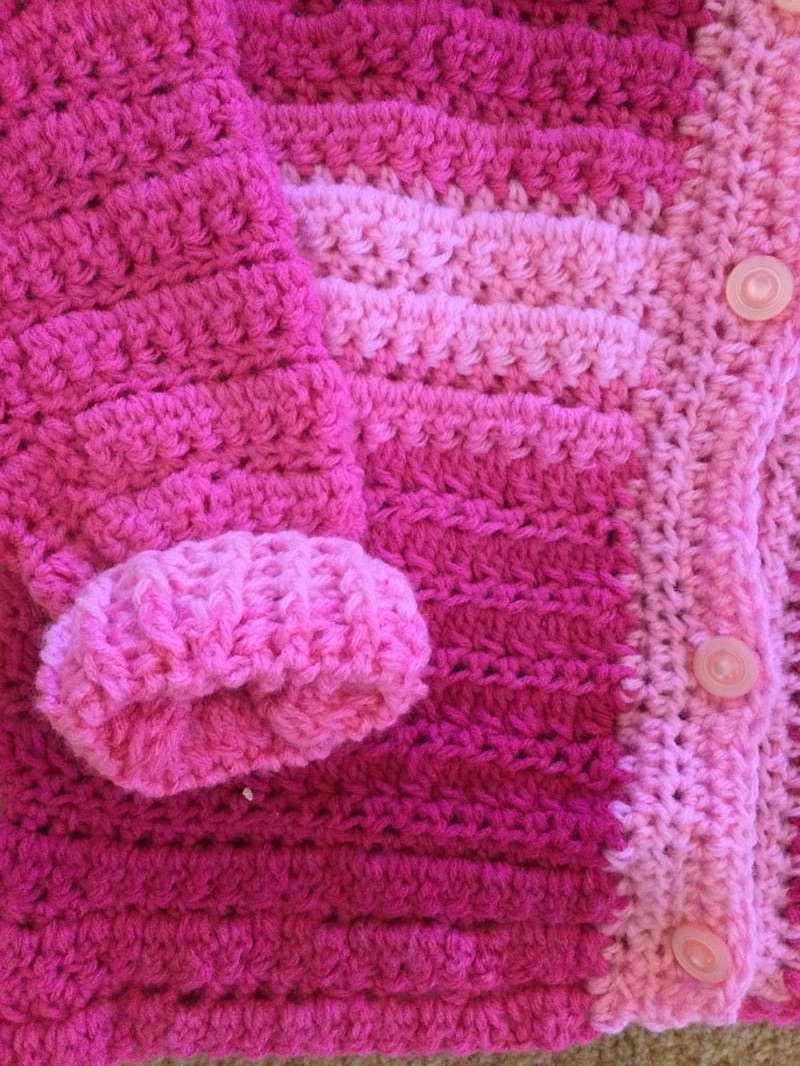
 I started with 2 girlis in mind and 2 skeins of Red Heart #4 Super Saver Ombre Jazzy color way With about 960 yards of yarn in very bright shades of pink, I had enough to crochet a sweater for an average size girl 5 or a lean size 8 to be used in fall 2023. The Color Block Sweater by Tiffany brown for Daisyt Farm Crafts seemed to work for me. Although the author suggested using Caron Simply Soft in the worsted #4 weight range, I would be using worsted that was in the heavier end of the worsted range. The pattern was written for girls in size 4-5 using an H (5.0mm) hook. Since my yarn was thicker, I used an I hook (5.5mm) so that the stitches would have definition. I followed the author's directions for the number of inches required for each dimension. Still, the project would be an experiment. 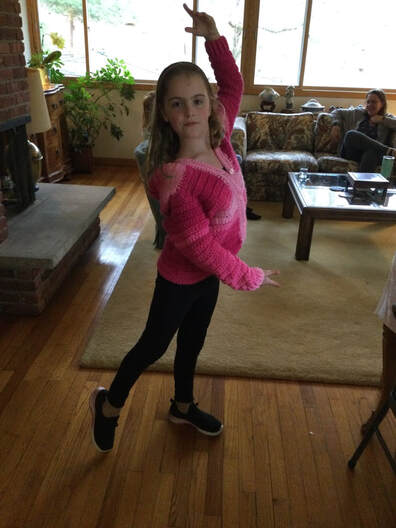 The hooded sweater began at the neck to create a yoke for a cardigan. After the armholes were created, the piece was joined to the body to continue down to the hem. The pattern designer changed colors at this point her color block design. Since I had lots of color variation with the Jazzy Ombre, I just continued with the same skein.The pattern was a two step repeat. Row1 was HDC. Row 2 was done in DC clusters. When I finished the body, I completed the main part of the sweater in alternating Front and Back Post Double Crochet Stitches to form a ribbing of about 2 inches. 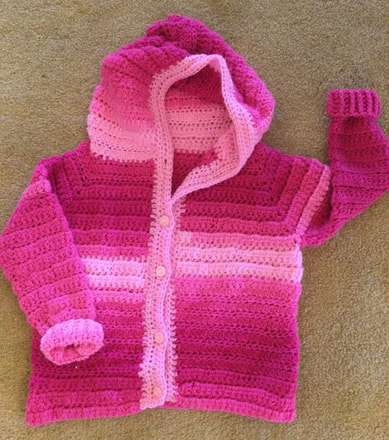 Sleeves were crocheted by picking up stitches from the armhole and crocheting in the round. Decreases were made as the sleeve was narrowed down to the cuff that was finished in two inch bands of alternating Front and Back Post Double Crochet stitches.
To execute the hood, I picked up stitches in HDC along the neckline.I continued in pattern to form rectangle. When the hood was the correct dimension, I folded the piece together and stitched together from the edges to the midpoint. The final step was to form the edging and placket for the buttons and buttonholes. I started with HDC at the lower fight bottom and cintiunuyed up the side, up across the hood, and then down to the bottom f the left side. Five buttons were marked evenly along the left side. When I continued along the opposite right side, I decreased one and chain one to create a buttonhole in the spot that matched the button markings. In the third row, HDC in the chain made for the bottonhole. Of course, the pattern provides more specific directions to finish the project. In all I believe I had 5 rows of HDC in the edging for an attractive finish.
When the sweater was complete, I tried it on the 4 year old that would be 5 by next winter. the color was great, but the sweater was so big it spilled over her form. Go to plan B. I tried it on the 7 year old, and low and behold, it fit. Even the sleeves were just right. My lovely granddaughter is a dancer who was happy to pose for me in dancerlike poses. She will wear the sweater this spring, It is at a bomber length and comes to lightly below the waist, but it may be too short for next winter since she is growing so fast. Eventually, her younger sister will be abs totakeit for her own, So cute.  I really like pattern repeat and the way the sweater fit the 7 year old, If I make this sweater again, I would probably use the Caron Simply soft recommended by the author and try it as originally intended in color block format. I have several skeins of this yarn in my stash, and so it might be worthwhile to try. The finished project is attractive, but there are a few tricky sections in the directions that I had to maneuver around.
Thank you for your feedback and reflections. I welcome you to join me only stitching journey. 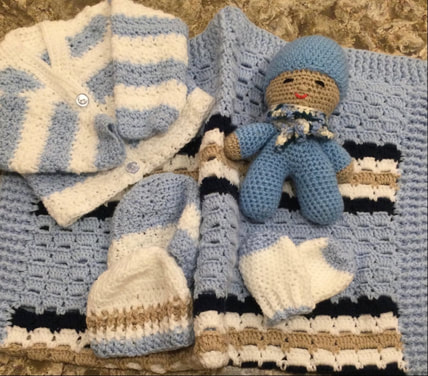 The first three months of 2023 have found me engaged in baby layettes, and the baby blankets have been the stars. With a new generation of parents, I have had the opportunity to learn new stitches and to pull out old favorites for the other pieces. My first set featured a V-Stitch striped blanket in white with stripes of varying thickness of lavender, darker purple, yellow, and sage green. The second blanket showcased the Modern Granny Blanket from Daisy Farm Crafts in white sky blue and green. With my third layette, I was ready to take on a more challenging piece. This time I used Joanne's house yarn Big Twist with sky blue as the main color and navy, white, and khaki as the contrasting stripes. Again, I have to thank Daisy Farm Crafts for their pattern, the Block Stitch Blanket. 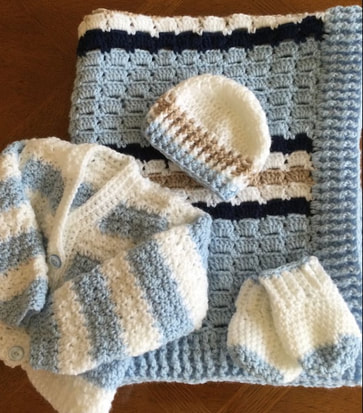 For the third blanket, I crocheted with an H hook (5.0mm) with an initial chain of 113 stitches for a multiple of 5+ 3. Then I crocheted in single crochet to provide a base for the blanket stitches. The directions showed that a chain of 103 stitches plus a border would yield a blanket 36" x 45". . Even though I added 10 more stitches in the initial chain, my finished blanket with a 2 inch border on each side only measured 28 inches. I like this pattern and want to repeat it. However, I would add at least 10 more stitches in the initial chain for a base of 123. I really don't understand the problem as the Big Twist Yarn is an even heavier #4 weight than the Caron Simply soft suggested in the directions. Another solution might be to move up to an I hook (5.5mm) 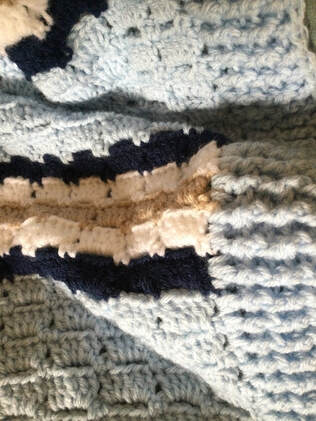 After the initial set up, there is a 2 step repeat to form the blocks. The first row begins with 2 single crochet stitches. Then chain 3 and skip 3 stitches. Repeat across the row to end with 2 single crochet stitches. In the second row, the crocheter makes 5 double crochet stitches in each 3 chain space. More specific directions are provided in a relatively easy pattern from Daisy Farm Crafts. After the final row of single crochet, I made a border of alternating Front and Back Post Double Crochet (FPDC and BPDC) on the top and bottom of the blanket. Then I picked up stitches along the sides to complete the two inch border. 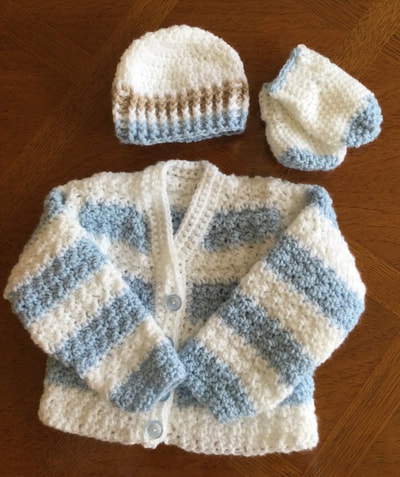 My cardigan in sky blue and white comes from the Leisure Arts Book, Crochet in a Day for a Baby by Candi Jensen. The 6 month size sweater was crocheted in a Griddle Stitch aternating white and blue stripes. To make the Griddle Stitch, alternate Single Crochet and Double Crochet Stitches. In the following row, Single Crochet in the Double Crochet Stitch, and Double Crochet in the Single Crochet Stitch. The cardigan is crocheted from the bottom up in one piece for the body. Then divisions are made for the right front, armhole, back, armhole, and left front. A diagram is included to show how the one piece will look. There is little seaming. Sleeves are crocheted separately and sewed or crocheted together to form the sleeve tube. Sew or crochet the shoulders together. Then fit the sleeves into the armhole and sew t complete that part of the sweater. For a border, I started to single crochet up the right front to stitch up the sweater and continued around to neck and down the left side.I chained 1 and reversed for row two. After finishing row two, I placed pins along the left side to mark the 4 buttonholes. If I made the sweater for a girl, I would place the pins along the right side. In row three, I made the button holes on the bands opposite to the markers. To make the buttonholes, I began with two single crochet stitches. Then chained 2 stitches and skipped two stitches. Next I single crocheted to one stitch before the next marker.and continued to make button holes. In the fourth row, I chained 1 and single crocheted down the band. I made 2 sc in each chain 2 space. At last, I completed the band with a fifth row of chain 1 and single crochet for the complete length of the band.  To complement the cardigan, I made 2 hats and a pair of mitts. the first started with 8 Half Double Crochet stitches in a magic circle. I added stitches to the crown until there wee 56 stitches. Then I stitched the sides by stitching around in a griddle stitch until the hat was 5.5 inches from the top of the hat. The second hat was based on the adult version of Lakeshore Beanie. However, I stopped at 50 stitches before beginning the sides in alternating Back and Front Post Double Crochet. Stripes were done in white, blue, and khaki. For the mitts, I used the Green and White Mitts pattern in single crochet to make the white mitts with blue tips for size 3-6 months. 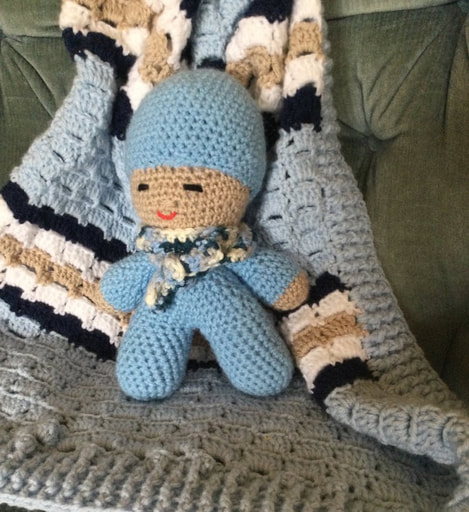 The final piece was the Amigurumi Little Boys-Free Pattern so that the child would have a 9 inch baby that was the just the right size for him hold.I crocheted with the same Big Twist yarn bib blue for the clothes and khaki for the face. A multicolored scarf accented the piece. I used a G (4,0mm hook) in single crochet for relatively tight stitching.
I am pleased to lhave finished the baby layette with a variety of pieces. The baby will be born in June, and so the 2 hats, sweater and mitts will be just right for the Falkland winter months. The couple is special to us as we haveknownthe father ands parents for decades. Besides the baby's father used to ride his bike over to our house when he was in high school to work on his papers with our computer. We wee delighted to attend the wedding last June, and were thrilled to hear about their baby to be. As always, I appreciate your feedback and reflections. Please join me on my stitching journey. |
Archives
November 2022
Categories
|


 RSS Feed